Plugin Operation 🅱️
Configure the payment methods that you will accept in your store. These depend on the commercial conditions your merchant has active with Kushki.
Find out how you can use the Kushki plugin that you installed and configured in your VTEX store.
4. Plugin operation
4.1. Administrator’s view
By being the administrator of your VTEX store, you will be able to:
- Visualize a list of your received transactions, including the payment method used by your customers. Keep in mind that, from your VTEX store or Kushki panel, you can obtain more information about your transactions.
To validate the status of the orders made in your merchant, follow these steps:
4.1.1. Login to your VTEX administration store.
4.1.2. In the main side menu, choose the Orders icon 🛒.
4.1.3. Select All orders.
4.1.4. Click on the order you require to visualize its status and other characteristics.
- Check the details of the order list; you will see if the payment was made through Kushki and the corresponding Transaction ID.
- Visualize the payments made from the Kushki dashboard.
4.2. Transaction visualization in the Kushki Console
To verify the transaction information you have received in your VTEX store from the Kushki Console, keep in mind that, you will find the following ticket numbers enabled with which you will be able to reconcile the information of these transactions.
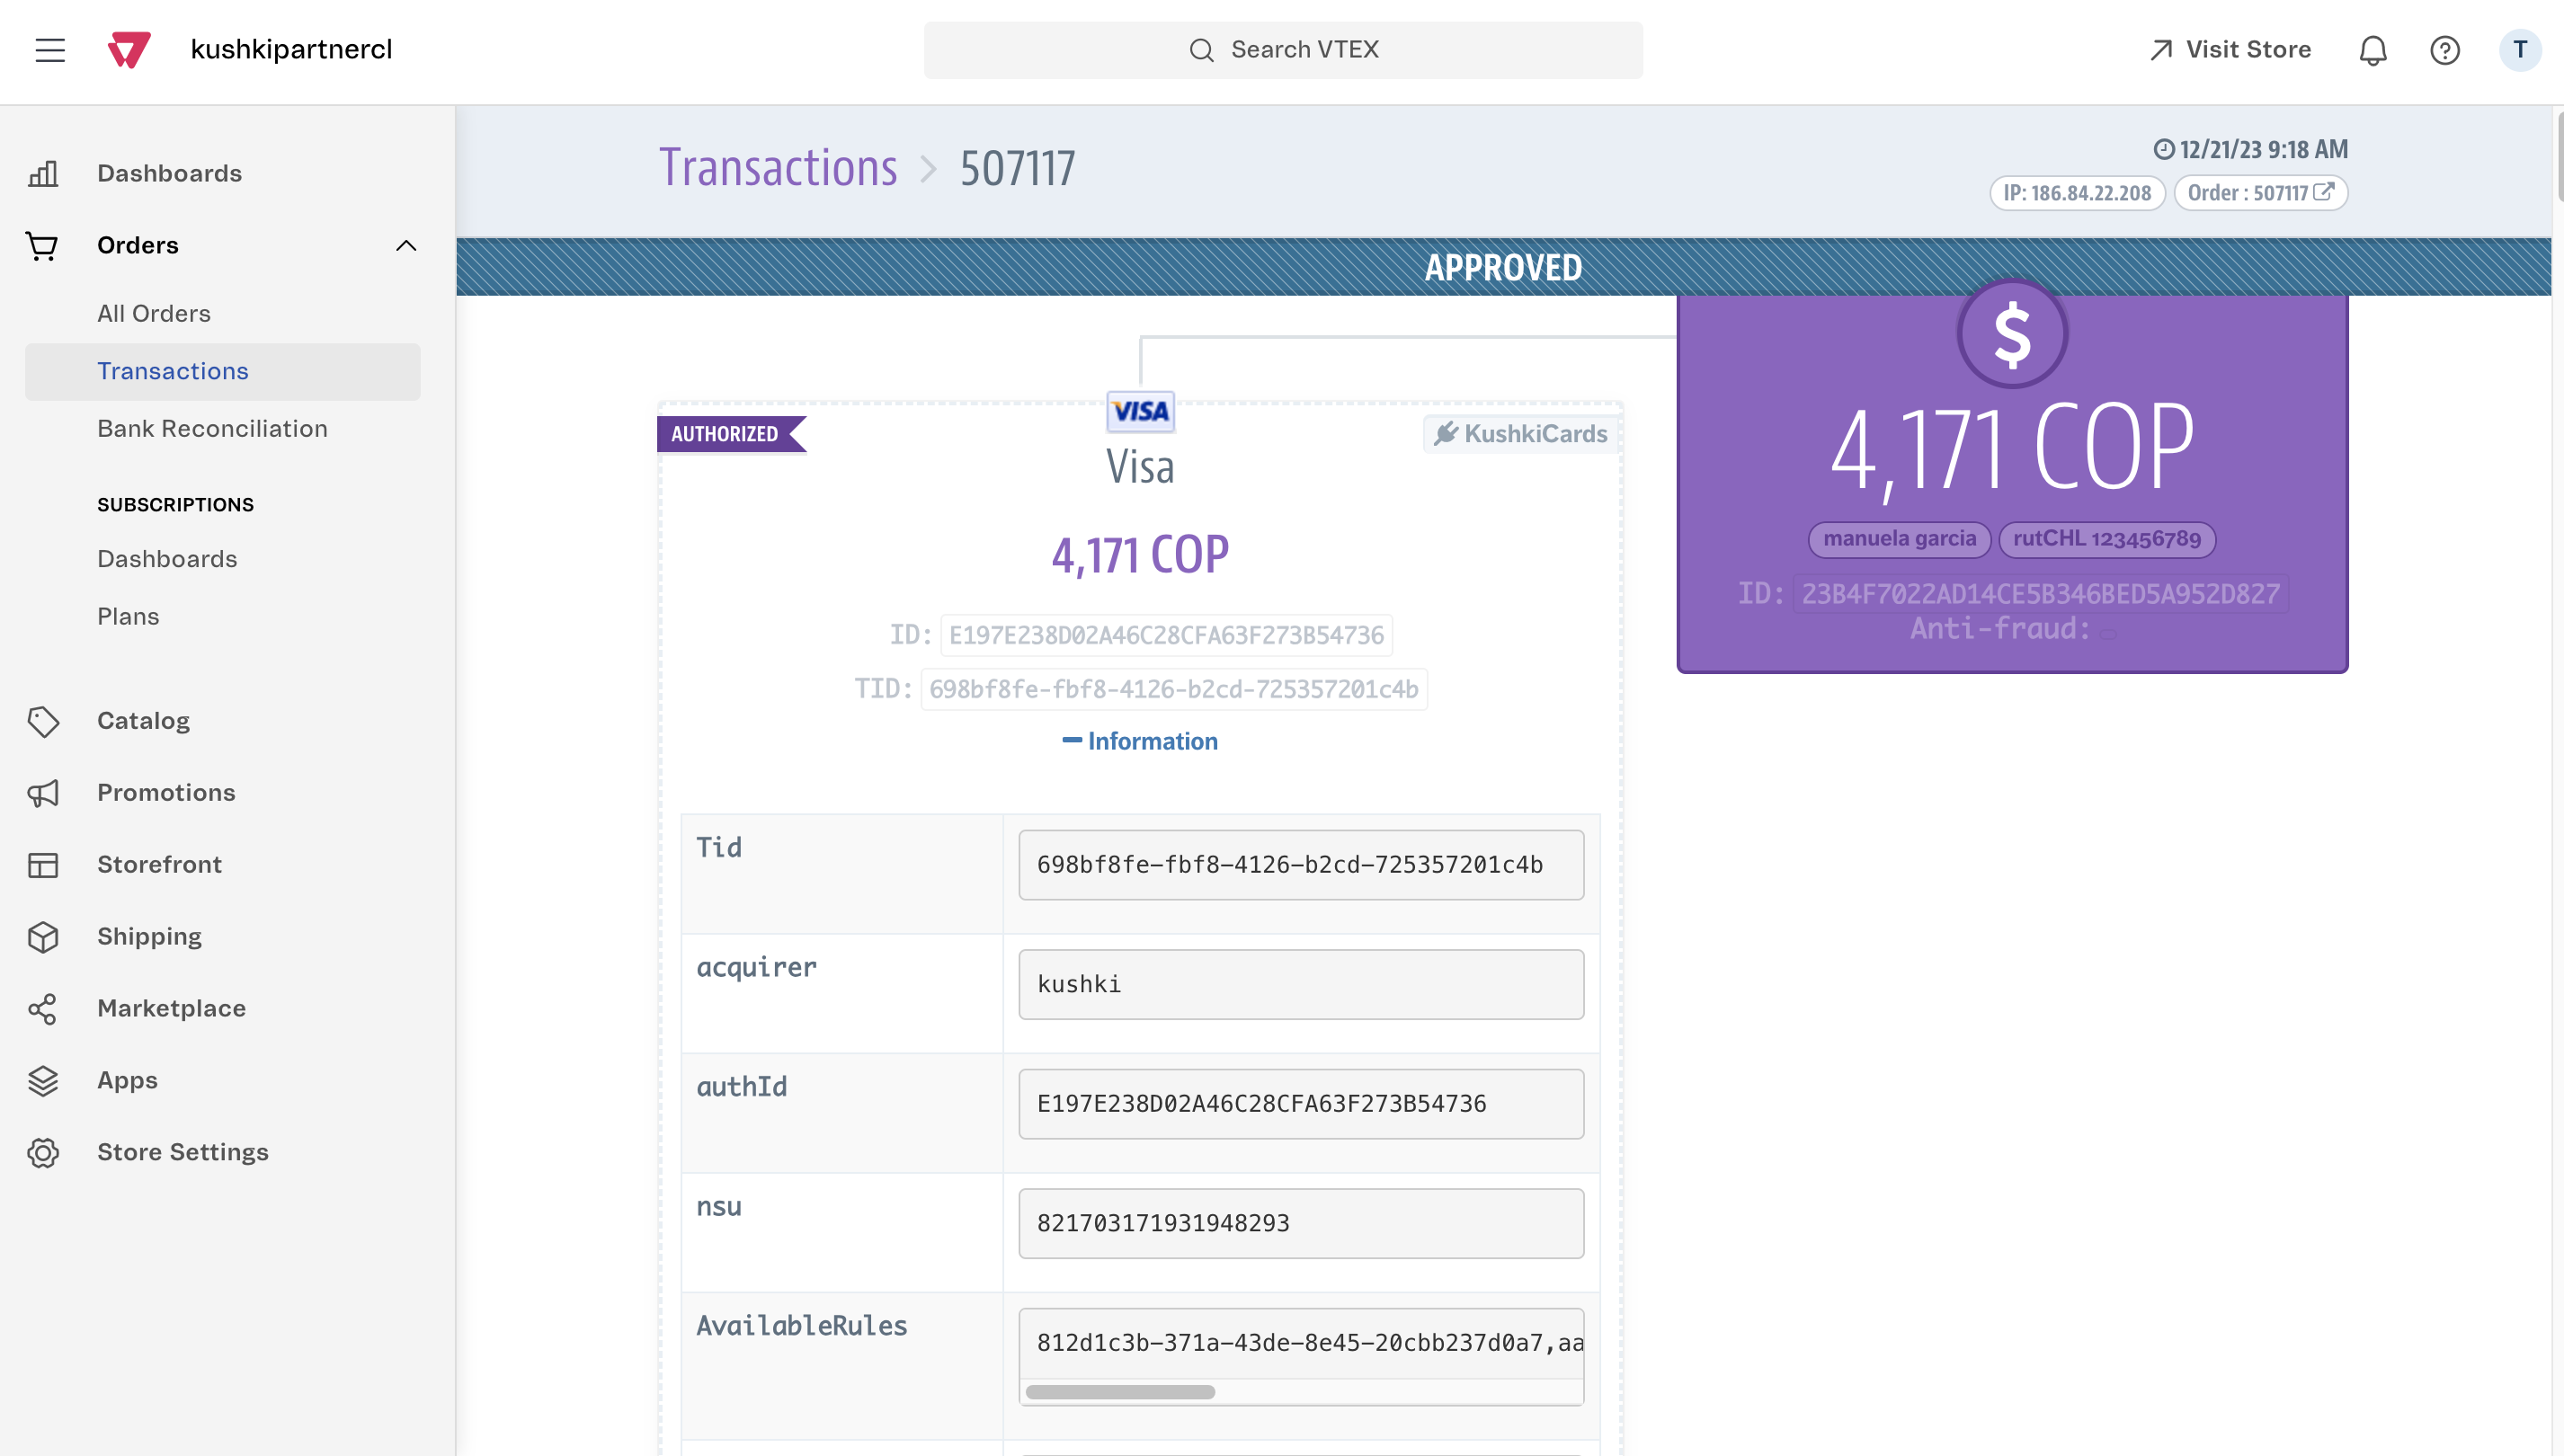
- Payment NSU: it corresponds to the transaction ticket number.
- Payment TID: it corresponds to the transaction reference number (transaction_reference).
To find this information, log in to your VTEX store > in the main side panel, select the Orders 🛒 icon and then Transactions > click on the Transaction you want to search > you will find the total amount of the transaction, the ID and TID. For more details of the transaction, click on + Information, there you will find the NSU.
In the Kushki Console assigned to your store, enter the NSU information of the payment in the Transactions section.
4.3. VTEX order status
When making payments in your VTEX store, the transactions will be classified by different status depending on the stage they are in, from the start of the authorization process to the successful completion.
To get to know what are the different order status generated in your store, we recommend you to visit Transactions flow in Payments guide; available in the VTEX Help Center.
4.4. Updating order status in the Kushki Console
Keep in mind that the notifications of the transaction statuses that you receive in your merchant with the cash, transfer, and card payment methods will be made through the Webhooks configuration. You will be able to see their configuration in your Kushki Console once you receive your production and UAT accounts.
4.5. Type of available documents
From your VTEX store, you will be able to visualize the types of available documents in the country where your merchant operates, and how your integration with Kushki will receive it. These depend on the type of person that is making the transaction; they are as shown below:
| Type of person/Platform | VTEX | Kushki |
|---|---|---|
| Natural person | ID (Known in Spanish as DNI) | ID |
| Legal Entity | TIN (Known in Spanish RUC) | TIN |
4.6. Payment processing
4.6.1. Process cash payments
Once your merchant’s customer is going to checkout the purchase from their shopping cart, they have to complete a form with their personal information: Email Address, First Name, Last Name, Identification Number, and Phone Number. It is also required that your customer includes the Shipping Address, and select cash payment as their payment method.
By clicking on Buy Now, your customer will see a message on their screen confirming their order processing, as well as a PDF with the payment order. This will also be sent to the email address provided in the form. With the payment order, the customer can go to one of our payment points indicated in the PDF.
In VTEX, once generated a new order with Kushki Cash, you will see the transaction in the order lists (Orders 🛒 > Transactions) with the Started status, which indicates the payment is awaiting to be completed. Your customer will see this transaction as Initialized from the checkout.
Once the payment has been successfully completed, the order status will change to Approved, indicating the transaction has been successfully paid. If the time expired and the payment was not completed, the order status will show up as Canceled.
4.6.2. Process transfer payments
Once your merchant’s customer is going to checkout the purchase from their shopping cart, they have to complete a form with their personal information: Email Address, Name, Last Name, Identification Number, and Phone Number. It is also required that your customer includes the Shipping Address and select Transfer payment as their payment method.
By clicking on Buy Now, your customer will be able to make the transaction directly in their bank application.
Upon payment, your customer will see their order confirmation. The information will also be sent to the email address provided on the form.
In VTEX, once generated a new order with Kushki-Transfer, you will see the transaction in the orders list (Orders 🛒 > Transactions) and as your store’s administrator, you will see the order status such as Started; awaiting for a payment approval. Once the transfer is approved, the transaction will be shown as Approved. The information will also be sent to the email address provided in the form.
4.6.3. Process card payments
4.6.3.1. Customer purchase process
Once the customer of your merchant is going to checkout the purchase in their cart, they must complete a form with their personal data: Email, Name, Surname, Identification Document, and Telephone/Mobile. It is also required that your client include the Shipping address and select card payment as their payment method.
When selecting Credit Card or Debit card as the payment method, your client must:
4.6.3.1.1. Enter your Card number and confirm that YES, THE CREDIT CARD NUMBER IS CORRECT.
4.6.3.1.2. Select the Franchise to which the credit or debit card belongs.
4.6.3.1.3. Enter the Name on card as it appears on the card.
4.6.3.1.4. Add the Month and Year of the Expiry Date of the card.
4.6.3.1.5. Enter the CVV.
4.6.3.1.6. Click on the checkbox to confirm the shipping address of the requested order.
4.6.3.1.7. Select the Buy Now button.
In VTEX, once a new order is generated with KushkiCards, we can see the transaction in the order list (Orders 🛒 > Transactions) with the Started status, which indicates the payment is awaiting to be completed. Your customer will see this transaction as Initialized from the checkout.
Once the payment has been successfully completed, the order status will change to Approved, indicating the transaction has been successfully paid. When the order has been invoiced, the transaction will be updated to Completed.
If the time expired and the payment was not completed, the order status will show up as Canceled.
4.6.3.2. Authorization and capture payments
When configuring the card payment through the KushkiCards connector, you will be able to enable the two-step payment option.
To do so, please log in to your VTEX store > select the Store Settings ⚙️ icon at the bottom left of the screen > In PAYMENT, select Providers > Click on KushkiCards > Edit > In the Deferred authorization and capture (In Spanish, Autorización y captura diferidos), select Yes > Click on the Save button.
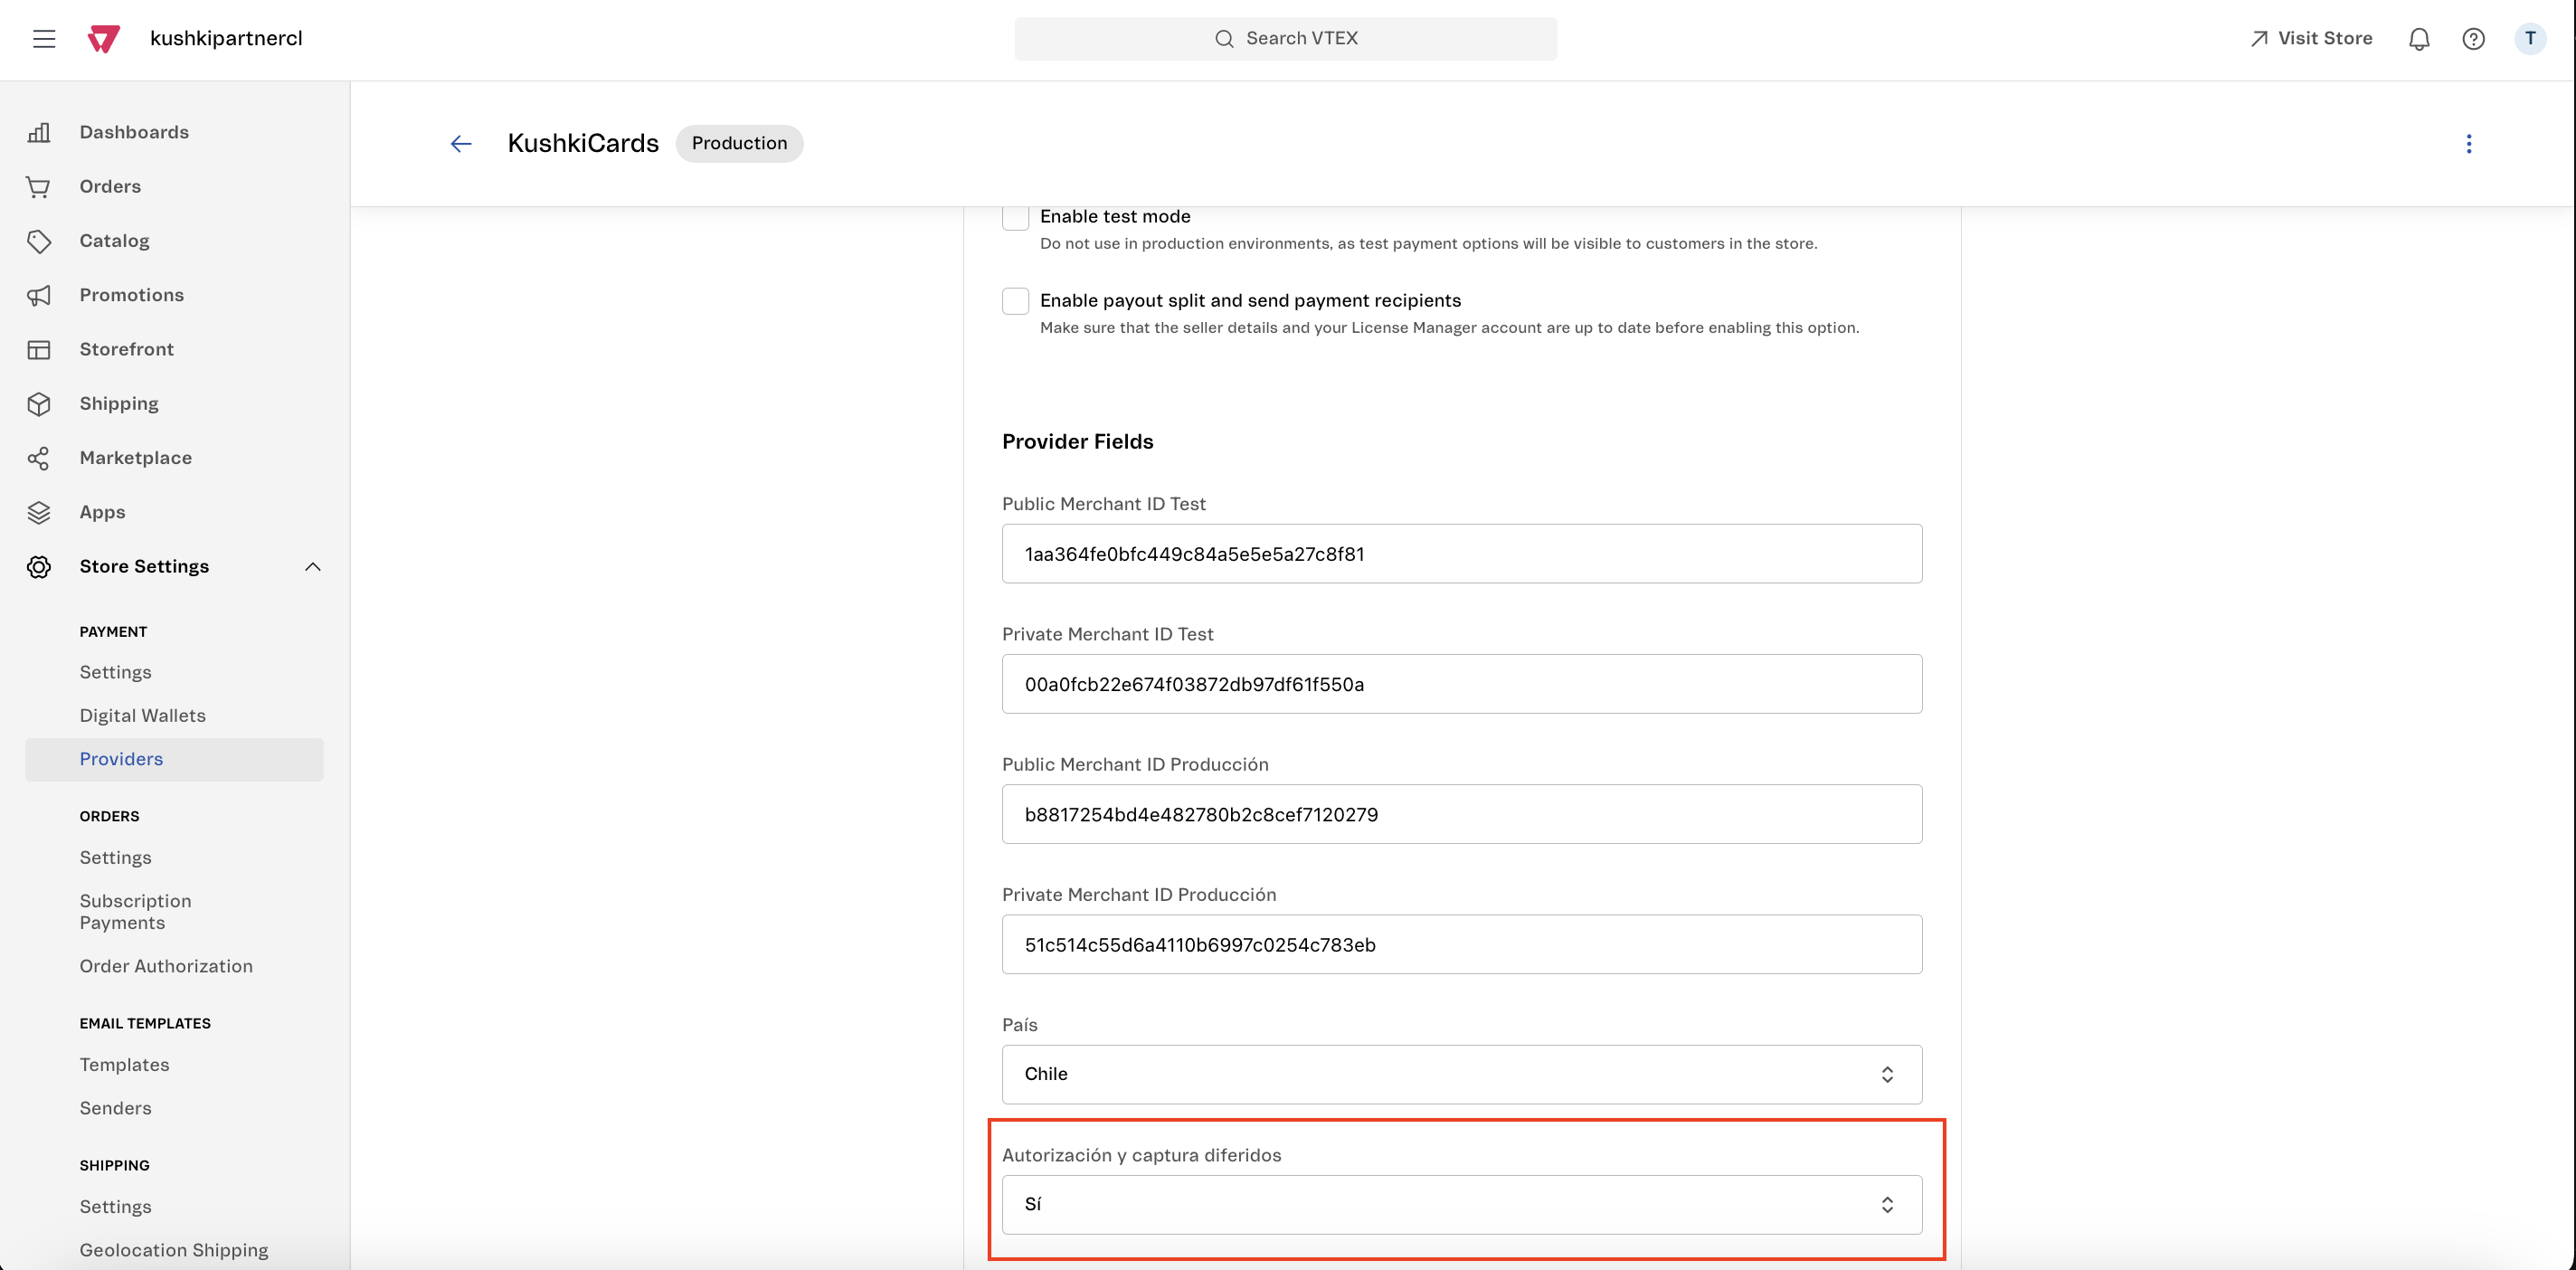
When the customer of your merchant makes the purchase, this order will appear in Orders 🛒> Transactions as Approved; which means that this order is pre-authorized in the system.
To capture the payment, please do the following:
4.6.3.2.1. Go to Orders 🛒 and then to Transactions.
4.6.3.2.2. Select the transaction you require to authorize.
4.6.3.2.3. Click on the Order icon at the top right of the screen.
4.6.3.2.4. Select Start preparation.
4.6.3.2.5. Click on the validation checkboxes, confirming that You understand that this process will interfere with the progress of the order, that this Action cannot be undone and that You know the consequences of this action on the order flow.
4.6.3.2.6. Click on Proceed with status.
4.6.3.2.7. After updating the order to the final flow, click on Invoice.
4.6.3.2.8. Select the Billing Method.
4.6.3.2.9. Complete the Billing Details.
4.6.3.2.10. Click Save Invoice.
The GIF below will show you the step-by-step process mentioned above:
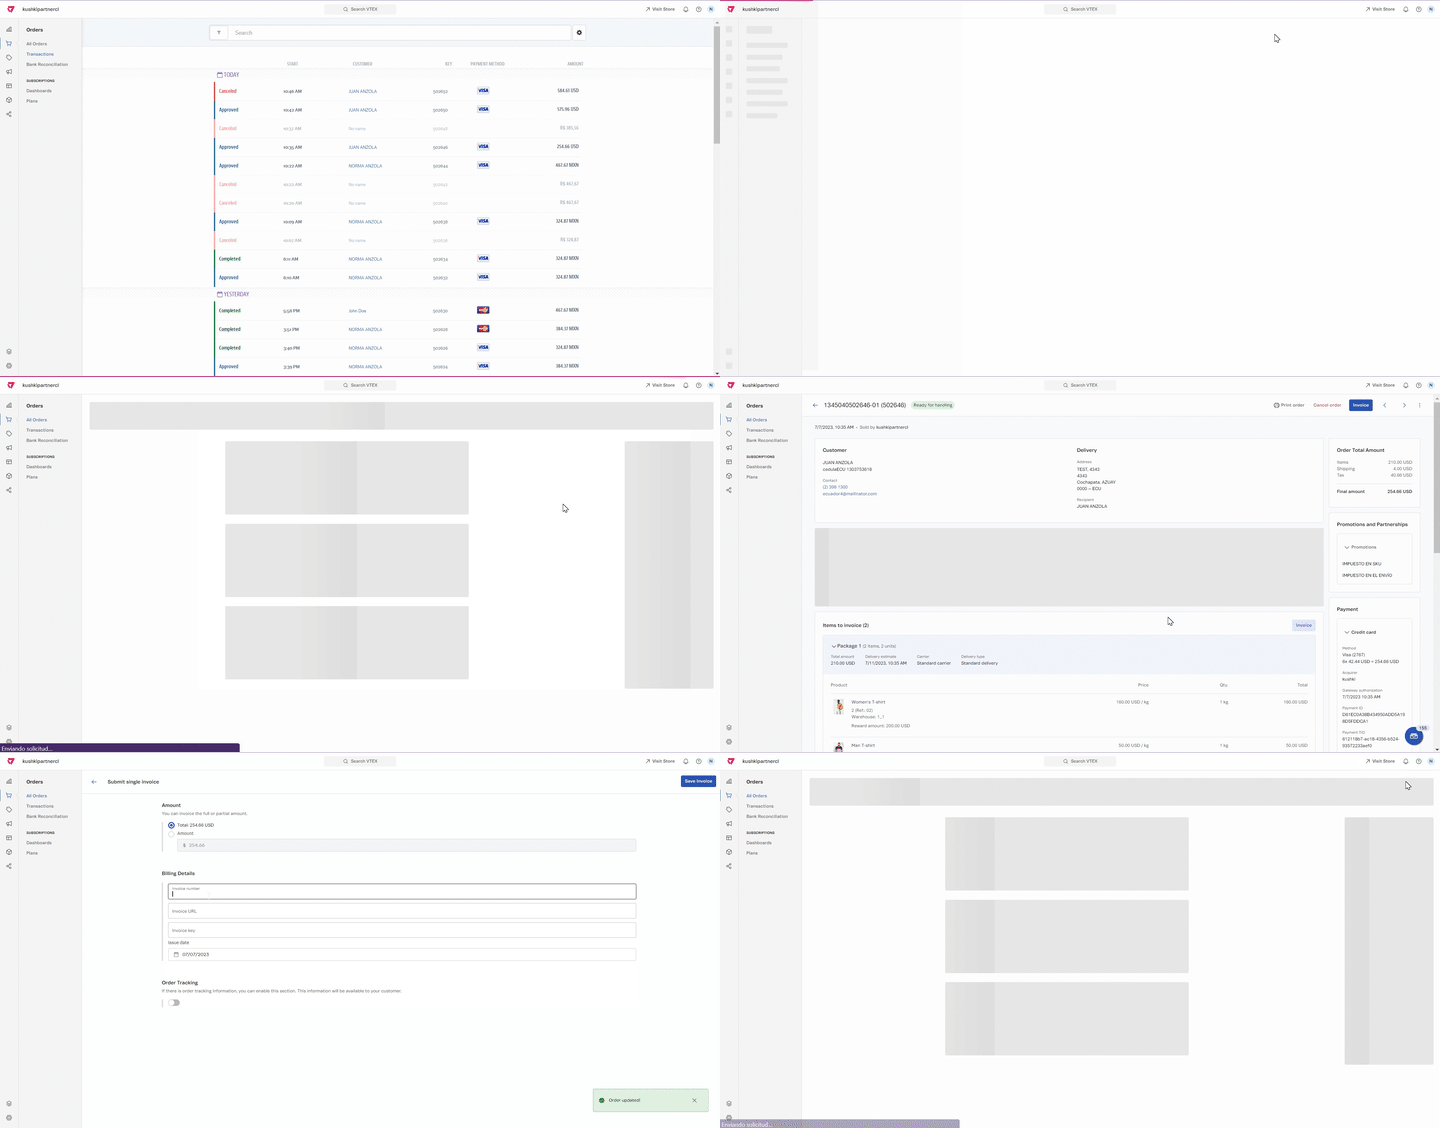

By doing this process, the capture and invoicing process will start and the order status will change to Completed in Orders 🛒> Transactions and in Orders 🛒 > All Orders it will appear as Invoiced.


4.6.3.3. Deferred payments
When configuring the card payment method through the KushkiCards connector, you will be able to enable the deferred payments option.
To do so, please perform the following steps:
4.6.3.3.1. Log in to your VTEX store.
4.6.3.3.2. Select the Store Settings ⚙️ icon at the bottom left of the screen.
4.6.3.3.3. In PAYMENT, select Settings.
4.6.3.3.4. Choose Payment Conditions.
4.6.3.3.5. Click on the Franchise you want to enable the deferred payments.
4.6.3.3.6. Select the Installments option.
4.6.3.3.7. Fill out the information that appears on the screen, including the Number of installments, the amount of the Minimum installment, the Billing method, and the option to enable the Third-party interest rate.
4.6.3.3.8. Click on the Save button.
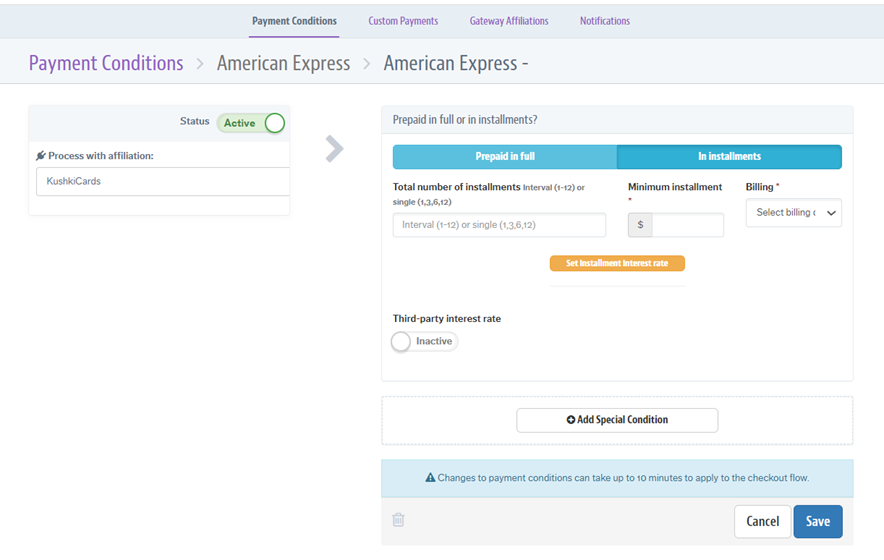
At the time your customer:
- Make the payment with an amount greater than the amount you included to activate the deferred payment,
- Select the card franchise you have configured;
They can select the number of installments with which the total payment will be made.

4.6.3.4. One-time card payments with OTP authentication
If you are interested in adding an additional security layer to the transactions you receive at your merchant, you can do so through the OTP authentication process.
Your customer will have up to 3 opportunities to enter the 3 digits received correctly; otherwise, the current transaction will appear as Canceled.
4.6.3.5. One-time card payments with 3DS authentication
In order to guarantee security for your customers, our plugin offers you the option to implement the 3DS authentication process.
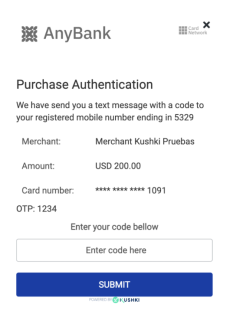
Once your customer fills in the payment information and clicks the Buy Now button, Kushki will check if the 3DS authentication should be enabled. If so, a screen similar to the one below will appear in the payment flow where they will need to enter the code they have received on their cellphone to continue with the transaction.
They will have up to 3 opportunities to enter the code you have received; otherwise, the transaction in progress will appear as Canceled.
Your customer will see a screen similar to the one below:
4.6.3.6. Voids and refunds
4.6.3.6.1. Voids
If you want to cancel a payment that has not yet been invoiced, you can perform a transaction void.
To do so, please follow the steps outlined below:
4.6.3.6.1.1. Log in to your VTEX store.
4.6.3.6.1.2. Select the Orders 🛒 icon and then choose All Orders.
4.6.3.6.1.3. Select the order you want to void, which should be in any of the available statuses, except for Invoiced.
4.6.3.6.1.4. In the upper part of the screen, click on Void Order.
4.6.3.6.1.5. Click on each of the Validation Checkboxes; keep in mind that this process cannot be undone and interferes with the order progress.
4.6.3.6.1.6. Enter the Reason to Void.
4.6.3.6.1.7. Select Confirm > The order status will appear as Voided once VTEX confirms with the payment method the void request.
4.6.3.6.2. Partial or full refunds in local currency for card payments
If you want to return a payment that has been already received or captured, you can request a refund of the transaction made by your customer.
To request a partial or full refund of the payments you have received by card in your merchant, follow the steps below:
4.6.3.6.2.1. Login to the VTEX platform.
4.6.3.6.2.2. In Orders 🛒 , select All Orders.
4.6.3.6.2.3. Find the order for which you need to make a refund.
4.6.3.6.2.4. In Invoice, click on Return Items.
4.6.3.6.2.5. Select the (partial refund) or all the Products to refund (full refund), indicating the Units or other characteristics of the returned items.
4.6.3.6.2.6. In Return Details, enter the Invoice Number under which the refund process will be performed.
4.6.3.6.2.7. Click on Request Refund.
There you go! The system will process your request. Once the system approves it, it will display a message in the transaction history, specifying that the transaction has been partially or fully refunded.
5. Additional Recommendations
Keep in mind these suggestions:
If your VTEX store is showing performance issues, please check the VTEX Incident Updates Page, which includes the daily report of errors for this platform.
Make sure the credentials you have configured are the correct ones, since, by using the wrong passwords, it may happen that the payment method will not show up in your store. Additionally to this check up, we recommend you make the step-by-step process mentioned in this manual. In case the problem continues happening for this scenario, please contact the Support team.
If you need to check the information about the Registering Gateway Affiliations, check the Tutorials and Solutions section, which is available in the VTEX platform.
If you need to obtain more information to configure the payment conditions for your store, enter the Tutorials and Solutions section in the VTEX platform.
Visit the VTEX Help Center guides to learn about the trade policies with which you can set up configuration rules, such as:
- How to add products that are part of the store’s catalog.
- The established prices for each product and/or services.
- The logistics and routes to be used in the distribution of the products offered in your store.
- The creation of payment conditions under special aspects of enabling, restricting on, or making available disposition to collaborators, customers, vendors, and buyers of your store.
- Enabling and Accessing the environments available for your store.
- Other format and structure configurations.
 Chile
Chile Colombia
 Ecuador
 Mexico