Generate a payment button
How to create a payment button?
To receive payments with the Kushki payment button you must do the following:
- Set up the payment button from your Console.
- Set up the subdomain.
- Integrate the payment button in your front-end.
- Redirect your customer to the payment session.
- Check the status of the transaction and show a success or failure page to your customer.
1. Set up the payment button
These are the instructions to create and customize a payment button from the console.
1.1 Log in with your credentials at https://console.kushkipagos.com/auth if you are going to create a payment button for a production environment or at https://uat-console.kushkipagos.com/auth, to use a test environment.
1.2 Click on the option Configuration from the left side menu. Several settings options will appear for your merchant.
1.3. From the Integrations section, click on Payment Button. The Payment Button window opens, so you can customize your payment button.
1.4 In the Payment Button window, you can make the following settings for your payment button:
1.1 Style settings
- Logo: You can upload your customized logo to appear on the payment form. Maximum size allowed 1000 × 1000. Formats: .png, .jpg.
- Primary color: You can modify the color of the Payment Summary card as well as other visual elements.
- Button color: It allows you to choose a different color for the payment button.
- Button Shape: It allows you to choose between 3 established shapes for the payment button (Round, Semi, Straight).
- Button text: It allows you to change the text of the payment button.
- Show transaction amount on button: It allows you to choose whether to show the amount of the transaction on the payment button.
1.2. Advanced settings
- Default language: It allows you to choose the default language of the payment form (Spanish, English, Portuguese). The language of the form can be changed by the end customer on the payment form.
- Additional product information (optional): It indicates whether additional information will be displayed in addition to the payment summary box. The added fields will go into the json object in the body of the request.
The following video will walk you through the process of setting up a payment button from the Console:
2. Set up your subdomain (optional)
For the confidence of your customers, you can set up a subdomain for the URL of the page to which your customers will be redirected to complete their payment, as in the following example:
tucomercio.kushkipagos.com
To configure the subdomain, you must request the subdomain configuration from our support team here.
3. Integrate a payment button
3.1 Request redirection URL
The first step will be to use the data of your paying customer and the breakdown of the products and prices to be paid in order to make a call to our payment button creation endpoint.
- Javascript
- Python
- PHP
var request = require("request");var options = {method: 'POST',headers: ['Private-Merchant-Id': '' // Replace with your Private merchant id]url: 'https://api-uat.kushkipagos.com/smartlink/v1/webcheckout', // Test environmentheaders: {'content-type': 'application/json'},body: {"kind":"webcheckout","contactDetail":{"email":"tucliente@test.com","name":"Tu cliente"},"redirectURL":"https://www.tucomercio.com","products":[{"description":"Tenis","name":"trekking pro","quantity":20,"unitPrice":1000}],"paymentConfig":{"amount":{"subtotalIva0":10,"currency":"USD","iva":2,"subtotalIva":2},"paymentMethod":["credit-card","cash","transfer"]}}json: true};request(options, function(error, response, body) {if (error) throw new Error(error);console.log(body);});
import requestsurl = "https://api-uat.kushkipagos.com/smartlink/v1/webcheckout"payload = "{\"kind\":\"webcheckout\",\"contactDetail\":{\"email\":\"tucliente@test.com\",\"name\":\"nombresyapellidos\"},\"kind\":\"redirectURL\":\"https://www.tucomercio.com\",\"products\":[{\"description\":\"Tenis\",\"name\":\"trekking pro\",\"quantity\":2,\"unitPrice\":100}],\"paymentConfig\"{\"amount\":{\"subtotalIva\":0,\"subtotalIva0\":200,\"ice\":0,\"iva\":0,\"currency\":\"USD\"}},\"paymentMethod\":[\"credit-card\",\"cash\",\"transfer\"]}"headers = {'content-type': 'application/json'}response = requests.request("POST", url, data=payload, headers=headers)print(response.text)
$client = new http\Client;$request = new http\Client\Request;$body = new http\Message\Body;$body->append('{\"kind\":\"webcheckout\",\"contactDetail\":{\"email\":\"tuusuario@test.com\",\"name\":\"Tu usuario\",\"redirectURL\":\"https://www.tucomercio.com\",\"products\":[{\"description\":Tenis,\"name\":trekking pro,\"quantity\":2,\"unitPrice\":100}],\"paymentConfig\":{\"amount\":{\"subtotalIva0\":200,\"iva\":0,\"subtotalIva\":0},\"paymentMethod\":[\"cash\",\"transfer\"]}');$request->setRequestUrl('https://api-uat.kushkipagos.com/smartlink/v1/webcheckout');$request->setRequestMethod('POST');$request->setBody($body);$request->setHeaders(array('content-type' => 'application/json'));$client->enqueue($request)->send();$response = $client->getResponse();echo $response->getBody();
As a result of this call, you will get a webcheckoutUrl to which you will redirect your customer to complete the payment in the Kushki checkout experience.
3.1.1 Additional information
If you require it, additional fields can be sent in the payment button creation request. These fields will have two purposes:
- They will appear on the payment screen under the Information tab, as it is shown in the following image:
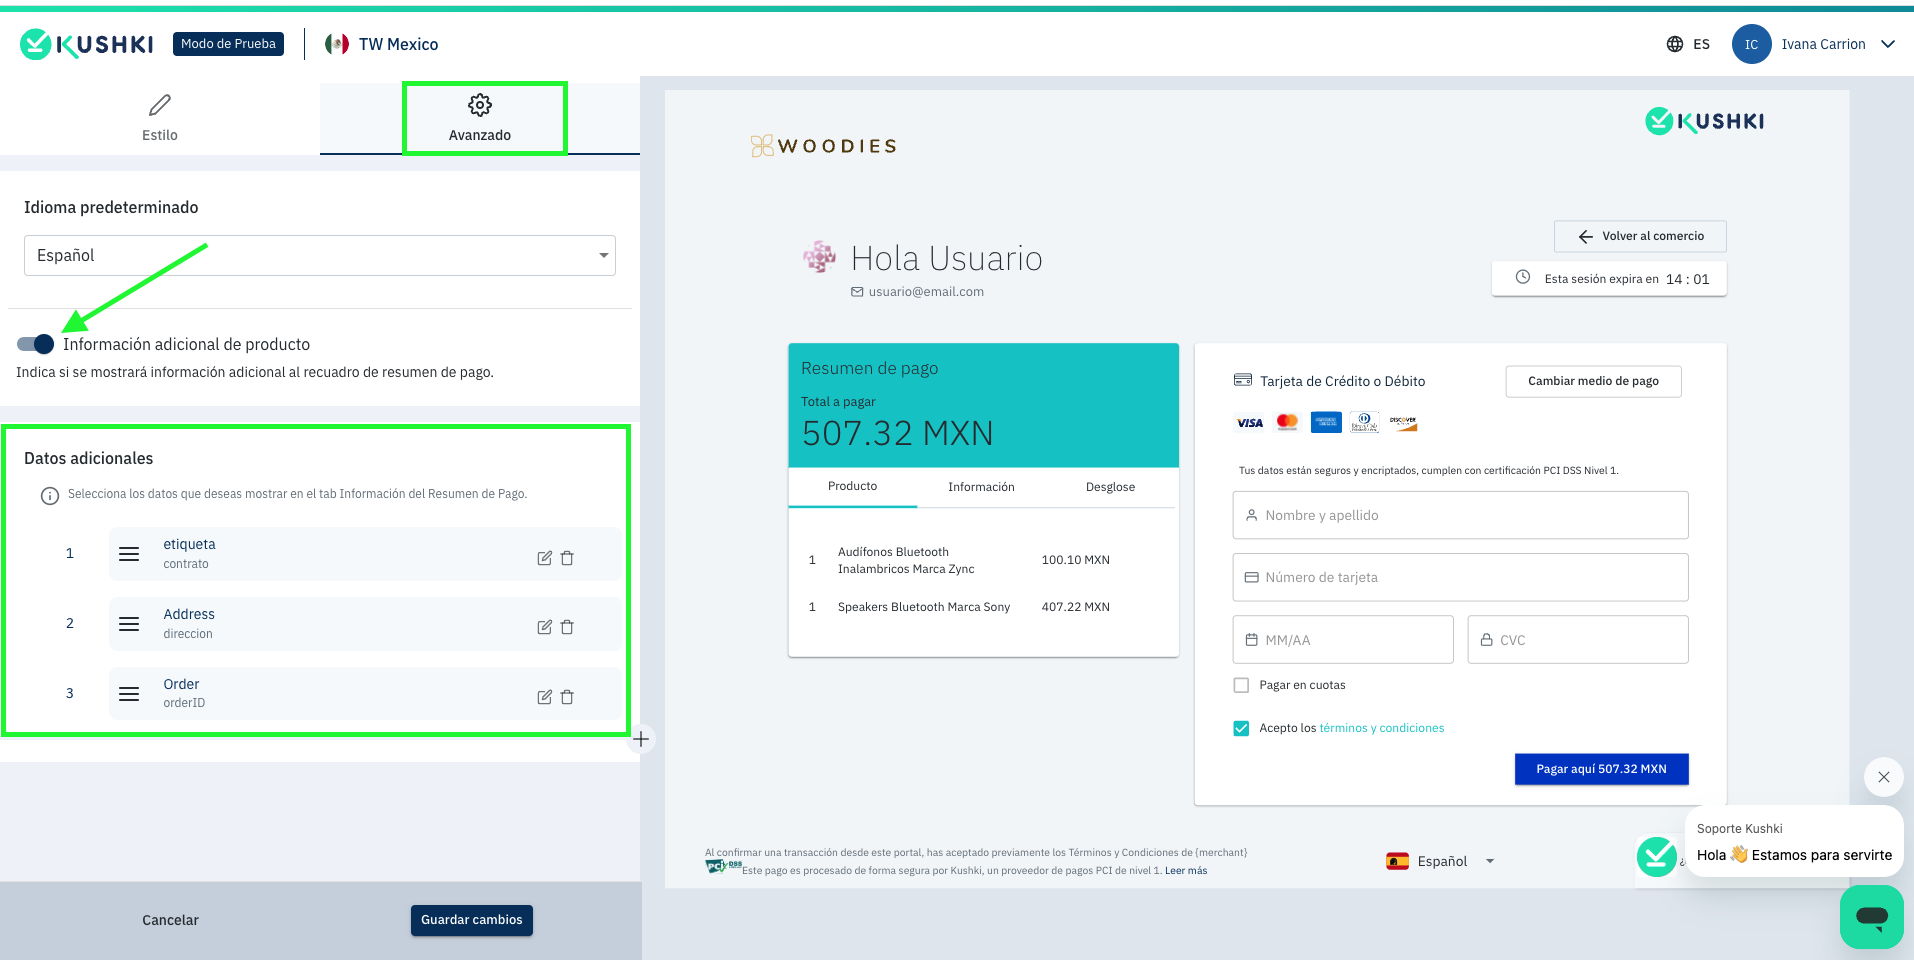
- The attribute defined will be sent along with the transaction information and it can be viewed in the webhook, as part of the
metadataobject.
Follow the steps below to enable this option:
- Enter your Kushki console and go to the Configuration > Integrations > Payment Button section.
- Click on the Advanced option and enable the Additional product information feature.
- To add new fields, click on the + button. Two text fields, Label and Attribute, will be displayed for you to enter the necessary values. The label will be displayed in text format within the payment form. Meanwhile, the attribute will be used to create the Payment Button through the API. It will be sent along with the transaction information, and it will be visible even at the Webhook level.
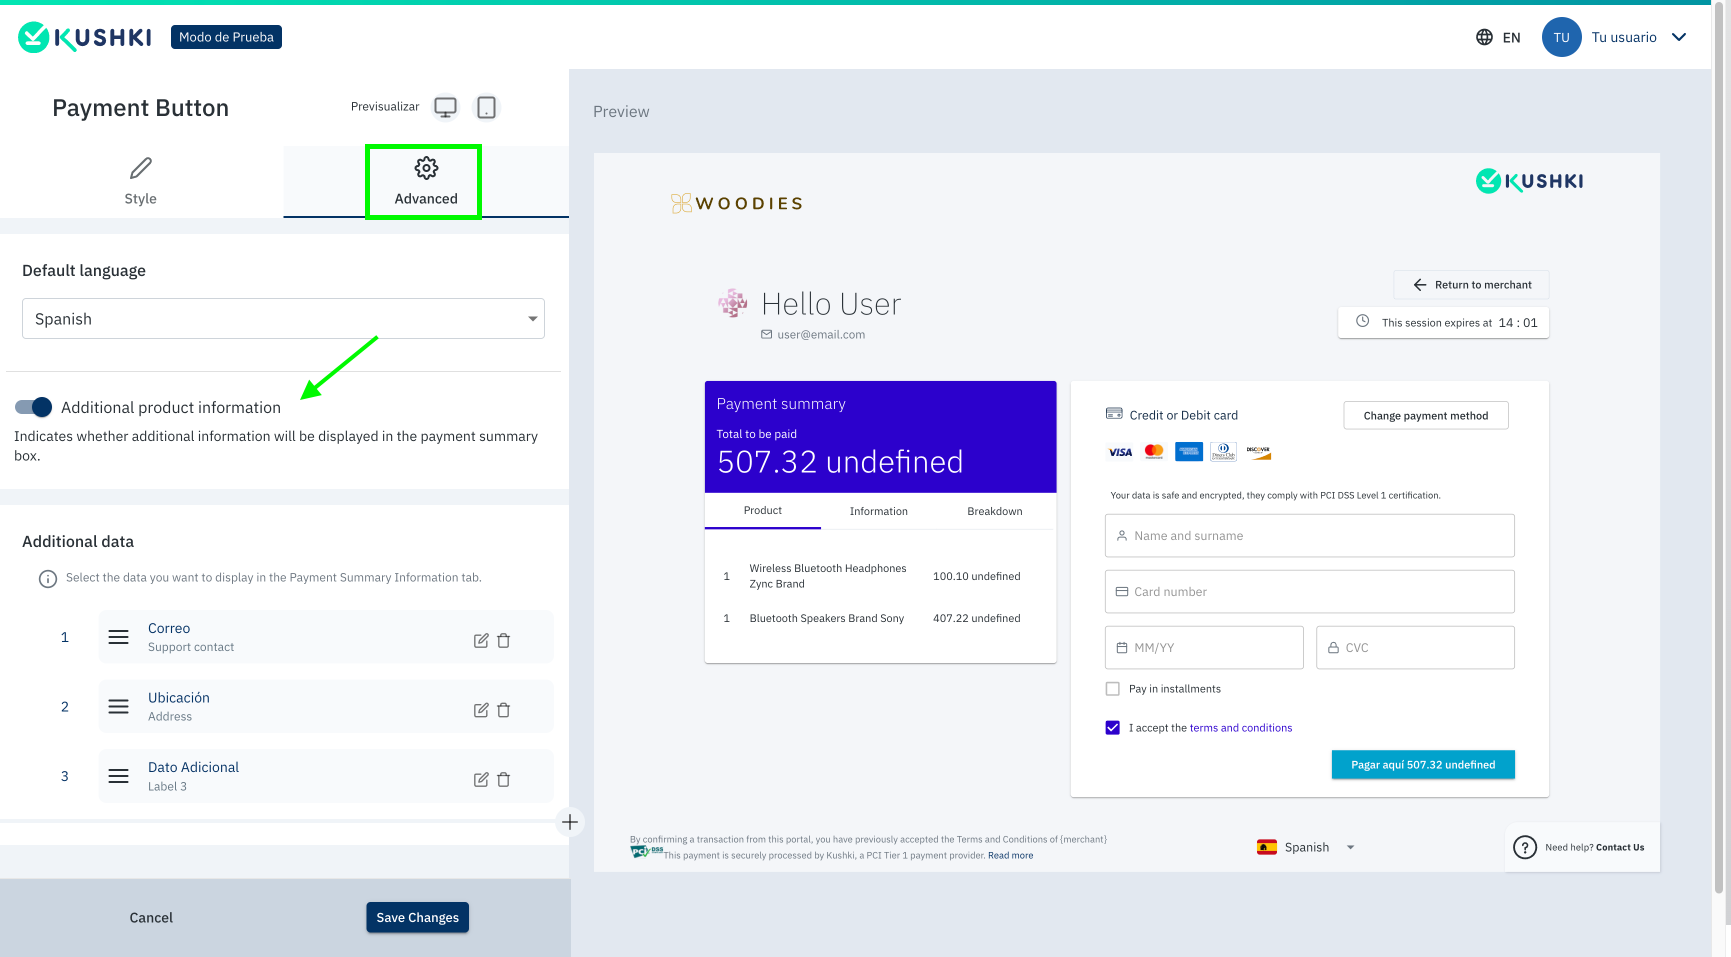
- You should add the
additionalInformationobject in the request, which must contain the attribute’s name exactly as configured in the Kushki console and any value.
// },"additionalInformation": {"contrato": "3381","direccion": "Calle 67 #78-92","orderID": "000323"}
In your Kushki console, in the Transactions > Collections module, you can view this information by entering the transaction details and navigating to the Metadata tab.
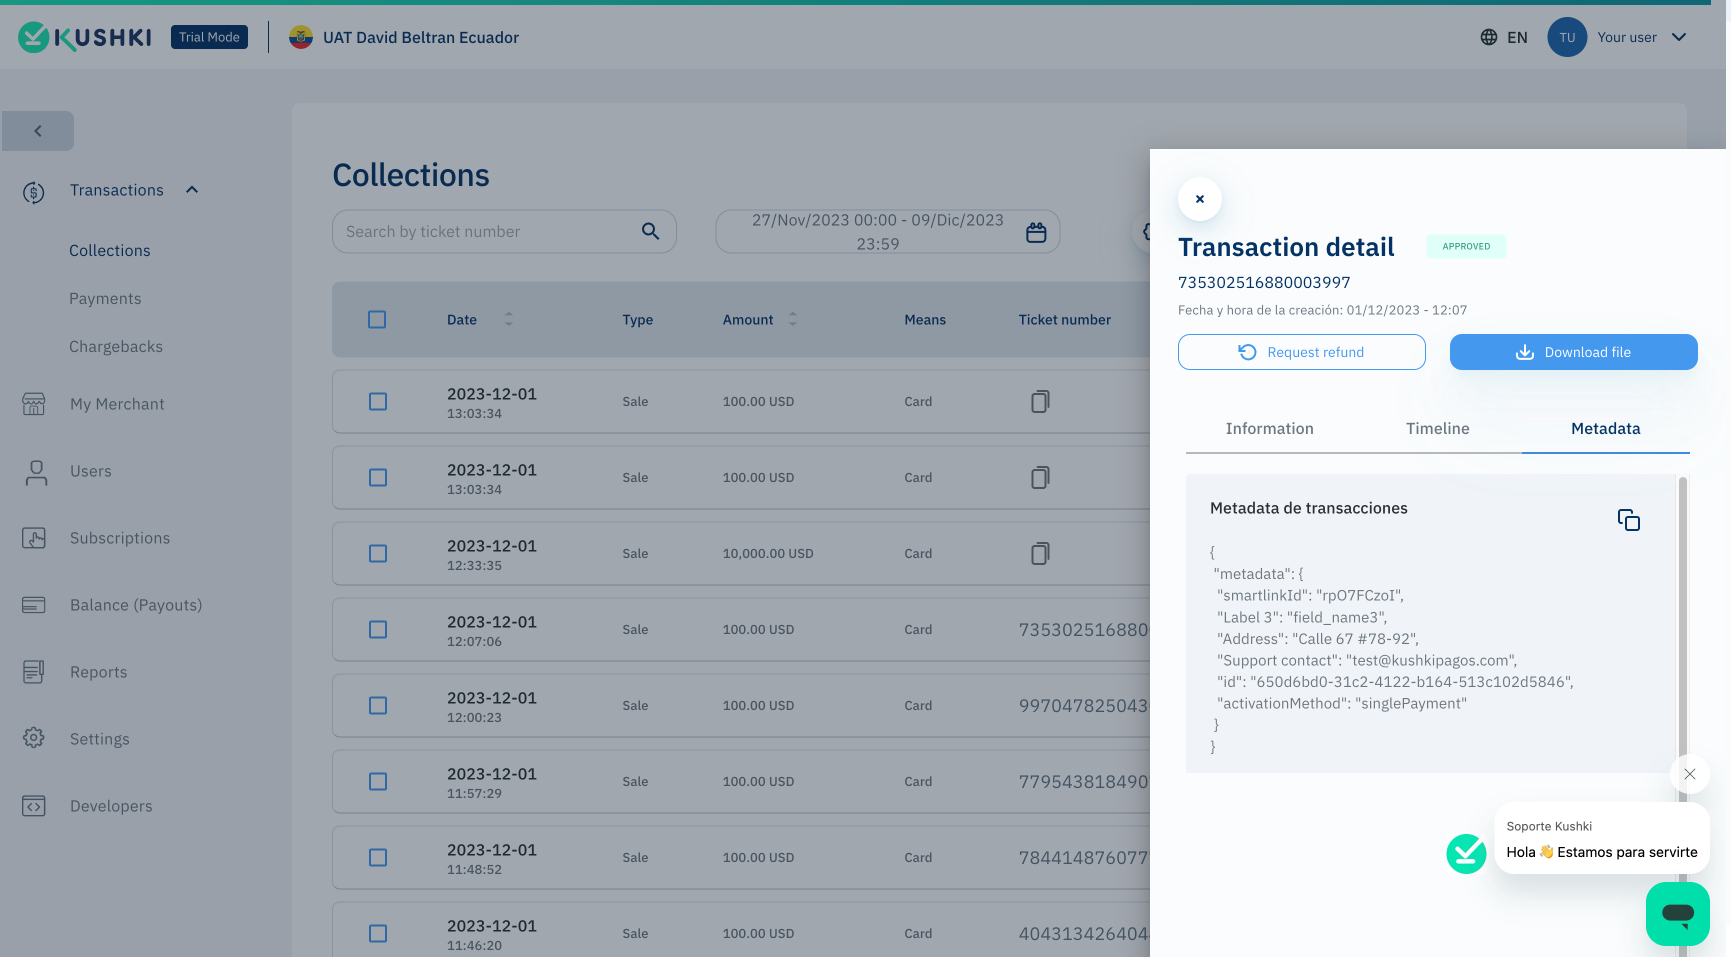
3.1.2. Payment button for authorization and capture
In case you need to make an authorization (or reservation) of a specific amount on your customer’s card and capture the funds later, you must send the "transactionType": "PRE_AUTH" parameter in the body of the payment button creation endpoint. Your user will be redirected to the payment session to complete the transaction, which will be recorded as an authorization in your Kushki Console.
To capture the amount, you must identify the transaction’s ticketNumber from your Console. With this ticketNumber you can make the capture or the void of the authorized amount using our endpoints of capture or void depending on whether or not the service has been completed.
3.1.3. Installment payment message
You can display a message to your customers that explains how the installment payment works:
Installments are banking, interest is managed by the issuer bank of each card
To enable this message, follow the next steps:
Access your Kushki console and go to the Configuration > Integrations > Payment Button section.
Click on the Advanced option and enable the Display installment payment message option.
Once the option is enabled, it will display a message such as the following picture on the payment screen.
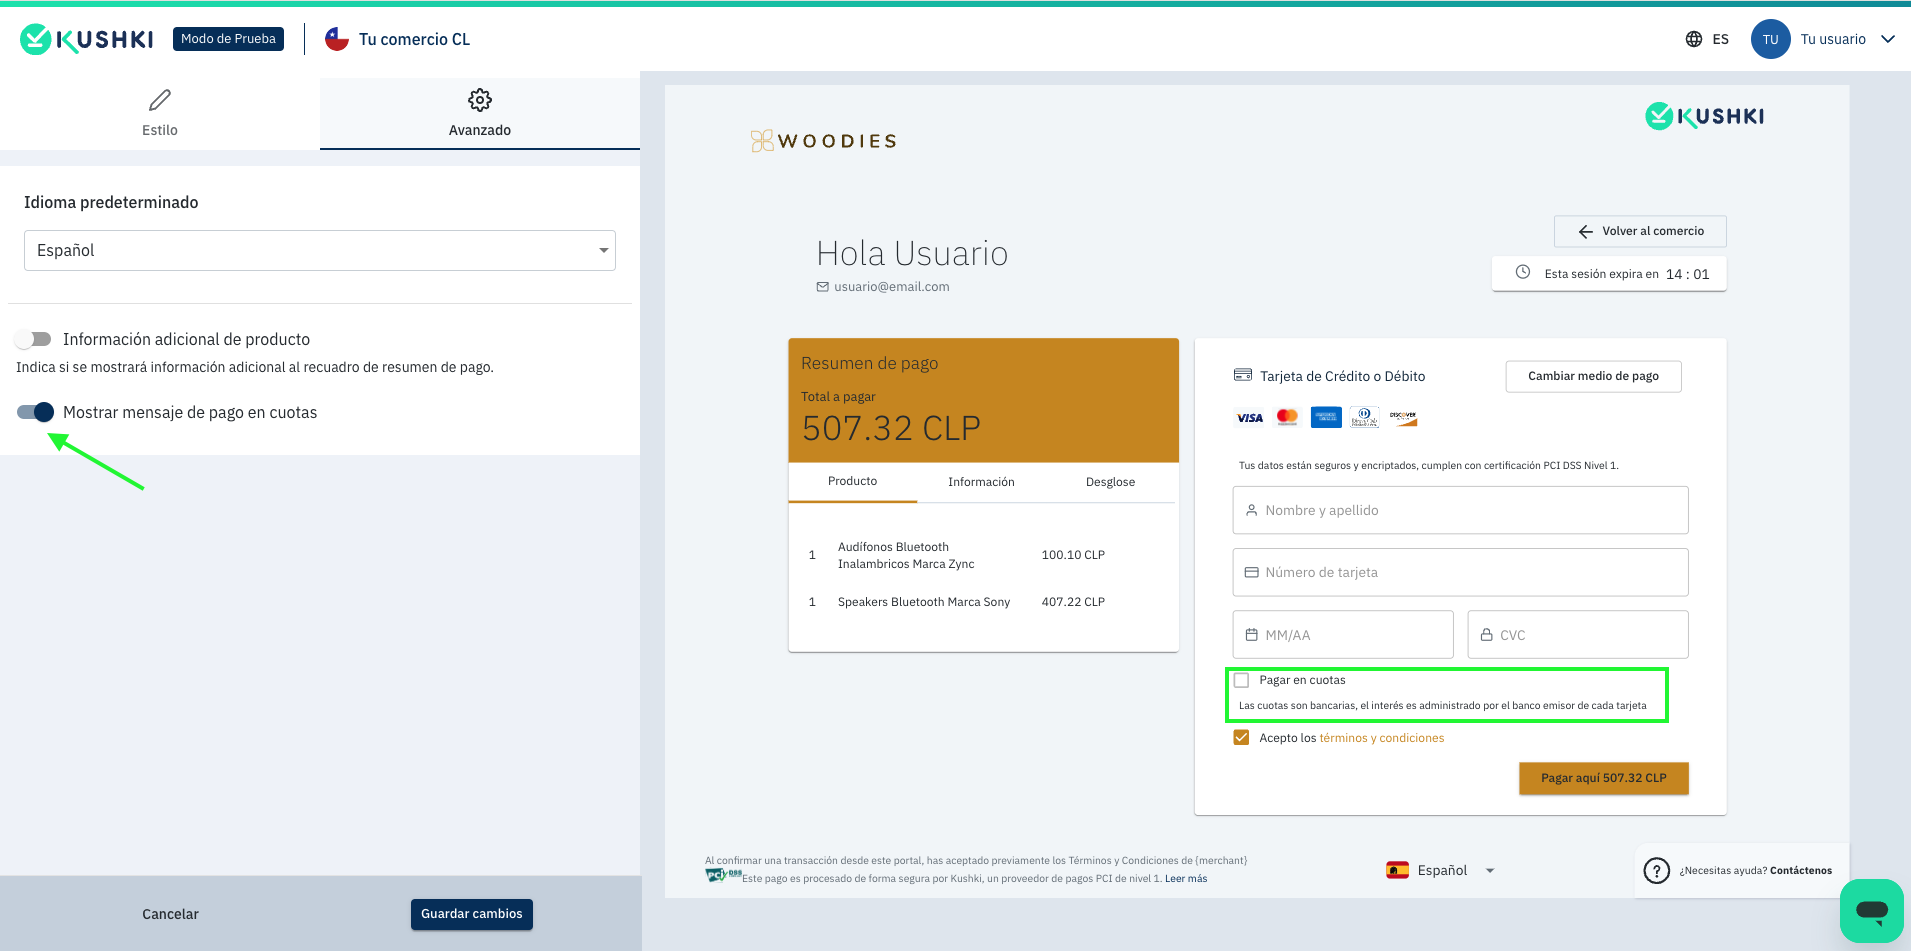
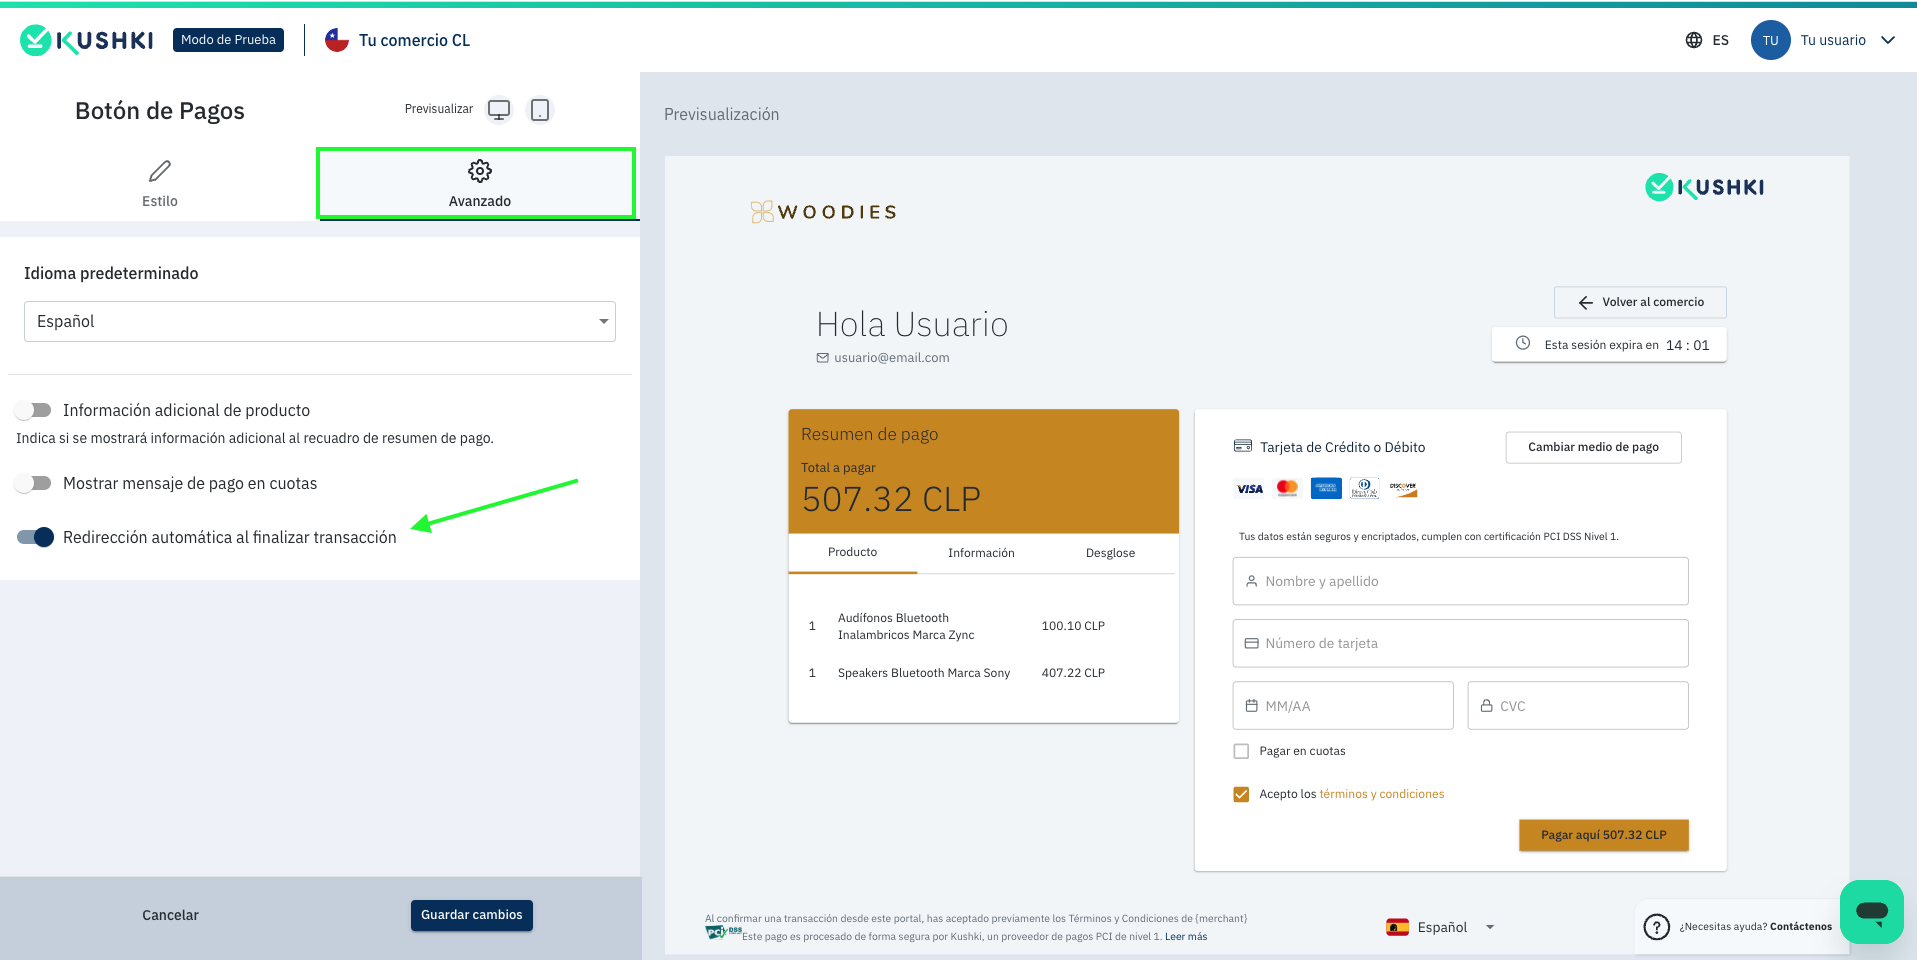
3.1.4. Automatic redirection at end of transaction
You can activate an automatic redirection so that once the payment is completed, your customer is redirected to the URL provided in the parameter."redirectURL":"https://www.tucomercio.com".
This redirection will be effective in 10 seconds after the transaction is successfully completed.
3.2 Add the button to your site (optional)
Alternatively, you can integrate a Pay with Kushki button into your Kushki front-end by following the steps below:
3.2.1 Import payment button
Include the kushki-checkout.js script in your checkout page by adding it to your HTML file. Always load kushki-checkout directly from cdn.kushkipagos.com to ensure that you comply with the PCI standard. Do not include the script in a bundle or package or host a copy of it on your server.
UAT environment
<head>...<script src="https://uat-cdn-webcheckout.kushkipagos.com/kushki-checkout.js"> </script>...</head>
Production environment
<head>...<script src="https://cdn-webcheckout.kushkipagos.com/kushki-checkout.js"> </script>...</head>
3.2.2 Add payment button to your website
The payment button needs a permanent place on your page. Enter the following code in your website’s -, where you want the payment button to be displayed.
<div id="banner-container"></div><script>var kshk = new KushkiWebcheckout({container: "kushki-banner",model: "vertical", // horizontal or buttonmerchantId: "10123114707934506208151813138411", // Merchant idwebcheckoutId: "o9V2wuk98",});</script>
1. container: It is the id of the html element (div), where the payment button will be displayed.
2. Model: It is the type of button to be displayed (vertical, horizontal, button):
- Horizontal:

- Vertical:
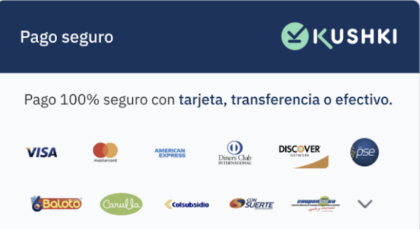
- Button:

3. merchantId: Is the merchant id obtained from the console (My Merchant > Merchant ID).
4. webcheckoutId: Is the webcheckoutId generated when consuming the endpoint to generate a Payment Button.
4. Redirect your customer to the Kushki payment session
Once you redirect your customer to the webcheckoutUrl provided by Kushki, your customer will have 15 minutes to complete the transaction. Once completed, Kushki will notify you via webhook of the status of the transaction, which can be of three types:
- Approved transaction: When the charge is made correctly. The user can download the payment confirmation or return to the merchant’s page by clicking the Return to Store button.
- Declined transaction: When the payment cannot be successfully completed, the user will be able to complete the transaction again with another valid payment method as long as the session is still active.
- Session timeout: The payment form will automatically expire after 15 minutes. The user will only have the option to return to the URL set by the merchant sent in the body of the request in the
redirectURLfield.
Once your customer clicks on Return to store, they will be redirected to the URL specified in the redirectURL field, so that you can show them the result of the transaction on your site.
5. Show the final status of the transaction on your site
Once your customer clicks Return to shop, they will be redirected to the URL specified in the redirectURL field, so that you can show your merchant the result of the transaction on your site.
To consult and display the final status of the transaction from your site, it is necessary to configure the webhooks for card, transfer o cash payments.
 Chile
Chile Colombia
 Ecuador
 Peru
Peru