Prestashop Integration Guide
Accept payments for your e-commerce through PrestaShop
Prestashop is a free and open source e-commerce option. It is written in the PHP programming language with support for the MySQL database management system. PrestaShop is currently used by thousands of stores worldwide and is available in 60 different languages.
For these reasons, Kushki sought to integrate its payment methods by creating a plugin that allows card payments with availability in several countries. You will find the installation and administration details below.
| Supported ✅ | Not supported ❌ |
|---|---|
| One-time debit and credit card payments in local currency | Recurring charges |
| Deferred credit card payments in local currency (USD) | Authorization and capture |
| Non-interest-bearing months with credit card | |
| Interest-bearing months with credit card | |
| Skip payments | |
| Scheduled charges with debit card | |
| OTP PIN authentication | |
| Full refunds in local currency | |
| Cash payment reception | |
| Transfer payment reception | |
| Anti-fraud engine |
Requirements
- For Prestashop version 1.7 or later, install 2.1.5 or higher plugin version.
- 2.1.5 and earlier plugin versions only support USD or COP as a currency type. To use another currency type, please install 2.1.6 or higher versions.
Installation and configuration of Kushki payment method module in Prestashop
The plugin source code can be downloaded from our official repository:
Download1. Installation
Requirements:
- You must download the Kushki payment module in .zip format.
- You must have Prestashop installed and configured with the type of currency you will use.
- You must have access to the administration section of Prestashop.
Follow these instructions to install the Kushki plugin in your Prestashop store:
1.1. In order to install the module, you need to log into the administration section of your Prestashop store. Once you are logged in, you must go to the section: Customize > Modules > Module Manager.
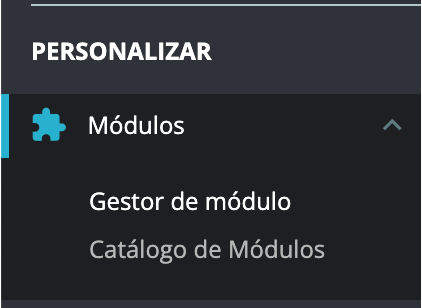
1.2. In the module view, click on the Upload a Module button.

1.3. A new module is displayed in which you can drag the downloaded plugin in .zip format. You can also use the file manager to find the plugin.
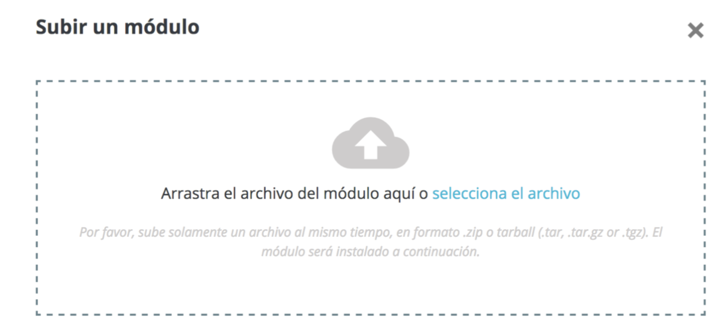
1.4. If the installation was successful, you can configure the module to start testing it.

2. Configuration
2.1. Enable Kushki in your Prestashop store
2.1.1. You can configure the module in two different ways:
- After installing the module, the confirmation screen will give you the option to configure.
- In the module management screen, you can find the plugin in the Payment category. Once you identify the Kushki module, select the Configure button.
2.1.2. On the module settings page, enter the following parameters:
- Public Key and Private Key: These credentials can be found in the Kushki administration console, in the Developers section, under the Credentials option.
- Test environment: This value defines whether we are in a test environment or in a production environment.
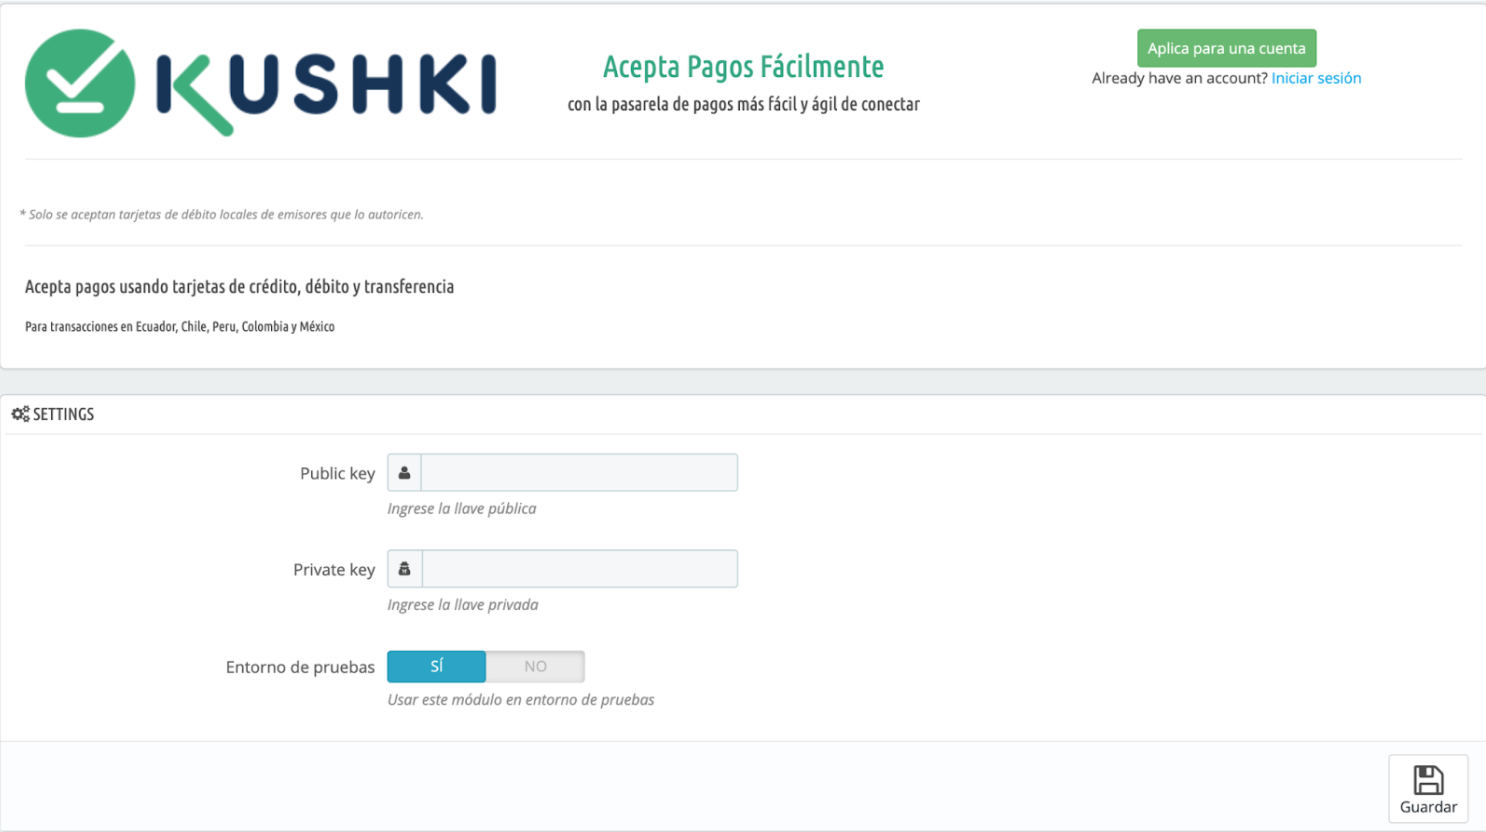
Note: In case you have not entered the public or private key, the payment method in the store may not be displayed. Additionally, in the notification tab (module administration section), you will see an alert when a public or private key has not been set.

2.1.3. Click the Save button to save changes.
2.2. Customize your payment form from the Kushki Console
When you link your Prestashop store with Kushki, our payment form will be added in a default version with predefined colors and styles. To customize your payment form (Kajita) in your Prestashop store, follow these steps:
2.2.1. Log in to your Administration Console and go to the Settings section.
2.2.2. Browse the page until you find the Integrations section.
2.2.3. Click on Plugins.
2.2.4. Select Prestashop. A message will be displayed.
2.2.5. Click on the message Configure the content and style of your form. Your Kajita for Prestashop will appear.
Follow the instructions given in Customize your payment form to customize the payment form for your Prestashop store.
3. Plugin operation
Now that you have the plugin installed and configured, it is time to see how to operate with it.
3.1. Prestashop order statuses
In Prestashop we can have different states for an order. Below are the possible states of an order with the plugin:
- Accepted payment: Payment has been successfully completed.
- On hold for payment by bank transfer: You have chosen to pay by bank transfer or cash, and you are waiting for the payment to be made. Upon successful payment, the status will change to Payment Accepted automatically.
- Canceled: Make the refund and update the store’s stock with the returned products.
- Preparation in progress: Indicates that an authorization has been made to reserve funds on the card. To perform the capture, the status of the order must be changed to Accepted payment.
3.2. Process one-time card payments
To process single payments with credit and debit cards , you need to have the One-time payment option selected at the top and the Credit and debit card option selected in the Payment options>Payment methods section inside the Kushki console in the following path: Settings > Integrations > Plugins > Prestashop > Customize the content and style of your form.
Once a new order is generated, you will see the transaction in the order list (Orders > Orders) with the status Accepted payment, which indicates that the payment has been completed.
3.3. Process payments with transfer
To process payments by transfer, you need to select the One-time payment option at the top and the Transfer option in the Payment options>Payment methods section within the Kushki console in the following path: Settings > Integrations > Plugins > Prestashop > Customize your form content and style.
Once a new order is generated, you will see the transaction in the order list (Orders > Orders) with the status On hold for payment by bank transfer, which indicates that the payment is waiting to be processed. Once the transfer has been successfully completed, the order status will change to Payment Accepted, indicating that the transaction was successfully paid.
3.4. Process cash payments
To process cash payments, you need to have the One-time payment option selected at the top and the Cash option selected in the Payment options>Payment methods section within the Kushki console in the following path: Settings > Integrations > Plugins > Prestashop > Customize your form content and style.
Once a new order is generated, we can see the transaction on the Prestashop store in the order list (Orders > Orders) with the status On hold for payment by bank transfer, which indicates that the payment is waiting to be processed. Once the payment has been successfully made, the order status will change to Accepted payment, indicating that the transaction was successfully paid.
3.5. Request a refund
Follow these instructions to request the return of approved transactions made with debit and credit card .
3.5.1. Login to Prestashop with your merchant’s credentials.
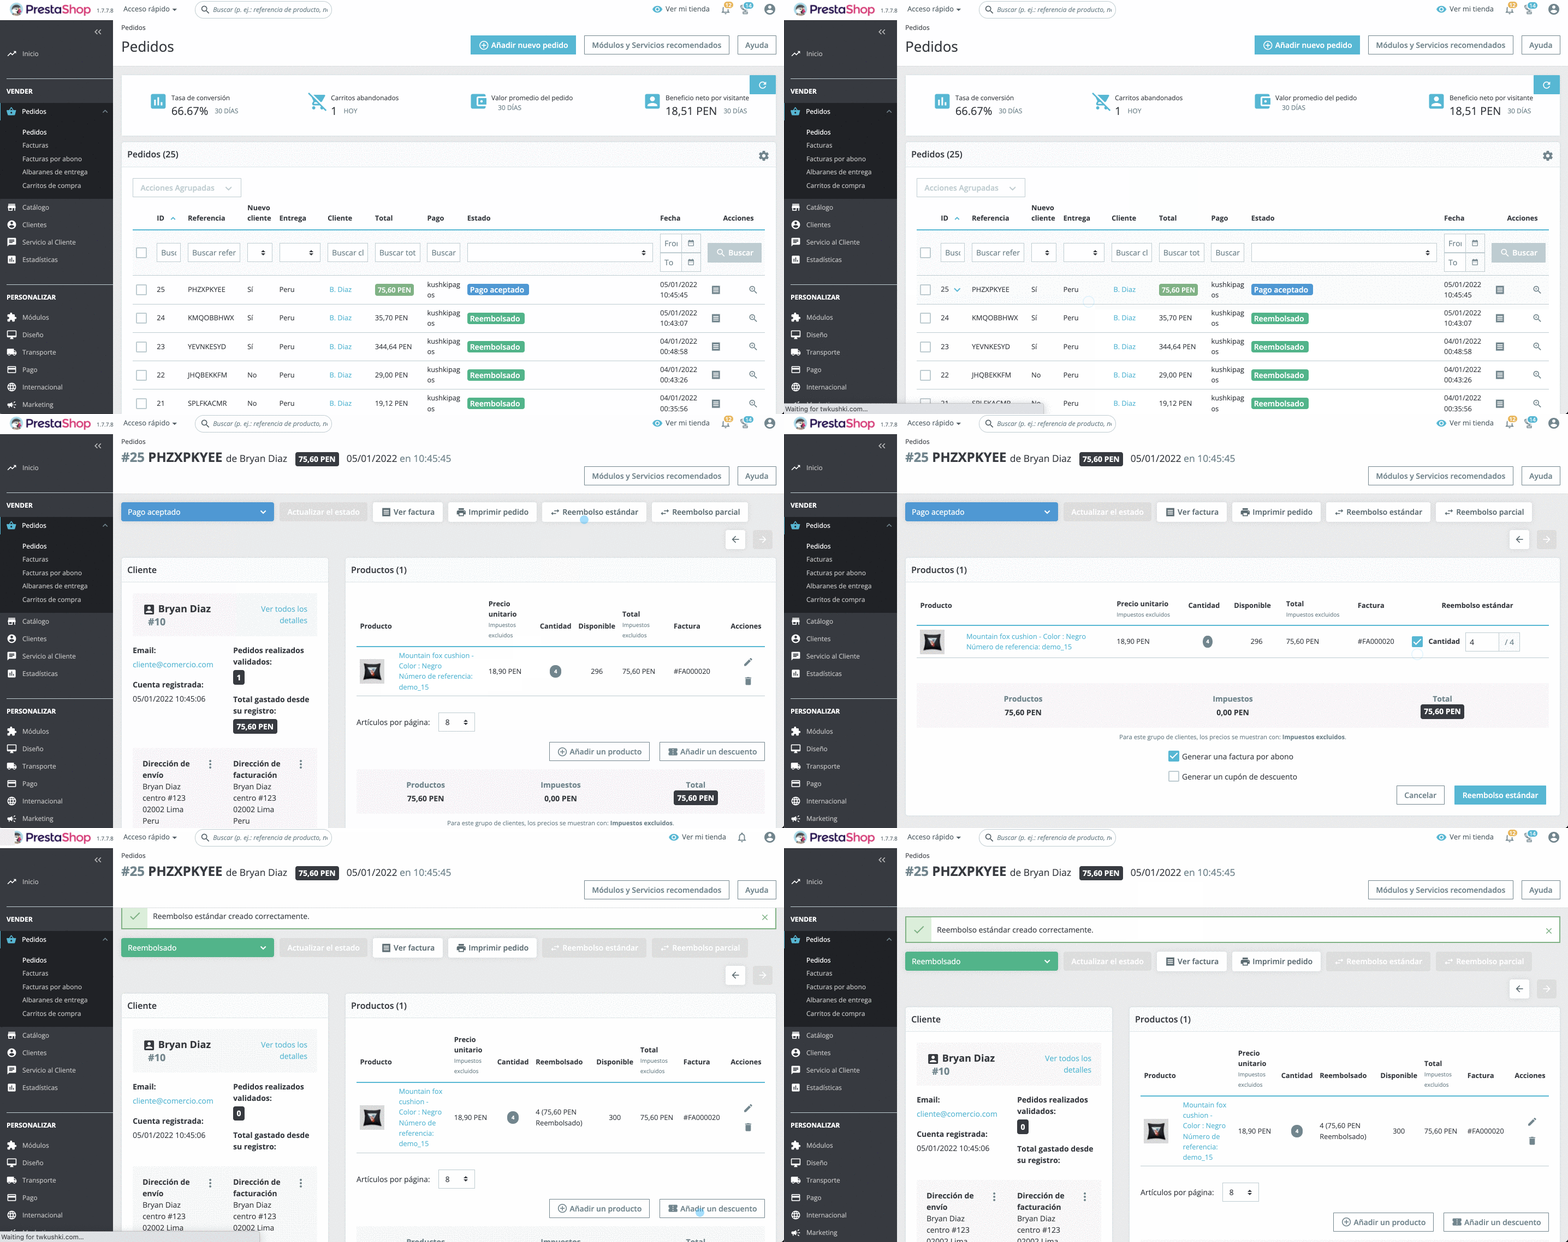
3.5.2. Click on the Orders > Orders option in the left side menu.
3.5.3. Click on the order to be refunded to enter into the order details.
3.5.4. Click on the Standard refund button on the top menu in the order details.
3.5.5. Check the box next to Amount to select the total of the items in the order and then click on the Standard refund button at the bottom to make the refund request. Remember that we currently only allow refunds for the total amount of the order.
3.5.6. The message Standard refund successfully created will appear indicating that the refund was successfully requested and the order status will change to Refunded.
Refunds can be of two kinds, depending on the day and time the original transaction and the cancellation request are processed:
- Cancellation (void): When the repayment request is made on the same day of the transaction before the deadline, which varies by country, the cancellation occurs at the moment.
- Refund: When the repayment request is made after the deadline. The process may take up to 45 days to be reflected as a credit note on the customer’s account.
These are the cancellation deadlines by country:
| Chile | Colombia | Ecuador | México | Perú |
|---|---|---|---|---|
| Up to 3 hours after the transaction is approved. | 20:59 hours on the day of the transaction. | 21:00 hours on the day of the transaction. | 23:59 hours on the day of the transaction. | 20:59 hours on the day of the transaction. |
4. Uninstallation
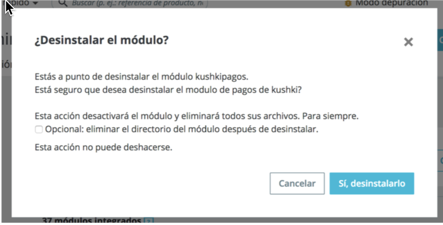
- To uninstall the module, you must go to the installed modules tab and look for the Kushki module. Select the Uninstall option as shown in the image:

- To complete the uninstallation process, confirm that you want to uninstall the module. If it is needed, you can select the option to remove the directory module.
5. Test your integration
There are test cards that you can use in the UAT environment to make sure your integration is ready. Use them with any CVV, zip code and future expiration date.
- Approved transaction:
5451951574925480 - Declined transaction on token request (front-end):
4574441215190335 - Declined transaction on payment application (back-end):
4000001278960006
 Chile
Chile Colombia
 Mexico
 Peru
Peru