Magento Integration Guide (Adobe Commerce) 🅱️
Accept payments for your e-commerce through Magento (Adobe Commerce)
Magento is an e-commerce platform that was acquired by Adobe in 2018. As a result, there are two versions of the platform:
- Magento Open Source
- Adobe Commerce
Kushki has a plugin for both versions, which will allow you to receive secure payments by credit and debit card, cash, and transfer. The details of the installation and administration of the plugin can be found below.
| Accept | Not accepted |
|---|---|
| Cash payment | Tokenization and execution of scheduled charges |
| Card payments | Webpay Plus Payments |
| Deferred payments | OneClick Webpay Payments |
| Two-step card payments (Authorization and Capture) | |
| OTP payments | |
| 3DS payments | |
| Transfer payments | |
| Partial and full refunds | |
| Same-day, partial, or full cancellations in local currency | |
| Anti-fraud engine |
Requirements
- Magento 2.4.x for optimal compatibility.
Installation and configuration
The plugin’s source code can be downloaded here.
1. Installation
Requirements:
- You must have downloaded the Kushki payment module in .zip format.
- You must have Magento installed and configured with the type of currency you will use.
- You must have access to the Magento administration section.
Follow these instructions to install the Kushki plugin in your Magento store:
1.1. In the Adobe Commerce installation directory, go to app > code (if it does not exist, you must create the code folder).
1.2. Extract the contents of the .zip file. The final path should be app > code > Kushki > Payment.
1.3. Update Magento. From an SSH terminal, run the following command in the root directory of Magento 2: php bin/magento setup:upgrade.
1.4. Compile the configuration by running the following command: php bin/magento setup:di:compile.
1.5. Deploy the static content. Run the following command in the root directory of Magento 2: php bin/magento setup:static-content:deploy.
1.6. Finally, remove the cache by running the command: php bin/magento cache:flush.
2. Configuration
Once the plugin is installed, we can proceed to configure it in your Magento store.
2.1. Get your credentials for Magento from the Kushki Console
To obtain your merchant ID, public credential, and private credential, which you will use during the configuration of the Kushki plugin in Magento, follow these steps:
2.1.1. Log in to your Console
2.1.2. Go to Configuration and navigate to the section Integrations
2.1.3. Click on Plugins
2.1.4. Select Adobe Commerce
An integration form will open
2.1.5. Enter the URL of your Adobe Commerce store and click Save
You will see a confirmation message
2.1.6. Click on Go to credentials
You will see the list of Credentials in your merchant, including those you just created for Adobe Commerce
Additionally, once you’ve configured your merchant URL, following the path Settings > Integrations > Plugins > Adobe Commerce, you’ll be able to view the Public API Key, as well as the Private API Key right there.
To go back to the list of all your Credentials in the Console, you’ll need to follow the path Developers > Credentials.
Below, we show you in a video the steps to get your credentials for Magento from the Console:
2.2. Enable Kushki in your Magento store
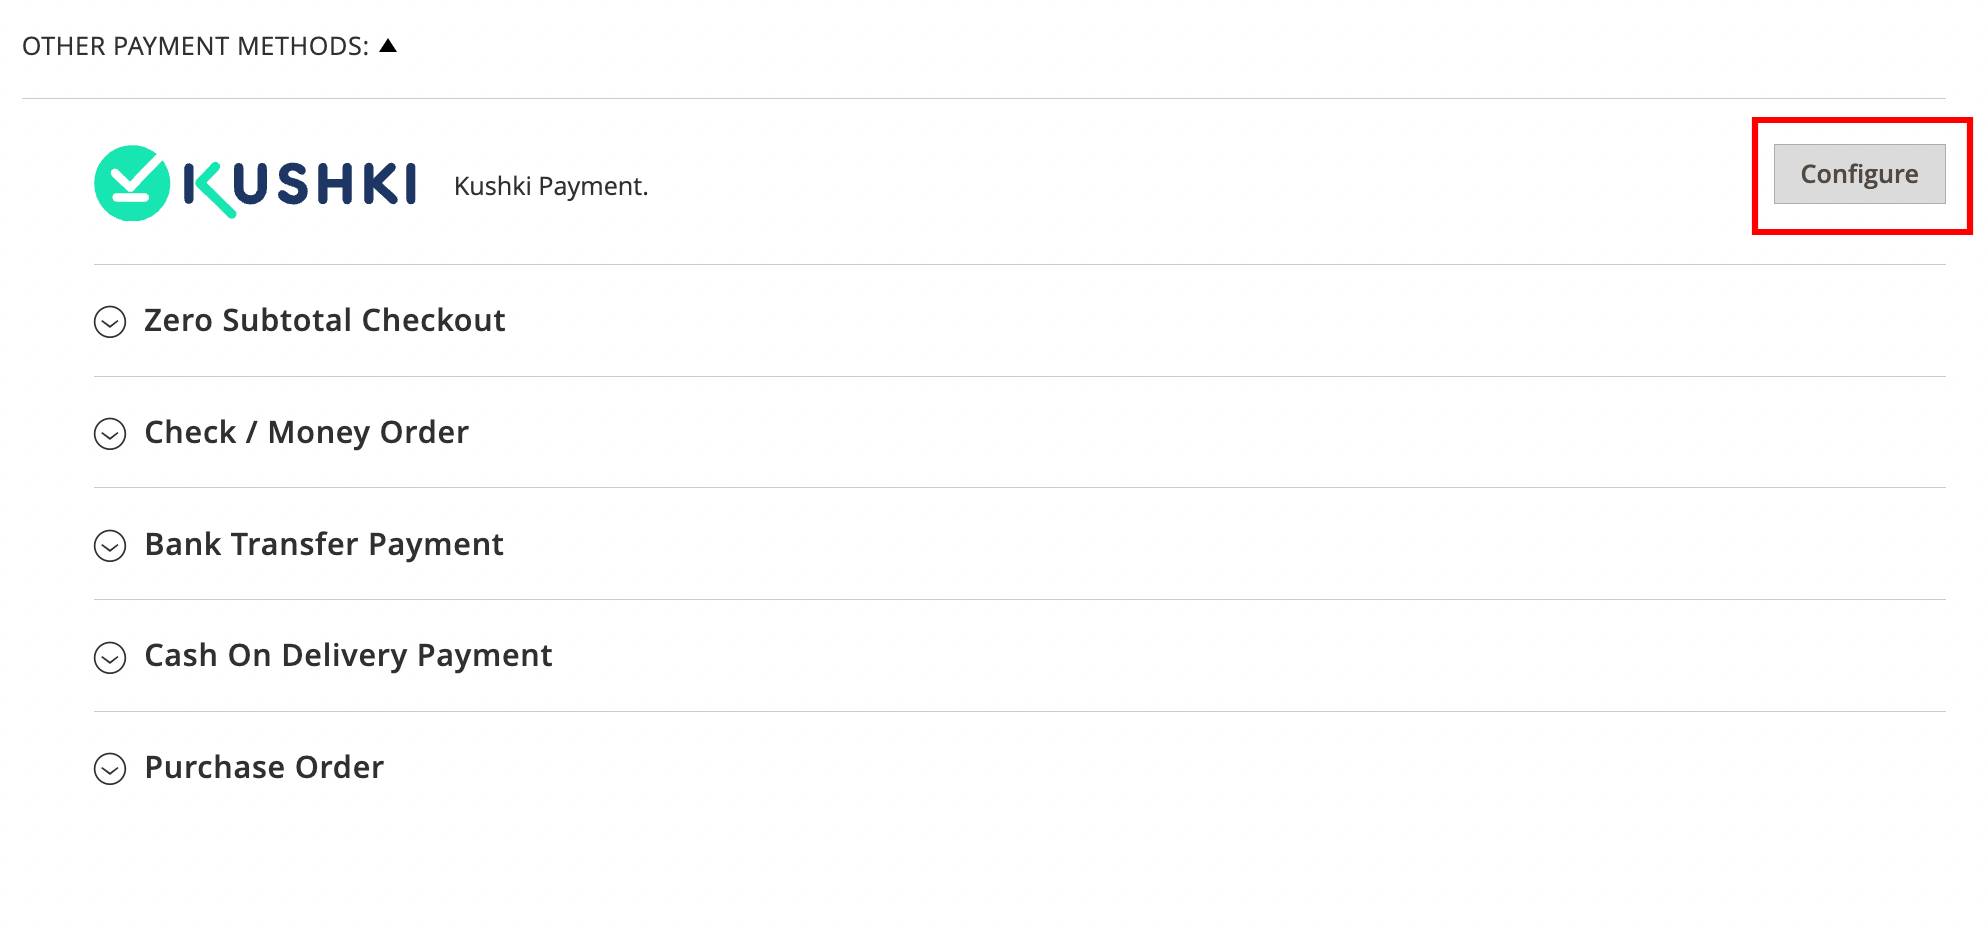
2.2.1. Go to Stores > Configuration > Sales > Payment Methods, and look for the Kushki Payment module in the Other Payment Methods section.
2.2.2. Click on the button Configure, located to the right of the module.
2.2.3. In General Configuration you can adjust the general data of the Kushki plugin.
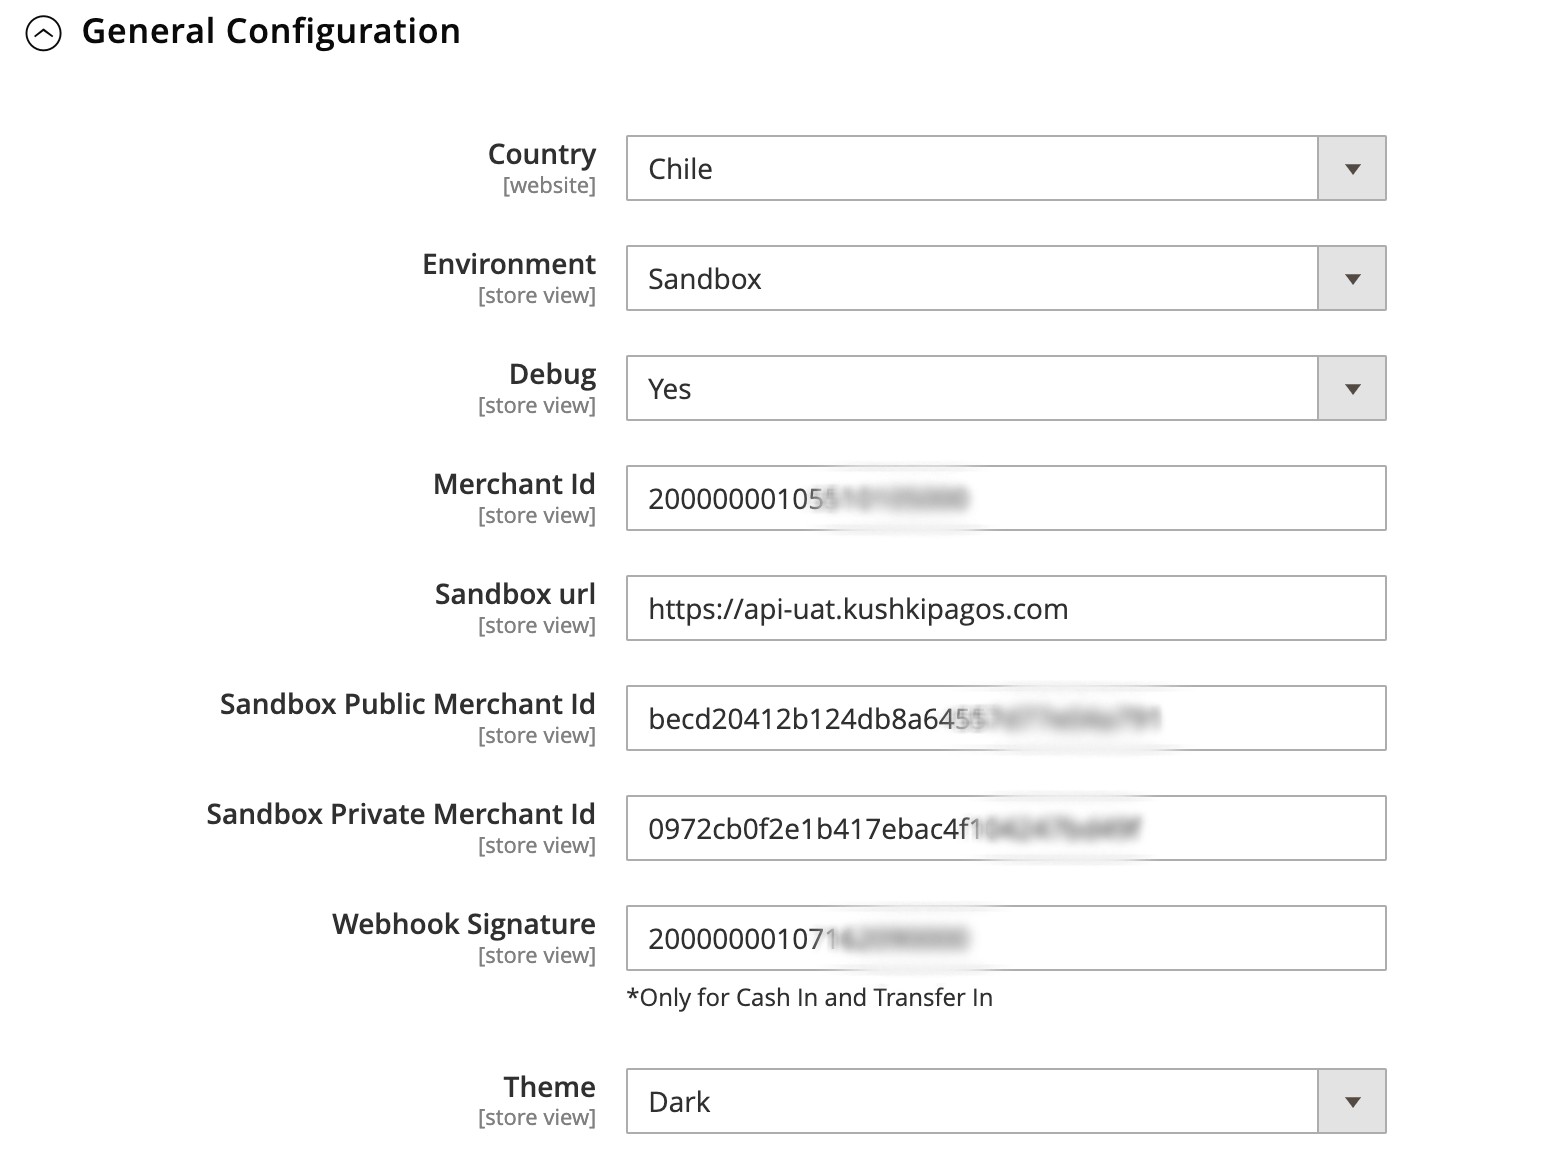
- Specify the country of operation in Country.
- Select the environment for the requests to be sent to the Kushki server with the option: Environment:
- Select Sandbox for the test environment
- Select Production for the production environment
- The URL field will depend on whether you’re using the test or production environment.
- For the test environment use:
https://api-uat.kushkipagos.com - For the production environment use:
https://api.kushkipagos.com
- For the test environment use:
- Add the merchant ID, as well as the public and private keys. These credentials are those obtained in step 2.1 Get your credentials for Magento from the Kushki Console. If they’ve already been generated, they can be found in the Console, at Developers > Credentials.
- Add your Webhook Signature and set up a webhook in the Kushki console, with which you’ll receive notifications of the states of the transactions. This step is essential.
- Select whether you want a light or dark theme.
2.2.4. Enable the desired payment methods by selecting Yes in the Is Active section of each one.

Once you have enabled a Kushki payment method, the configuration fields for each one will be visible.
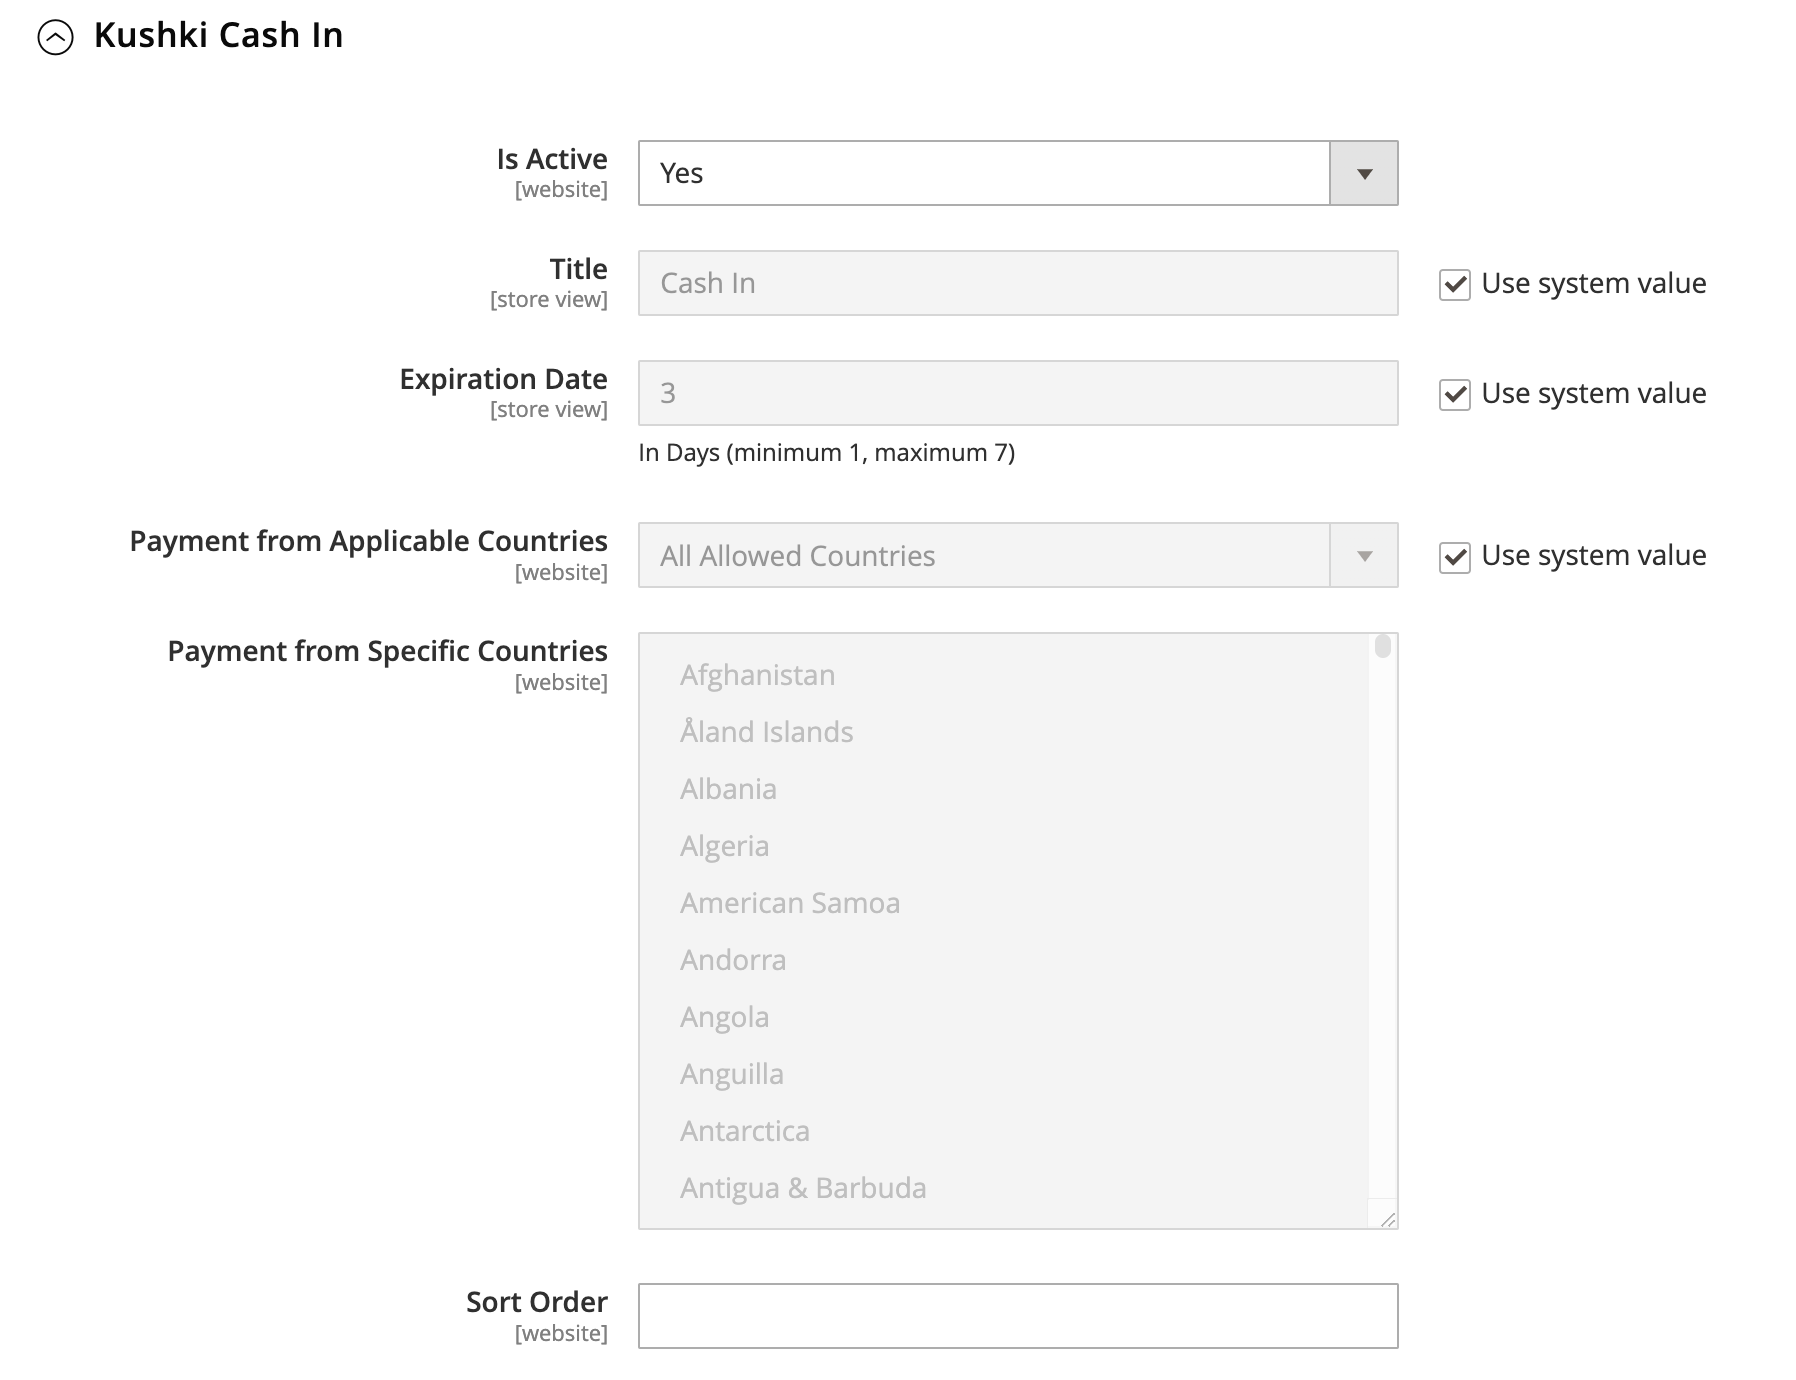
- Add the title of the payment method that will be shown to the customer in the front-end in Title.
- Allow customers to pay from any country in the Payment from Applicable Countries Countries section or restrict the list of countries in the section Payment from Specific Countries.
Taxes are configured in your Magento store, in the path Stores > Taxes.
3. Plugin Operation
Now that you have the plugin installed and configured, it’s time to see how to operate it.
3.1. Order states in Magento
In Magento, we can have different states for an order. Here are some of the possible states of an order with the Kushki plugin:
- Pending Payment This is the status of new orders that have not yet been processed. This status will change when the payment is confirmed.
- Payment Review The order’s payment is under review by Kushki.
- Suspected Fraud Indicates that the transaction is suspected of fraud. When this happens, no invoice is issued for the order nor is the confirmation email sent.
- Processing Means the order has been invoiced or shipped, but not both.
- Pending No invoice has been issued or the order shipped.
- On Hold This status is assigned manually. You can put any order on hold when required.
- Complete Orders marked as complete have been fully invoiced and shipped.
- Closed The order payment has been refunded.
- Canceled The order payment has not been made.
3.2. Process cash payments
To process cash payments you will need to activate and configure the Kushki Cash In payment method in the Kushki Payment plugin configuration, according to the instructions given in Enable Kushki in your Magento store. Remember to configure a webhook and add your webhook signature during the General Configuration of the plugin, to receive changes in the transaction states.
Once configured, your buyers will be able to select the option to pay with cash. During checkout buyers will need to fill out a personal data form for shipping, as well as add a type and identification number, and finally, place the order.

Once the order is placed by the buyer, they will see on the screen the ticket number, the total amount of the purchase, as well as the expiration date. Additionally, they will see the option to download the cash payment order. This will also be sent to the email address provided in the form. With the payment order, the customer can go to any of the payment points indicated in that document.
On the Magento side, once a new order with Kushki Cash In is generated, we can see the transaction in the order list (Sales > Orders) with the status Payment Review, which indicates that the payment is awaiting processing. Once the payment has been successfully made, the order status will change to Processing, indicating that the transaction was correctly paid. If time expired and no payment was made, the order status will be Canceled.
3.3. Process card payments
To process single payments with credit or debit card, you will need to activate and configure the Kushki Cards payment method in the Kushki Payment plugin configuration, according to the instructions given in Enable Kushki in your Magento store..
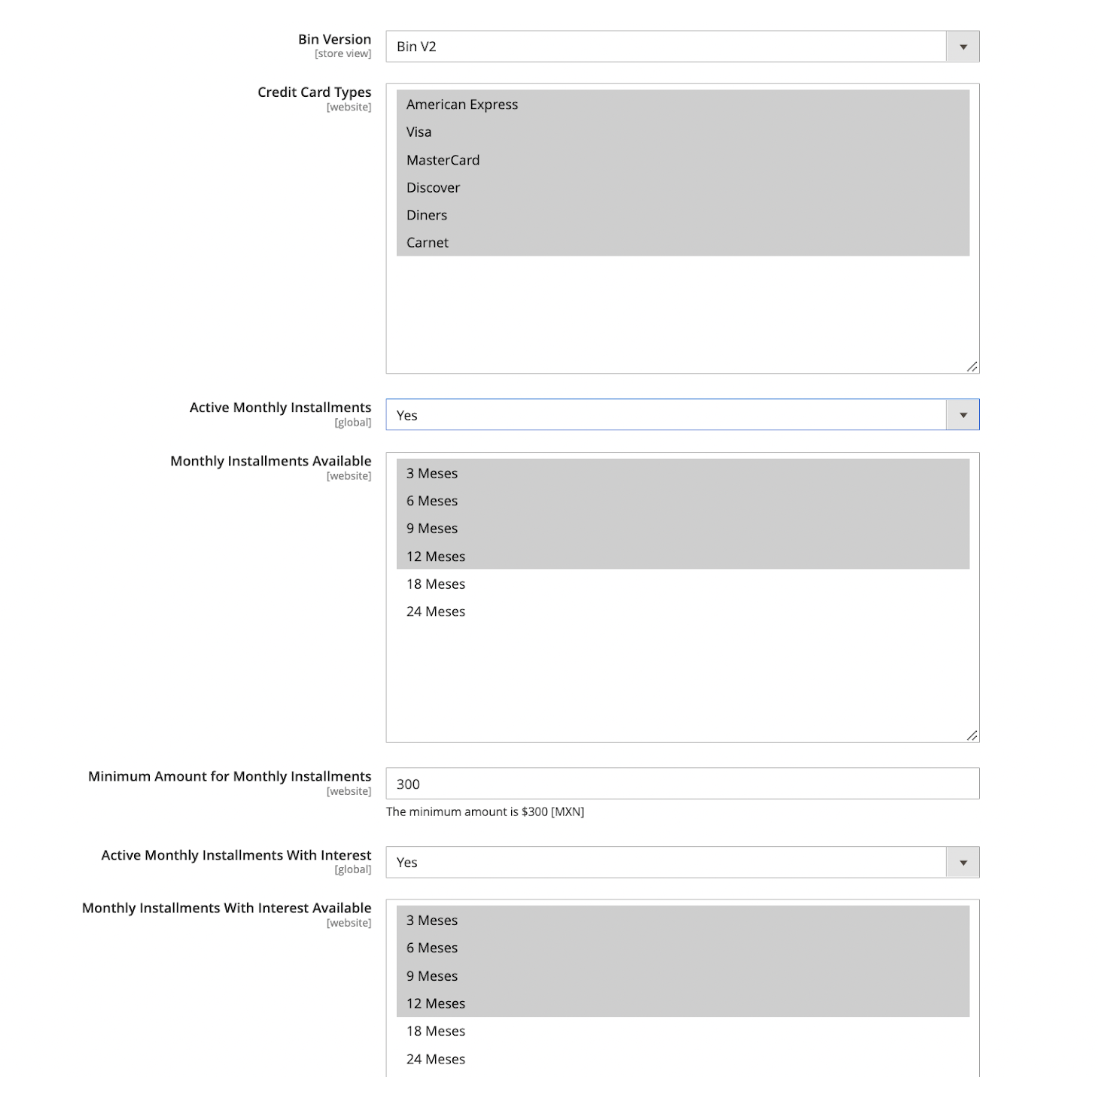
Additionally, you will have available other fields in the configuration of the Kushki Cards payment method, such as the types of cards accepted and deferred payments.
Once the method is configured, your buyers will be able to select the option to pay with a card. During checkout, buyers will need to fill out a personal data form for shipping, as well as add a type and identification number, and finally, add their card details, as displayed below.
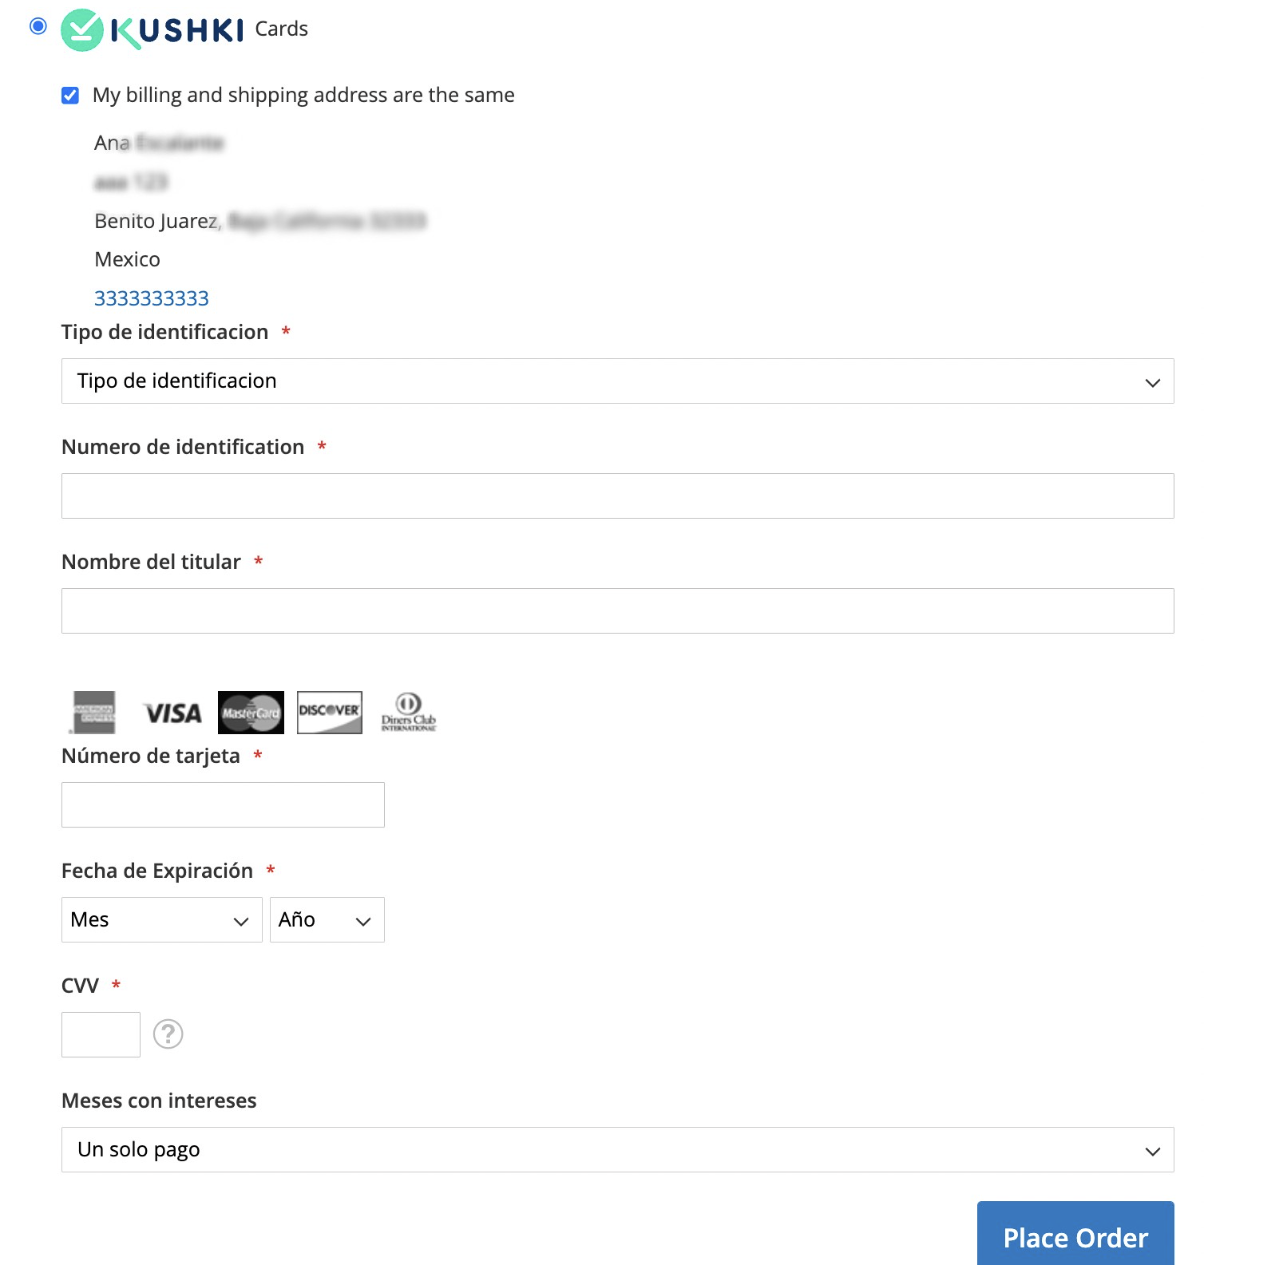
On the Magento side, once a new order with Kushki Cards is generated, we can see the transaction in the order list (Sales > Orders) with the status Processing, which indicates that the payment has been made, and the product is waiting to be shipped. Once the shipment has been made, the order status will change to Complete, indicating that the order has been invoiced and shipped successfully.
3.3.1. Authorization and Capture Payments
During the Kushki Cards Payment Method Setup, will have the option to enable two-step payments.

When enabling payments with authorization and capture, when a customer makes a purchase, the order will have a status of Payment review.
To capture the payment go to Sales > Orders, open the order you want to capture and in the left menu go to Invoces. Then click on “view” and in the top menu click on Capture. You will see a message confirming the capture. The status of the order will change to Processing. You can see the process in the following GIF:
3.3.2. Deferred payments
During the Configuration of the Kushki Cards payment method, you will have the option to enable deferred payments with certain characteristics:
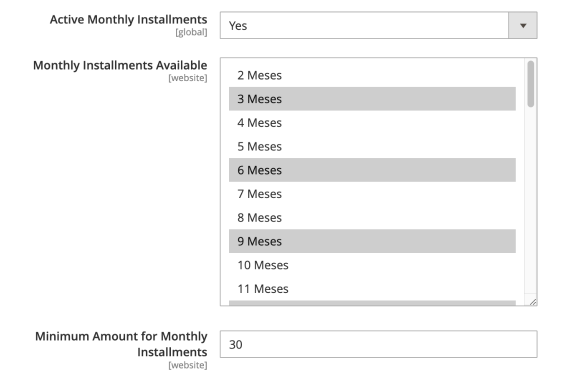
It is important that you select the available months, as well as the minimum amount for which the deferred payment option will be activated.
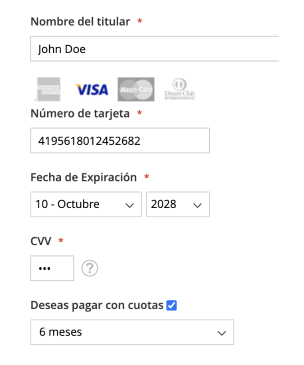
During checkout when a customer makes a purchase of an amount greater than you set to activate deferred payment, as well as a card that applies, they will see the option to pay in installments and can select the months:
3.3.3. Single card payments with OTP
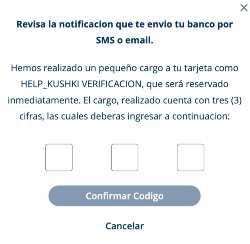
You can implement the authentication OTP process to add an extra layer of protection to your transactions. You will be able to configure for what type of transactions OTP validation will be requested, for example, when the transaction amount exceeds a certain threshold.
After the user completes the purchase form and clicks on the button to pay, a small charge of a random three-digit amount will be made to their card (between 1.01 and 9.99 MXN). The amount charged must be entered by the user to authenticate the transaction. This charge will be automatically voided in a couple of minutes.
3.3.4. One-time card payments with 3DS
You can implement 3DS authentication process to add an extra layer of protection to your transactions.
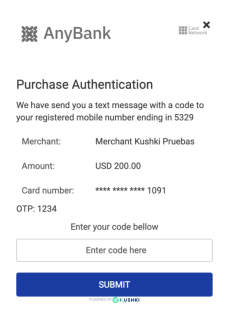
Once the user completes the form and clicks the Pay button, Kushki will validate whether 3DS authentication is required for the transaction. If such validation is required, your customer will be displayed a challenge whose experience may vary depending on the brand and the issuing bank. When the challenge is completed, the customer will be able to finalize the transaction.
An example of what the customer may see on their screen is as follows:
3.3.5. Voidings and Refunds
There are two types of refunds depending on the type of capture. If you wish to return a payment already captured, then a refund will be made. If you wish to cancel a pre-authorization, then a void will be performed.
To void a payment authorization, follow these steps:
- In your Magento Admin Console, go to Sales > Orders.
- Select the order placed with authorization that you want to void.
- Select Invoices > View.
- Select Credit Memo from the top left menu.
- Check the box Return to stock to return those products to your stock.
- Click the button Cancel located at the bottom.
To refund a captured payment, follow these steps:
- In your Magento Admin Console, go to Sales > Orders.
- Select the order you want to refund.
- Select Invoices > View.
- Select Credit Memo from the top left menu.
- Check the box Return to stock to return those products to your stock.
- Click the button Refund located at the bottom
You will see a confirmation message, and the order will change status to Closed. You can see the process in the following GIF:
3.4. Process payments with transfer
To process single payments by bank transfer, you must activate and configure the Kushki Transfer In payment method in the Kushki Payment plugin configuration, following the instructions given in Enable Kushki in your Magento store.
You will have other fields available in the configuration of the Kushki Transfer In payment method, related to the email that will be sent to the buyer as order confirmation:
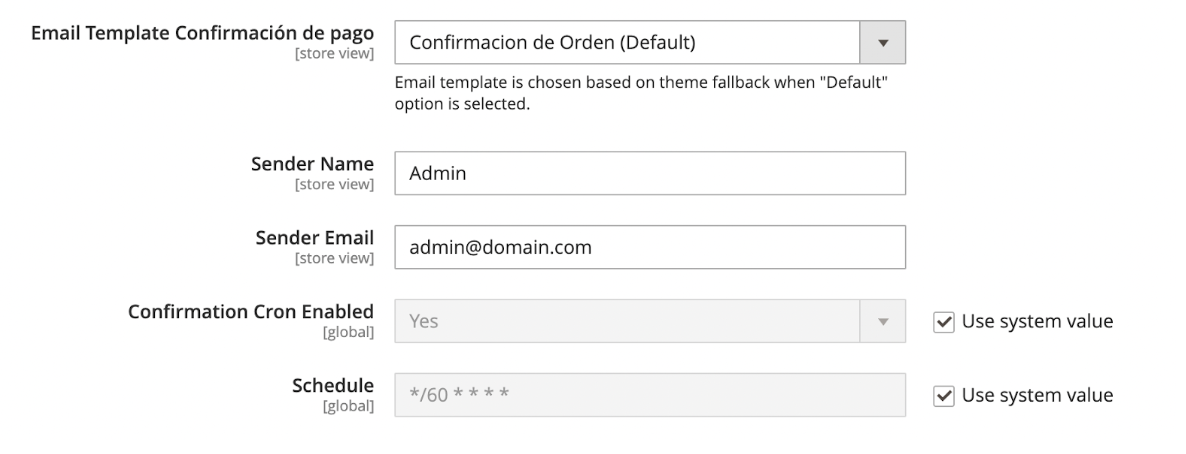
Additionally, you can customize the appearance of the email that will be sent in your Magento store, following the path Marketing > Email templates > Kushki > Order configuration.
Once the method is configured, your buyers will be able to select the option to pay by transfer. During checkout, buyers will need to fill out the personal data form for shipping, as well as select their bank, a type of identification, and enter the identification number.
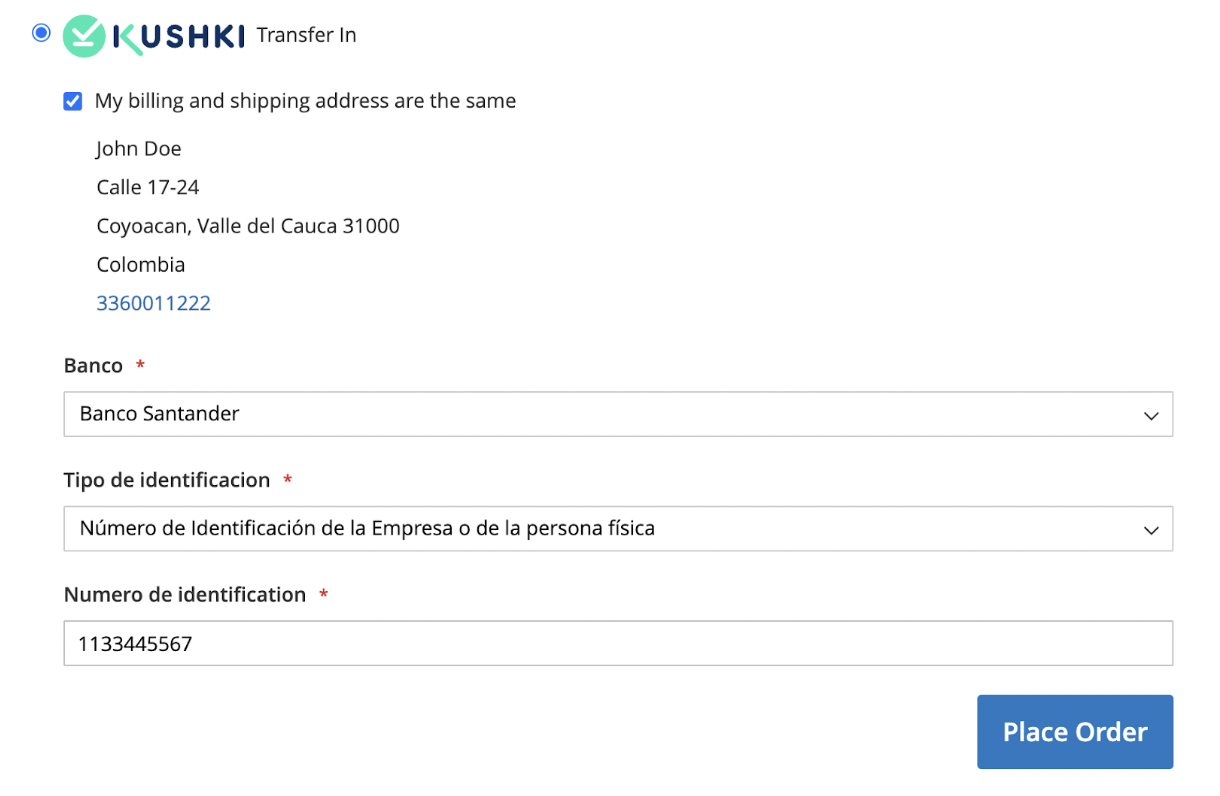
When placing an order, the buyer will see on screen the option to download the purchase information, where the necessary data to make the transfer appears. This information will also be sent to the email address provided in the form.
On the Magento side, once a new order with Kushki Transfer In is generated, we can see the transaction in the order list (Sales > Orders) with the Payment Review status, which indicates that the payment is waiting to be processed. When the payment has been made successfully, the order status will change to Processing, indicating that the transaction was correctly paid. If time has expired and the payment has not been made, the order status will be Canceled.
4. Uninstallation
4.1. In the Magento installation directory, go to app > code and remove the folder containing the Kushki source code.
4.2. Find the module named Kushki_Payment and remove the module entry from the database table setup_module.
4.3. The Kushki_Payment module should also be removed from app > etc > config.php.
4.4. Update Magento. From an SSH terminal, run the following command in the root of the Magento2 directory: php bin/magento setup:upgrade.
4.5. Compile the installation by running the following command: php bin/magento setup:di:compile
4.6. Deploy the static content. Run the following command in the Magento2 root directory: php bin/magento setup:static-content:deploy.
4.7. Finally, remove the cache by executing the command: php bin/magento cache:flush.
 Colombia
 Ecuador
 Mexico
 Peru
Peru