Accept One-Time Payments with OTP
OTP (One Time Password) is another layer of online protection against financial fraud.
This functionality is available for the following models:
☑ Acquirer
☑ Aggregator
A “one-time password” (OTP) authentication (also known as dynamic password) is a password that is valid for a single transaction. It aims to reduce fraud and provide extra security for your merchant’s online payments.
Consider using OTP when your merchant has a substantial amount of fraud or particularly sensitive or high-value transactions since this might result in a lower conversion due to added steps in the payment process.
You will be able to specify the type of transactions for which OTP validation will be requested, for example, when the transaction amount exceeds a certain threshold.
Check below for the availability of OTP authentication with the affiliation and integration models available in Kushki.
OTP authentication availability
By affiliation methods
OTP authentication is available when processing transactions with the following card brands:
Aggregation
Credit card and debit card
| VISA | MasterCard | American Express | Diners |
|---|---|---|---|
| Supported ✅ | Supported ✅ | Supported ✅ | Supported ✅ |
Acquiring
Credit card and debit card
| VISA | MasterCard |
|---|---|
| Supported (through Kushki Instant Pay) ✅ | Supported (through Kushki Instant Pay) ✅ |
By integration methods
OTP authentication is available in the following integration methods:
| Supported ✅ | Not supported ❌ |
|---|---|
| Integration with Shopify | iOS integration (SDK) |
| Integration with Smartlink | Android integration (SDK) |
| Integration with Kajita | |
| Integration with payment button | |
| Integration through API | |
| Kushki.js integration | |
| Kushki.js Hosted Fields integration |
An example of what you will integrate is shown below:
How does it work?
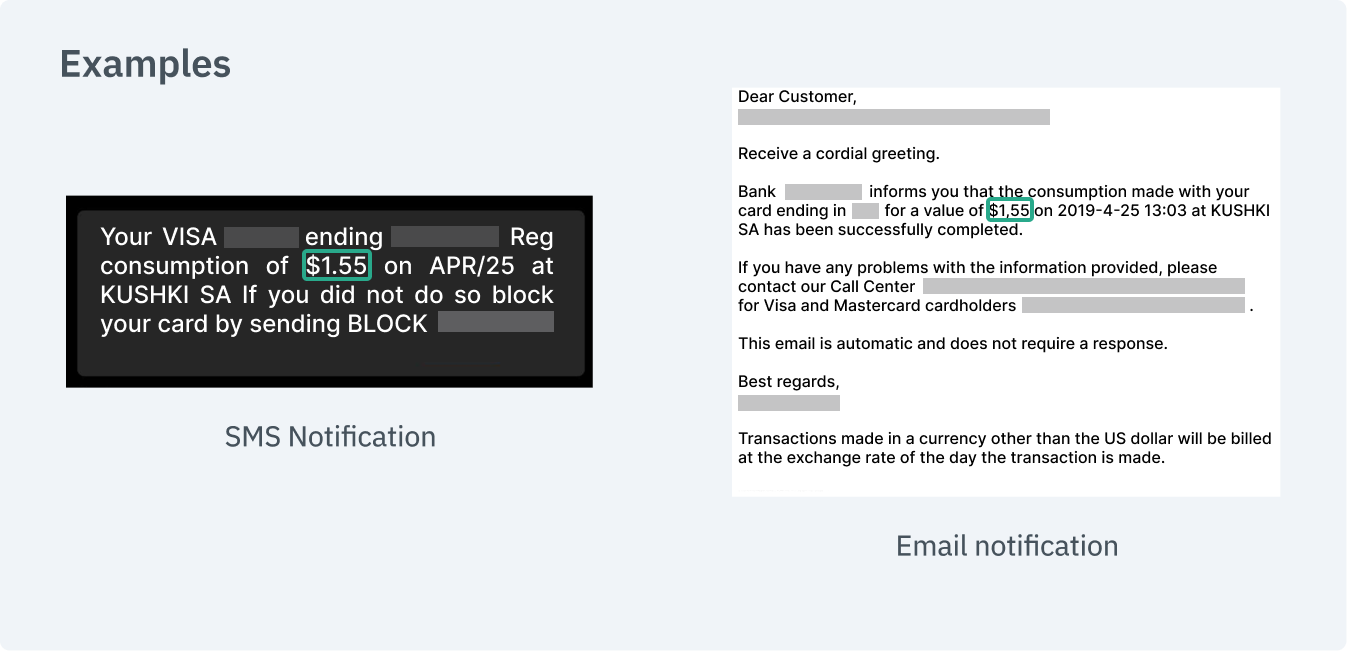
After the user completes the form and clicks on the payment button, a small charge of a random three-digit amount will be made to the user’s card (between 500 and 999 CLP). The amount charged must be entered by the user to authenticate the transaction. The user will typically be able to verify this amount in the notification or email sent by the bank or directly in their bank account. This charge will be automatically canceled in a couple of minutes.

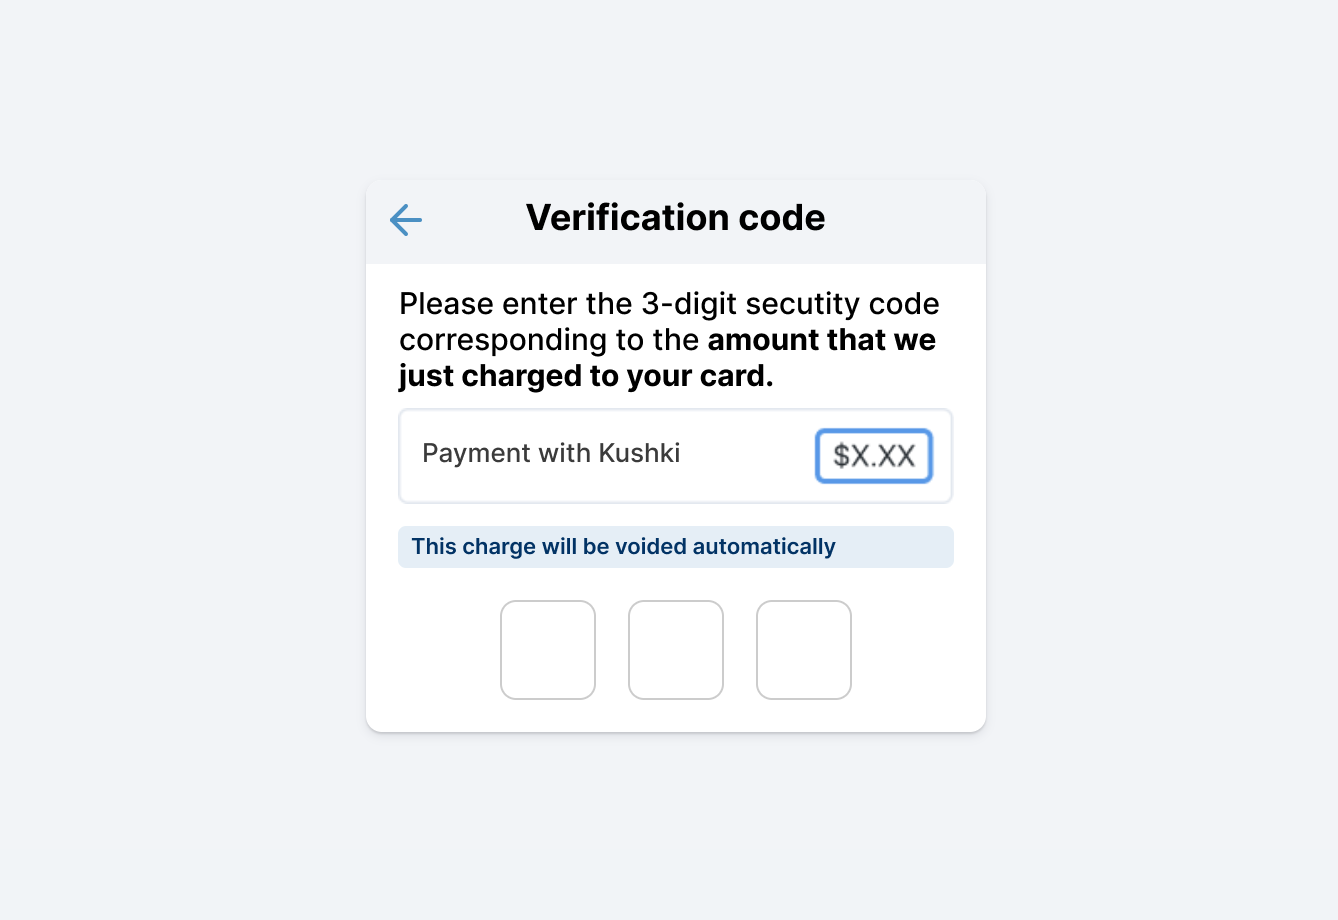
Once the payer consults the amount charged, they must enter this number in an interface that will be shown to your users to validate the transaction. The following is an example of the interface and the message you can present to capture the validation amount:

1. Set up your Front-end
Set up your front-end according to your integration.
Kajita
Follow our instructions for Kajita described in our guide to accept card payments.
Once you set up OTP for your merchant, Kajita will automatically ask for the OTP in each payment attempt. You don’t need to do anything else.
Kushki.js
Follow our instructions for Kushki.js described in our guide to accept card payments.
Now, before sending the data to the end-point in your back-end, we must collect the OTP from the user and validate it.
When an OTP is enabled, the response obtained from the requestToken() method will be as shown below:
{token: "90a9f2d93ba508c38971890454897fd4",secureId: "5e44449e-869b-4fed-bbca-e1bfa5af53c3",secureService: "KushkiOTP"}
Once the requestToken() response is obtained, you will need to display a field in your form to collect the user’s OTP.
By using the OTP collected the user along with the secureId obtained from requestToken, you must run the requestSecureServiceValidation() method to authenticate the OTP and obtain the code to send it to your back-end.
kushki.requestSecureServiceValidation({secureServiceId: "5e44449e-869b-4fed-bbca-e1bfa5af53c3", // Replace with the received secureIdotpValue: "155" // Replace with the OTP entered by the user}, (response) => {if(!response.code){console.log(response);// Submit the code to your back-end} else {console.error('Error: ',response.error, 'Code: ', response.code, 'Message: ',response.message);}});
Kushki.js Hosted Fields
If you need to validate the OTP code, you can use the onOTPValidation() method on your card instance. It is executed when a value is entered in the OTP field to validate the code. This method returns three callbacks (onSuccess, onError and onRequired), which will allow you to identify the status of the OTP validation in the hosted fields.
To implement OTP validation, first add a div container with id otp_id inside your application to display the field for entering the OTP value.
<!DOCTYPE html><html lang="en"><body>...<form><div id="cardholderName_id"></div>...<div id="otp_id"></div></form>...</body></html>
Second, you need to reference the otp_id container within your CardOptions instance.
import { IKushki, init, KushkiError } from "@kushki/js-sdk";import {CardOptions,ICard,initCardToken} from "@kushki/js-sdk/Card";const options : CardOptions = {amount: {iva: 1,subtotalIva: 10,subtotalIva0: 10},currency: "USD",fields: {cardholderName: {selector: "cardholderName_id"},...},otp: {selector: "otp_id"}}}
Finally, call the onOTPValidation() method which will indicate whether or not it is necessary to perform the validation through a callback (onSuccess, onError or onRequired). If validation is required, the field with the id otp_id will be displayed for the user to enter the required information.
try {cardInstance.onOTPValidation(() => {// On required callback, is executed when flow requestToken needs to validate OTP.console.log("You should implement logic to continue payment process.")},(error) => {// On error callback, is executed when OTP validation is incorrect. You will receive an error with code E008console.error("Catch error otp", error.code, error.message);},() => {// On success callback, is executed when OTP validation is successful.console.log("You should implement logic for continue charge process after validation OTP success")});} catch (error: any) {console.error("Catch error on onOTPValidation", error.code, error.message);}
Learn more about OTP validation with Kushki.js Hosted Fields.
2. Set up your Back-end
Please follow the instructions in our guide to accept card payments.
3. Test your Integration
You may use test cards in test mode to ensure that your integration is ready. Use them with any CVV and a future expiration date.
- Approved transaction:
5451951574925480 - Declined transaction during token request (front-end):
4574441215190335 - Declined transaction in OTP charge request (front-end):
4349003000047015 - OTP validation amount:
150
4. Prepare your Certification
Follow the guidelines described in our guide to accept card payments.
In addition to the guidelines described in the guide, if you are using Kushki.js, you also need to validate the following:
- There is a message explaining OTP.
- The OTP field appears when clicking on pay.
- The OTP field must be required.
- The OTP field only accepts numbers.
- The OTP field allows exactly 3 digits.
- Kushki’s logo must be visible for the customer. You can find our logo in several formats here.
 Colombia
 Ecuador
 Mexico
 Peru
Peru