Payment Distribution to Bank Accounts
Distribute payments to your customers' or vendor's bank accounts
Payment distribution by wire transfer consists of sending money to your customers’ accounts. In other words, if you have their bank details, you can use your Kushki distribution account and send the money to their accounts by wire transfer, using whatever logic you prefer.
This is ideal for:
- Payments for suppliers or sellers
- Marketplaces
- Delivery applications
Operation Details
The dispersion process in Chile is carried out through the following flow: Kushki > Bank > User.
| Parameter | Detail |
|---|---|
| Minimum amount per transaction | 1 CLP |
| Maximum amount per transaction | 7,000,000 CLP |
| Maximum amount per beneficiary | 80,000,000 CLP per day |
| Processing hours | 24/7 |
| Processing days | Monday to Sunday |
| Time to approve a transaction | Immediate (same bank and other banks) |
Flow
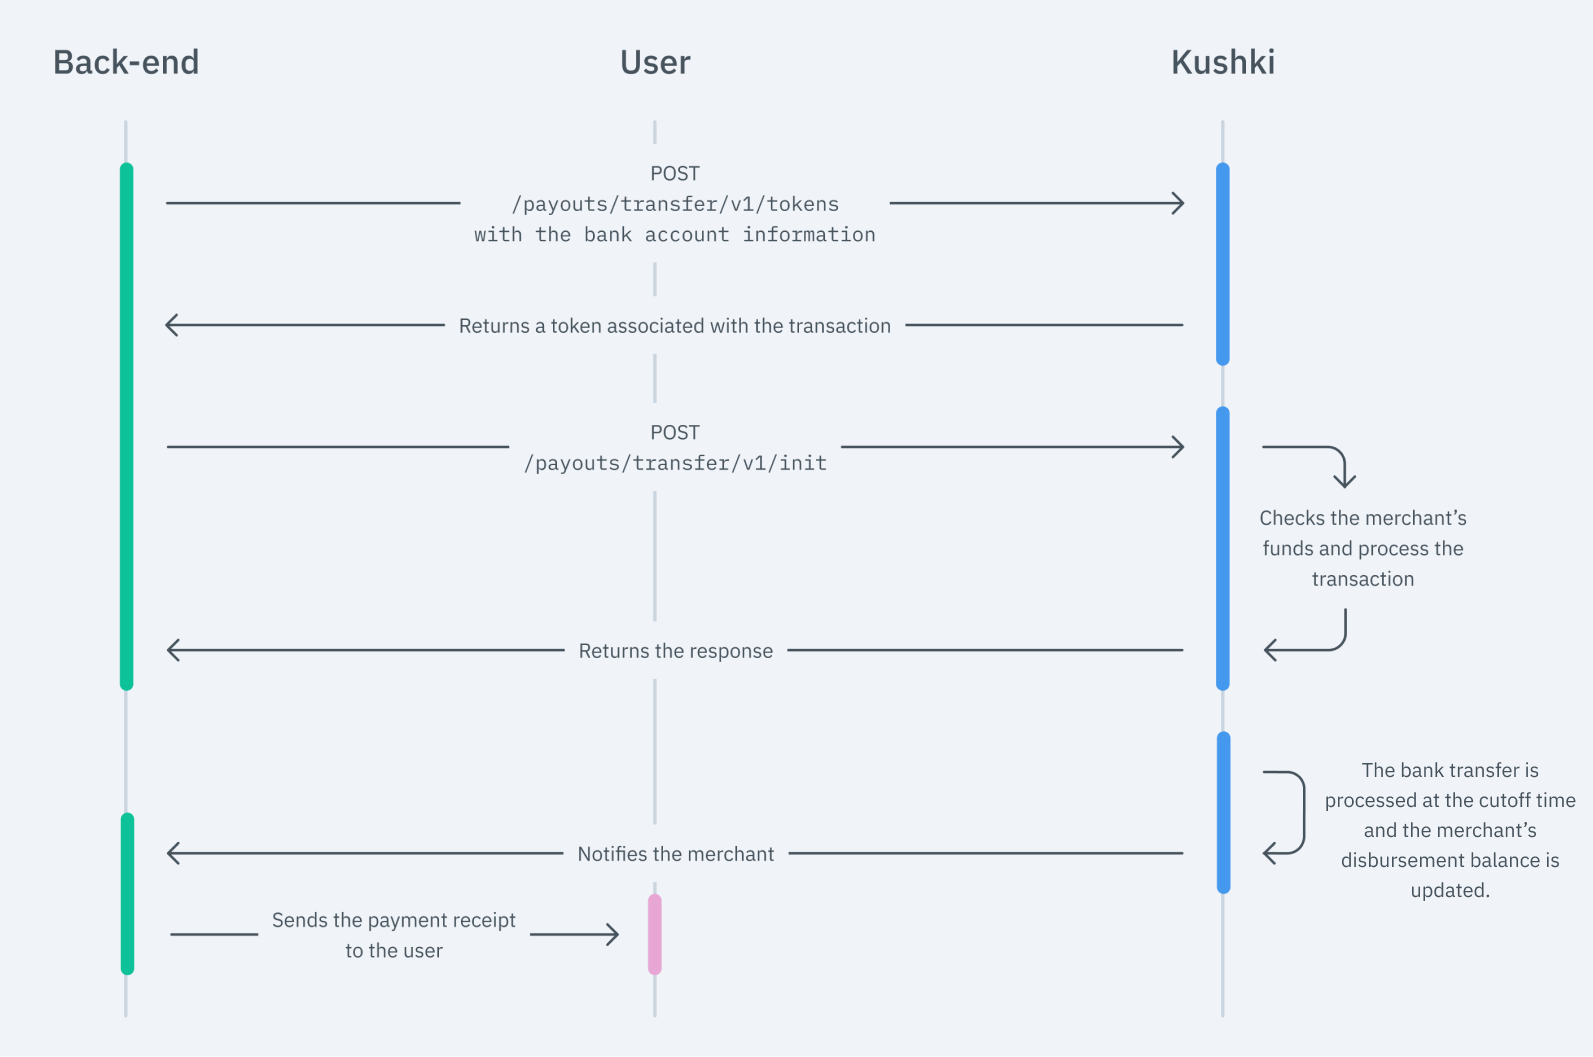
The flow that you will integrate is shown below:

Here you will learn how to integrate money distributions by wire transfer.
1. Obtain the list of partner banks
The first step is to check the list of banks available to make the wire transfer. To do so, you must use this endpoint, which will show you the banking institutions available to make the transaction.
- Javascript
- Python
- PHP
var request = require('request');var bankList = [];var options = {'method': 'GET','url': 'https://api-uat.kushkipagos.com/payouts/transfer/v1/bankList', // Test environment'headers': {'Public-Merchant-Id': '' // Replace with your Public Key}};request(options, function (error, response) {if (error) throw new Error(error);console.log(response.body);bankList = response.body;// Submit your code to filter the bank you need and send its id in token request});
import requestsurl = "https://api-uat.kushkipagos.com/payouts/transfer/v1/bankList" // Test environmentbankList = []payload = {}headers = {'Public-Merchant-Id': '' // Replace with your Public Key}response = requests.request("GET", url, headers=headers, data = payload)print(response.text.encode('utf8'))bankList = response.text// Submit your code to filter the bank you need and send its id in token request
$client = new http\Client;$request = new http\Client\Request;$request->setRequestUrl('https://api-uat.kushkipagos.com/payouts/transfer/v1/bankList'); // Test environment$request->setRequestMethod('GET');$request->setOptions(array());$request->setHeaders(array('Public-Merchant-Id' => '' // Replace with your Public Key));$client->enqueue($request)->send();$response = $client->getResponse();echo $response->getBody();bankList = $response->getBody();// Submit your code to filter the bank you need and send its id in token request
In response to this call, you will receive the name and code of the available banks. The latter must be sent in the transfer out token request.
2. Tokenize the information
After obtaining the bank code of the account where the transfer will be received, you have to request a token by using our transfer out token request endpoint.
- Javascript
- Python
- PHP
var request = require('request');var options = {'method': 'POST','url': 'https://api-uat.kushkipagos.com/payouts/transfer/v1/tokens', // Test environment'headers': {'Public-Merchant-Id': '', // Replace with you Public Key'Content-Type': 'application/json'},body: JSON.stringify({"name":"John Doe""documentNumber":"19885521","accountNumber":"06","accountType":"CA","bankId":"001","totalAmount":100,"documentType":"RUT","currency":"CLP","paymentDescription": "A short description of the payment"})};request(options, function (error, response) {if (error) throw new Error(error);console.log(response.body);// Submit your code to send the token you received to the next request});
import requestsurl = "https://api-uat.kushkipagos.com/payouts/transfer/v1/tokens" // Test enviromentpayload = "{\n \"name\": \"John Doe\",\n \"documentNumber\": \"19885521\",\n \"accountNumber\": \"06\",\n \"accountType\": \"CA\",\n \"bankId\": \"001\",\n \"totalAmount\": 100,\n \"documentType\": \"RUT\",\n \"currency\": \"CLP\",\n \"paymentDescription\": \"A short description of the payment\" \n}"headers = {'Public-Merchant-Id': '', // Replace with your Private Key'Content-Type': 'application/json'}response = requests.request("POST", url, headers=headers, data = payload)print(response.text.encode('utf8'))// Submit your code to send the token received to the next request
$client = new http\Client;$request = new http\Client\Request;$request->setRequestUrl('https://api-uat.kushkipagos.com/payouts/transfer/v1/tokens'); // Test environment$request->setRequestMethod('POST');$body = new http\Message\Body;$body->append('{"name": "John Doe""documentNumber": "19885521","accountNumber": "06","accountType": "CA","bankId": "001","totalAmount": 100,"documentType": "RUT","currency": "CLP""paymentDescription": "A short description of the payment"}');$request->setBody($body);$request->setOptions(array());$request->setHeaders(array('Public-Merchant-Id' => '', // Replace with your Public Key'Content-Type' => 'application/json'));$client->enqueue($request)->send();$response = $client->getResponse();echo $response->getBody();// Submit your code to send the token received to the next request
3. Initialize the transaction
In this step, you should have obtained a token, and then you will be able to start the distribution process with Kushki. You will need to make a call to our initialization endpoint to process the payment.
- Javascript
- Python
- PHP
var request = require('request');var options = {'method': 'POST','url': 'https://api-uat.kushkipagos.com/payouts/transfer/v1/init', // Test environment'headers': {'Private-Merchant-Id': '', // Replace with your Private Key'Content-Type': 'application/json'},body: JSON.stringify({"amount":{"subtotalIva":0,"subtotalIva0":100,"iva":0},"token":"53de1cb6bbb54011a0a98053d48677e0" // Replace with the token you received})};request(options, function (error, response) {if (error) throw new Error(error);console.log(response.body);});
import requestsurl = "https://api-uat.kushkipagos.com/payouts/transfer/v1/init" // Test environmentpayload = "{\n \"amount\": {\n \"subtotalIva\": 0,\n \"subtotalIva0\": 100,\n \"iva\": 0\n },\n \"token\": \"53de1cb6bbb54011a0a98053d48677e0\"\n}" // Replace with the token you receivedheaders = {'Private-Merchant-Id': '', // Replace with your Private Key'Content-Type': 'application/json'}response = requests.request("POST", url, headers=headers, data = payload)print(response.text.encode('utf8'))
$client = new http\Client;$request = new http\Client\Request;$request->setRequestUrl('https://api-uat.kushkipagos.com/payouts/transfer/v1/init'); // Test environment$request->setRequestMethod('POST');$body = new http\Message\Body;$body->append('{"amount": {"subtotalIva": 0,"subtotalIva0": 100,"iva": 0},"token": "53de1cb6bbb54011a0a98053d48677e0" // Replace with the token you received}');$request->setBody($body);$request->setOptions(array());$request->setHeaders(array('Private-Merchant-Id' => '', // Replace with your Private Key'Content-Type' => 'application/json'));$client->enqueue($request)->send();$response = $client->getResponse();echo $response->getBody();
In the response, a ticket number and a status are issued for the transaction.
4. Track the transaction status (optional)
Now that the transfer is close to being processed, you can check the transaction status via webhooks or manually, by using our API.
Webhook
The transaction status is automatically notified when the money has been deposited in the bank account.
API
In our API, you can use our Get Status endpoint to manually track the status of a specific transaction.
5. Test your integration
There are test ID numbers that you can use in the UAT environment to ensure that your integration is ready.
Approved transaction
- Account number:
1200000000 - Identification number:
19.998.005-K - Identification type:
RUT - Account type:
CA,CCoCV
6. Prepare your certification
Read the following guidelines for technical certification approval (required to obtain productive account credentials):
- Display messages on screen according to Kushki’s answers.
- Save and log all Kushki responses (required in case support is needed).
- If webhook notifications are received successfully, respond to the request with a status 200.
- Make sure that in the body of the request all the fields required in the API reference are included.
Accept webhooks
Handle postpaid events the right way.
 Colombia
 Ecuador
 Mexico
 Peru
Peru