Shopify
Accept payments for your e-commerce in Shopify. Kushki offers a plugin that you can install on your website, simplifying the purchase process for your customers.
Shopify is an e-commerce platform that allows you to build your online store from scratch. You will be able to promote, sell, and send your products, without the need to write a single line of code or have experience developing webs. It is ideal for small and large merchants, since it has tools that will help you scale your merchant. Shopify is currently used by thousands of stores around the world, and it is available in 50 different languages.
For these reasons, Kushki sought to integrate their payment methods by creating a plugin that allows secure and easy payments, and it is available in several countries. The installation and administration details will be found below.
| Supported ✅ | Not supported ❌ |
|---|---|
| Credit and debit card payments | Recurring charges (Scheduled or One-Click Payments) |
| Authorization and capture | |
| Cash payments | |
| Transfers | |
| OTP and 3DS authentication | |
| Sift Science anti-fraud engine | |
| Full and partial refunds | |
| Same-day, partial or total cancellations in local currency |
Minimum requirements
To make the integration and configuration process of the Kushki plugin in your Shopify store, your merchant must meet the following requirements:
Once your merchant is certified by the Kushki team, your merchant must have a Kushki production account, with which the Public API Key and Private API Key will be generated. The access to this account will be provided by our Onboarding team.
You must have a master user in the Kushki console, with which you will be able to manage the features and configurations according to the commercial agreement established between your merchant and Kushki. To request it, contact your assigned sales executive.
Remember to activate and configure the Payment button (webcheckout) service with Kushki, to ensure that the Shopify plugin works.
You must have previously created an account with Shopify. In case you don’t have one, access to the Shopify Help Center to create it and generate your domain.
Installation and configuration
Once you have your store configured in Shopify and have a production account on Kushki, do the following:
- Login to your merchant console with your username and password.
- In the side menu, select Settings.
- In Integrations, choose the option Plugins.
- Select Shopify. The screen where you will be able to Configure the content and style of your form will be displayed.
- Enter the Domain assigned by Shopify and click on the Save button.
- Once you save your domain, the information of the Public API Key and the Private API Key associated with your merchant will appear. You can click on the Copy button to add this information to the clipboard.
- In the add a Kushki App in Shopify option, click on the word Here and the system will redirect you to the Shopify Installation Page.
- Click on the Add App button.
- Enter your Email on the Shopify login screen.
- Click “Continuar con el correo electrónico”.
- Enter your Password and click “Iniciar sesión”.
- Enter the Authentication Code you received on your mobile device.
- Click on “Iniciar sesión”.
- Choose Your Store.
- Choose your Account.
- The settings for installing the Kushki plugin will open by default. Click on Install App.
- A window will appear in wich you must enter the credentials. Paste the credentials for the Public Key and Personal Key (Private Key) that you copied in the step 6 of this section.
- Click “Enviar datos”.
- Click on “Ir a Configuración”.
- The system will redirect you to the Settings. In the Payments section, click Add payment methods.
- In Search by provider, search theKushki connector and click Activate.
- Check/uncheck the Card Franchises you want to accept in your merchant.
- Check if the store is active in test mode. Node that the Enable test mode option must be unchecked; otherwise, please disable it and click Save.
- Click the Activate Kushki button, and you will see the Kushki Activated message.
Configuration of the customer contact method and the currency to be transacted
- In the side menu, select Checkout.
- In Customer contact method, verify that the Email box is selected. Otherwise, select this option.
- Click Save. The following message will appear: Settings saved.
- To set up the currency, in the side menu select Store details.
- In Store Currency, choose the currency you’re transacting with and select Save.
Kushki will be enabled for you to receive payments from your customers in your Shopify store.
This is what the payment experience with the Kushki plugin will look like in your Shopify store:
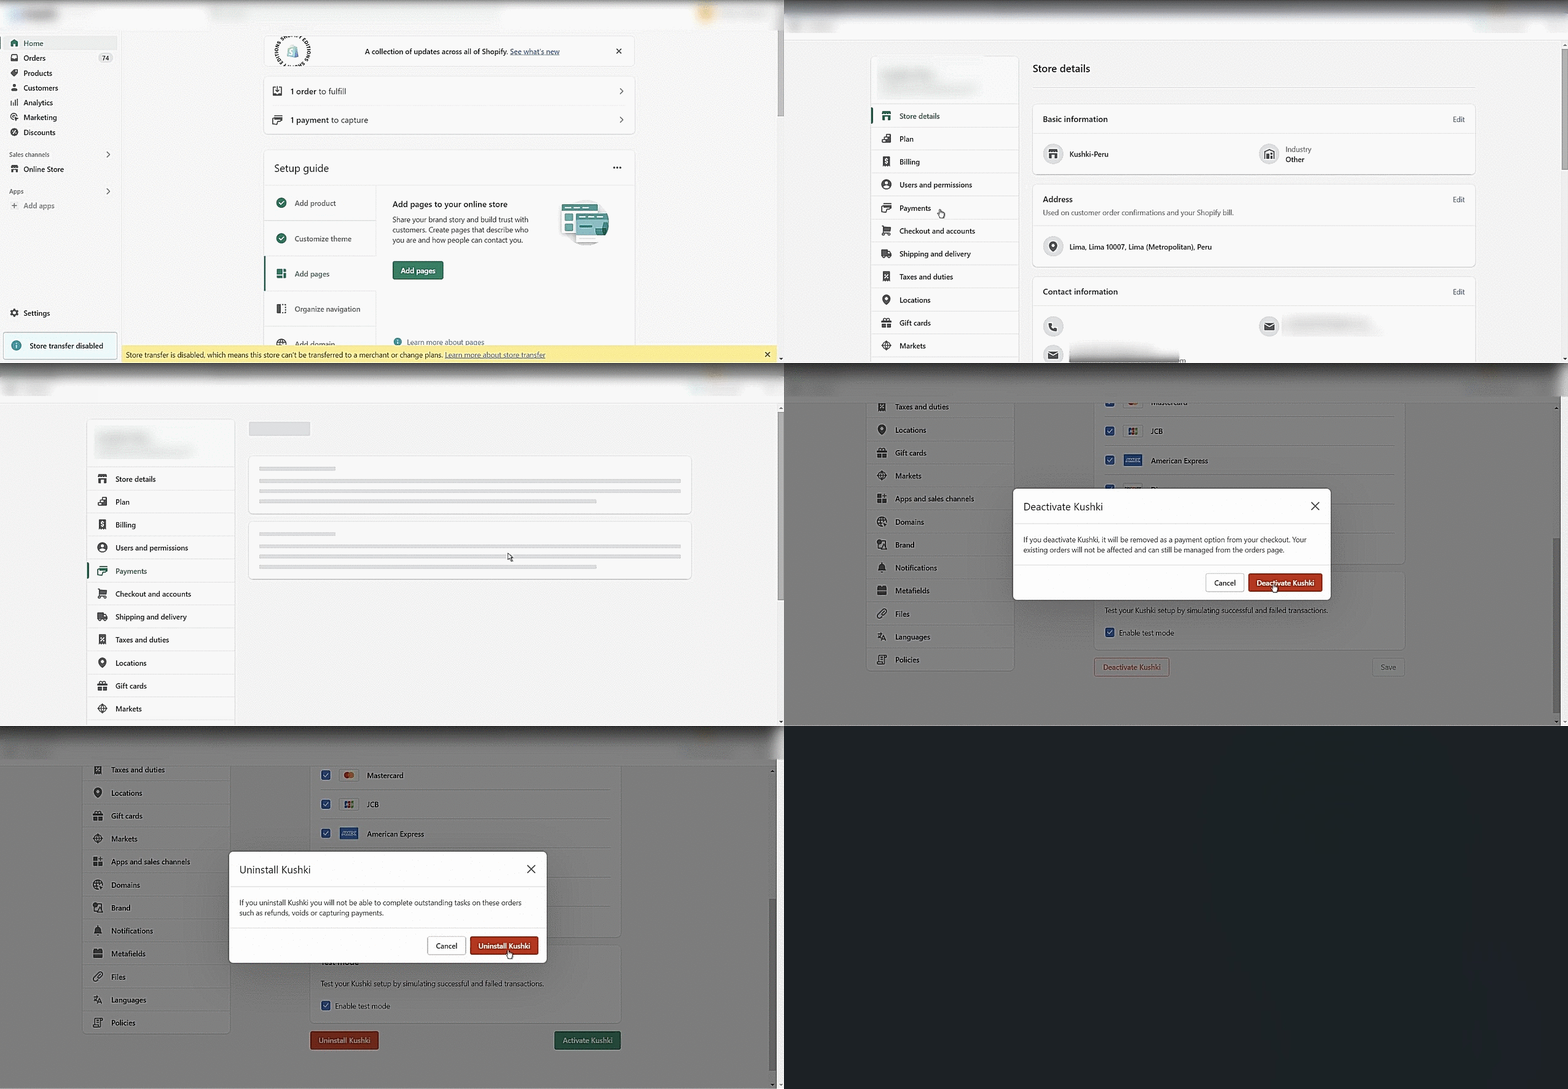
Uninstallation
- Sign in to your Shopify Console.
- Go to Settings > Payments, in the Supported payment methods section find Kushki and select Manage, and a new window will immediately open.
- Click the Deactivate Kushki button at the bottom of the window.
- A confirmation window will appear, click the Deactivate Kushki button to confirm. Once this is done, the following message will be displayed: Kushki deactivated.
- Click Uninstall Kushki to remove the Kushki plugin.
- A confirmation message will appear, click the Uninstall Kushki button to confirm. Once this is done, the system will display the following message: Kushki uninstalled.
The following GIF will guide you through the plugin uninstall process:

 Chile
Chile Ecuador
 Mexico
 Peru
Peru