Distribute Payments in Cash
Distribute payments in cash from your platform
Distributing cash payments means delivering money physically to your customers or assistants. In other words, imagine that you offer a service or a product and to deliver it, you need the help of a third party, who will charge you for this service. The money paid for the service provided by a third party through this method of payment distribution makes this process easier, because by using a reference, the service provider goes to his/her nearest cash point and withdraws the money.
This is ideal for:
- Payments for suppliers or sellers
- Marketplaces
- Delivery applications
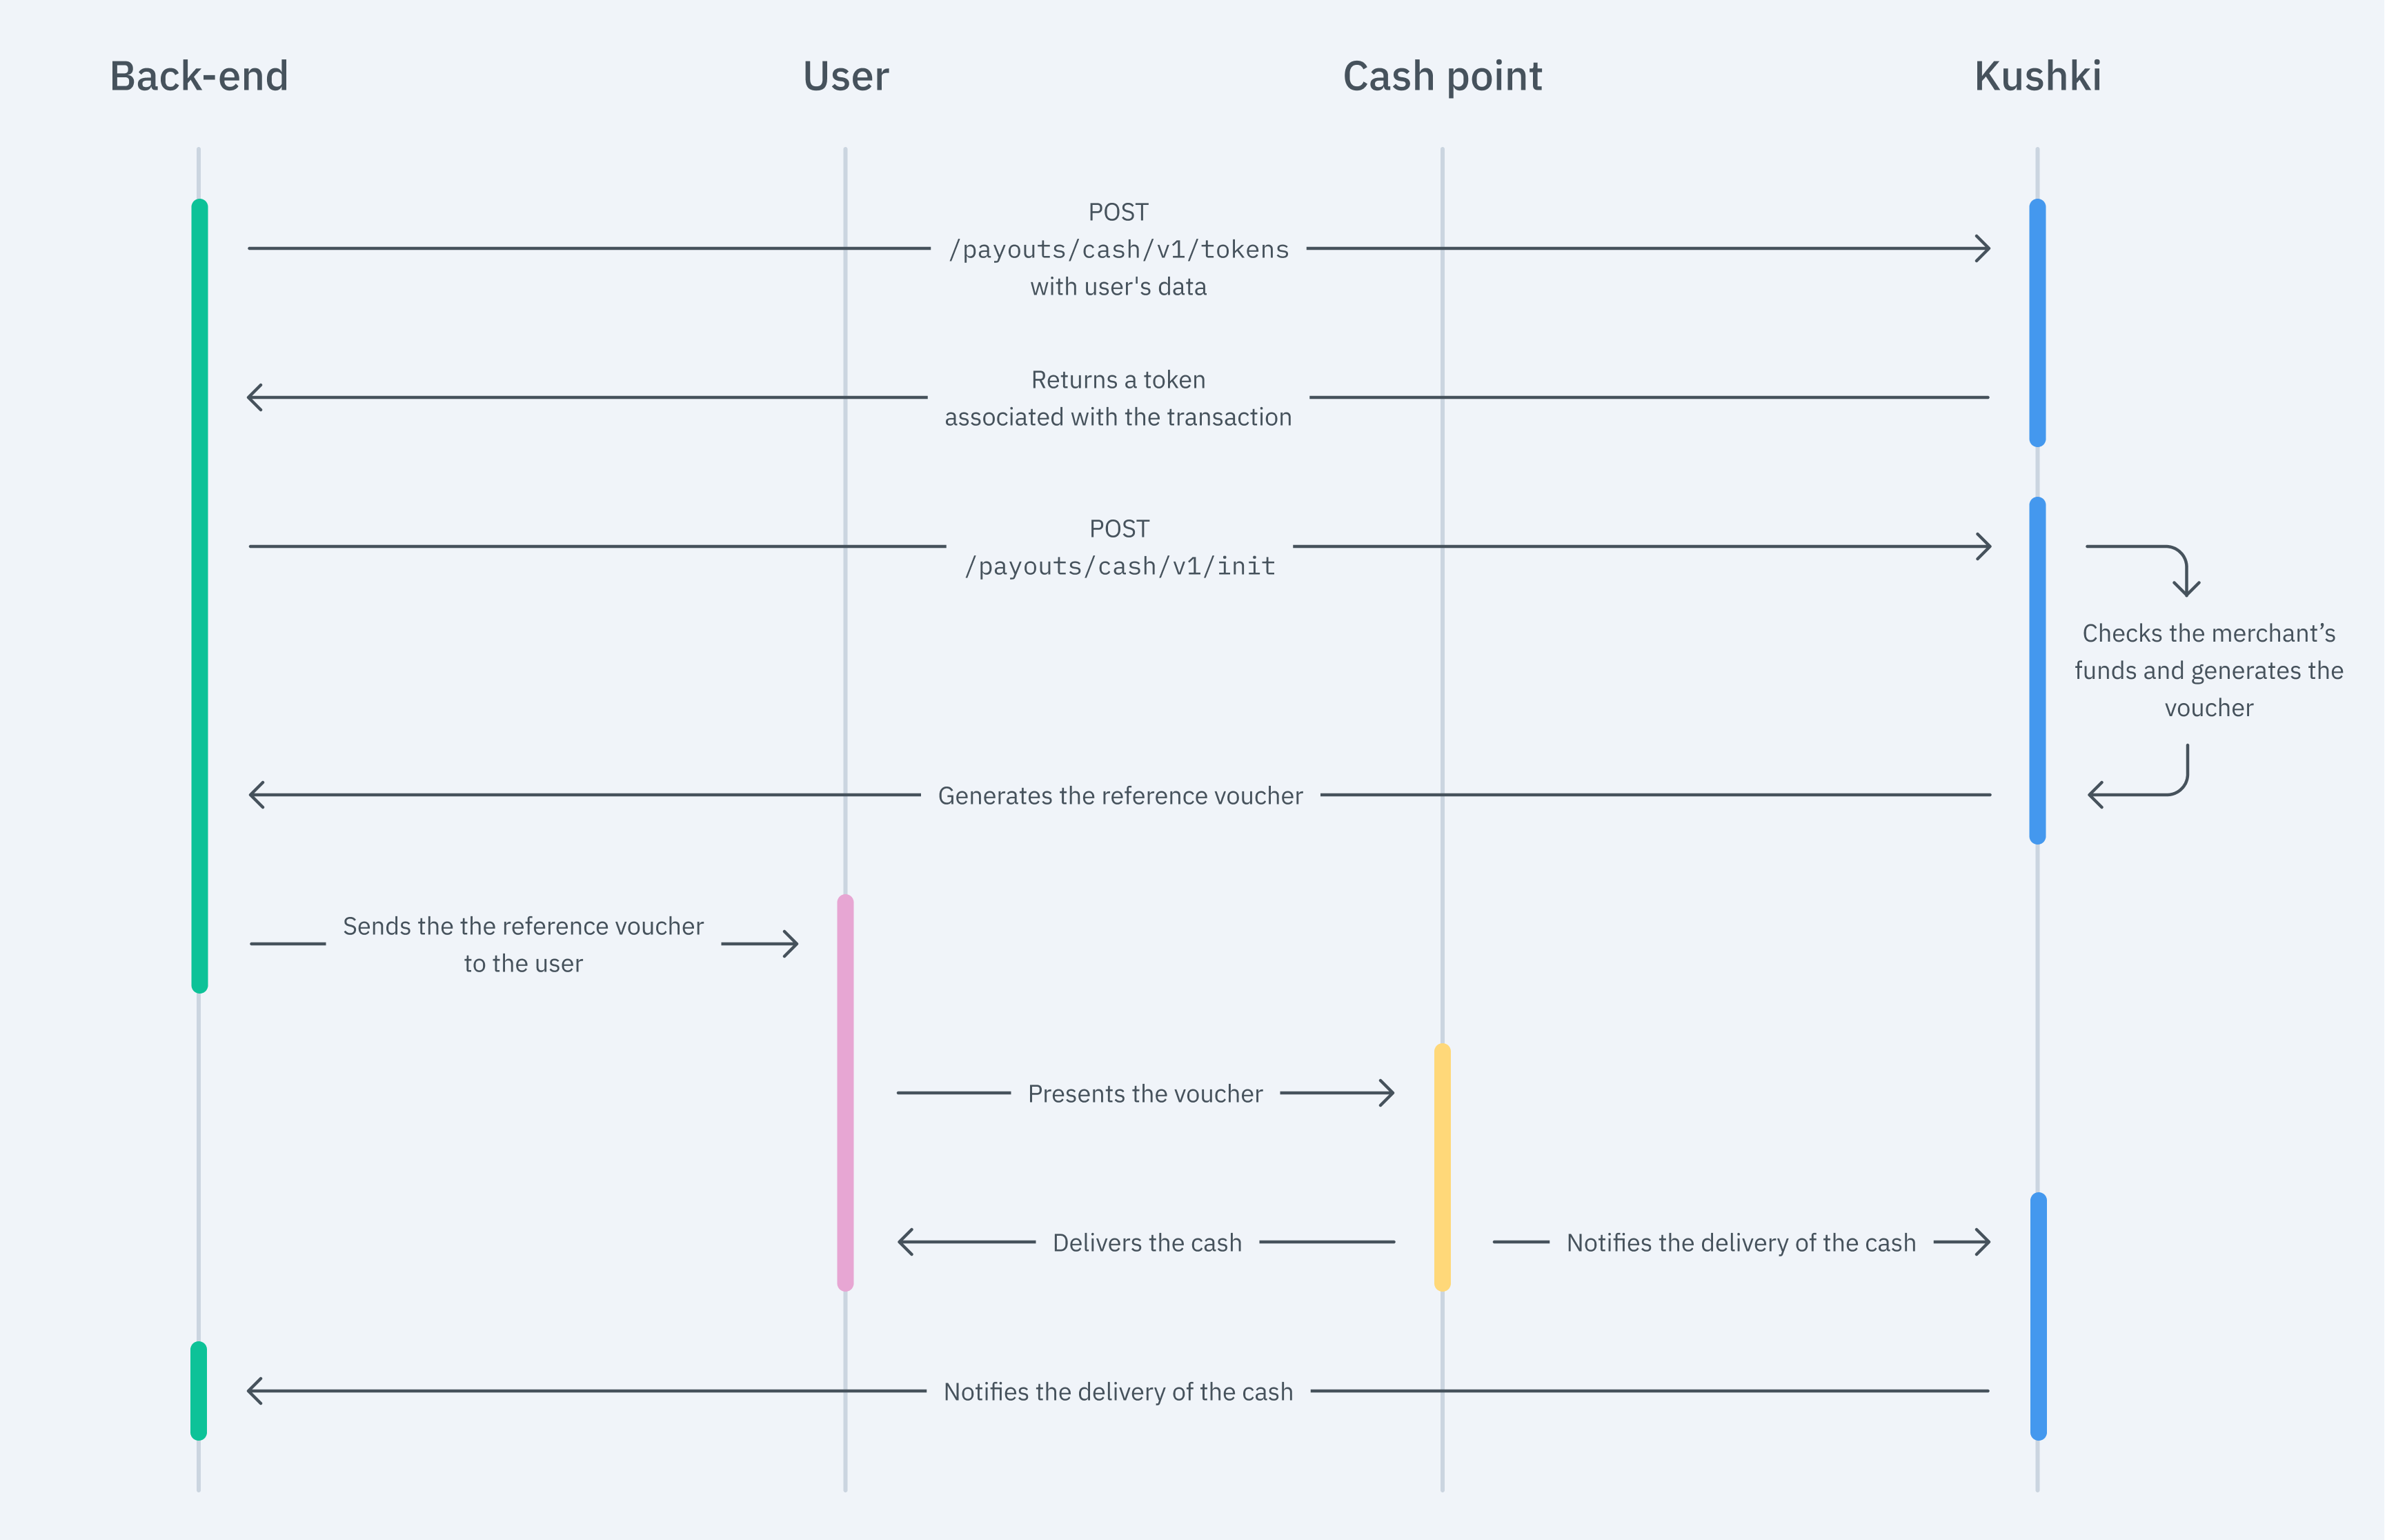
The flow that you will integrate is shown below:

To issue a payment reference through Kushki, so that customers can withdraw their money, simply capture the user’s data, create a token and submit the information to Kushki in order to be processed.
1. Tokenize Data
In this step, it is essential to collect the user’s data safely and generate a token for that information. You have to make a call to our tokenization endpoint.
- Javascript
- Python
- PHP
var request = require('request');var options = {'method': 'POST','url': 'https://api-uat.kushkipagos.com/payouts/cash/v1/tokens',// Test environment'headers': {'Content-Type': 'application/json','Public-Merchant-Id': '' //Replace with your Public Key},'body': JSON.stringify({"name":"Juan Carlos","lastName":"Castro Gómez","documentType":"CC","documentNumber":"123456789","currency":"COP","totalAmount":499999,"email":"test@kushkipagos.com","description":"A short description of the payment"})};request(options, function (error, response) {if (error) throw new Error(error);console.log(response.body);// Submit your code to send the init request});
import requestsurl = "https://api-uat.kushkipagos.com/payouts/cash/v1/tokens" // Test environmentpayload = "{\n\t\"name\": \"Juan Carlos\",\n\t\"lastName\": \"Castro Gómez\",\n\t\"documentType\": \"CC\",\n\t\"documentNumber\": \"123456789\",\n\t\"currency\": \"COP\",\n\t\"totalAmount\": 499999,\n \"email\":\"test@kushkipagos.com\",\n \"description\": \"A short description of the payment\"\n}"headers = {'Content-Type': 'application/json','Public-Merchant-Id': '' //Replace with your Public Key}response = requests.request("POST", url, headers=headers, data = payload)print(response.text)// Submit your code to send the init request
$client = new http\Client;$request = new http\Client\Request;$request->setRequestUrl('https://api-uat.kushkipagos.com/payouts/cash/v1/tokens'); // Test environment$request->setRequestMethod('POST');$body = new http\Message\Body;$body->append('{"name": "Juan Carlos","lastName": "Castro Gómez","documentType": "CC","documentNumber": "123456789","currency": "COP","totalAmount": 499999,"email":"test@kushkipagos.com","description": "A short description of the payment"}');$request->setBody($body);$request->setOptions(array());$request->setHeaders(array('Content-Type' => 'application/json','Public-Merchant-Id' => '' //Replace with your Public Key));$client->enqueue($request)->send();$response = $client->getResponse();echo $response->getBody();// Submit your code to send the init request
2. Initialize the Transaction
Now, you need to use the token obtained to start the payment distribution process with Kushki. With this token, you simply must make a call to our initialization endpoint.
- Javascript
- Python
- PHP
var request = require('request');var options = {'method': 'POST','url': 'https://api-uat.kushkipagos.com/payouts/cash/v1/init', // Test environment'headers': {'Private-Merchant-Id': '', // Replace with your Private Key'Content-Type': 'application/json'},'body': JSON.stringify({"token":"7afad32f69584c8ebafdea76e128f563", // Replace with the token you recieved"amount":{"subtotalIva":0,"subtotalIva0":49.99,"iva":0}})};request(options, function (error, response) {if (error) throw new Error(error);console.log(response.body);// Submit your code to show the receipt});
import requestsurl = "https://api-uat.kushkipagos.com/payouts/cash/v1/init" // Test environmentpayload = "{\n\"token\": \"7afad32f69584c8ebafdea76e128f563\",\n\"amount\": {\n\"subtotalIva\": 0,\n\"subtotalIva0\": 49.99,\n\"iva\": 0\n }\n}"headers = {'Private-Merchant-Id': '', // Replace with your Private Key'Content-Type': 'application/json'}response = requests.request("POST", url, headers=headers, data = payload)print(response.text)// Submit your code to show the receipt
$client = new http\Client;$request = new http\Client\Request;$request->setRequestUrl('https://api-uat.kushkipagos.com/payouts/cash/v1/init'); // Test environment$request->setRequestMethod('POST');$body = new http\Message\Body;$body->append('{"token": "7afad32f69584c8ebafdea76e128f563","amount": {"subtotalIva": 0,"subtotalIva0": 49.99,"iva": 0}}');$request->setBody($body);$request->setOptions(array());$request->setHeaders(array('Private-Merchant-Id' => '', // Replace with your Private Key'Content-Type' => 'application/json'));$client->enqueue($request)->send();$response = $client->getResponse();echo $response->getBody();
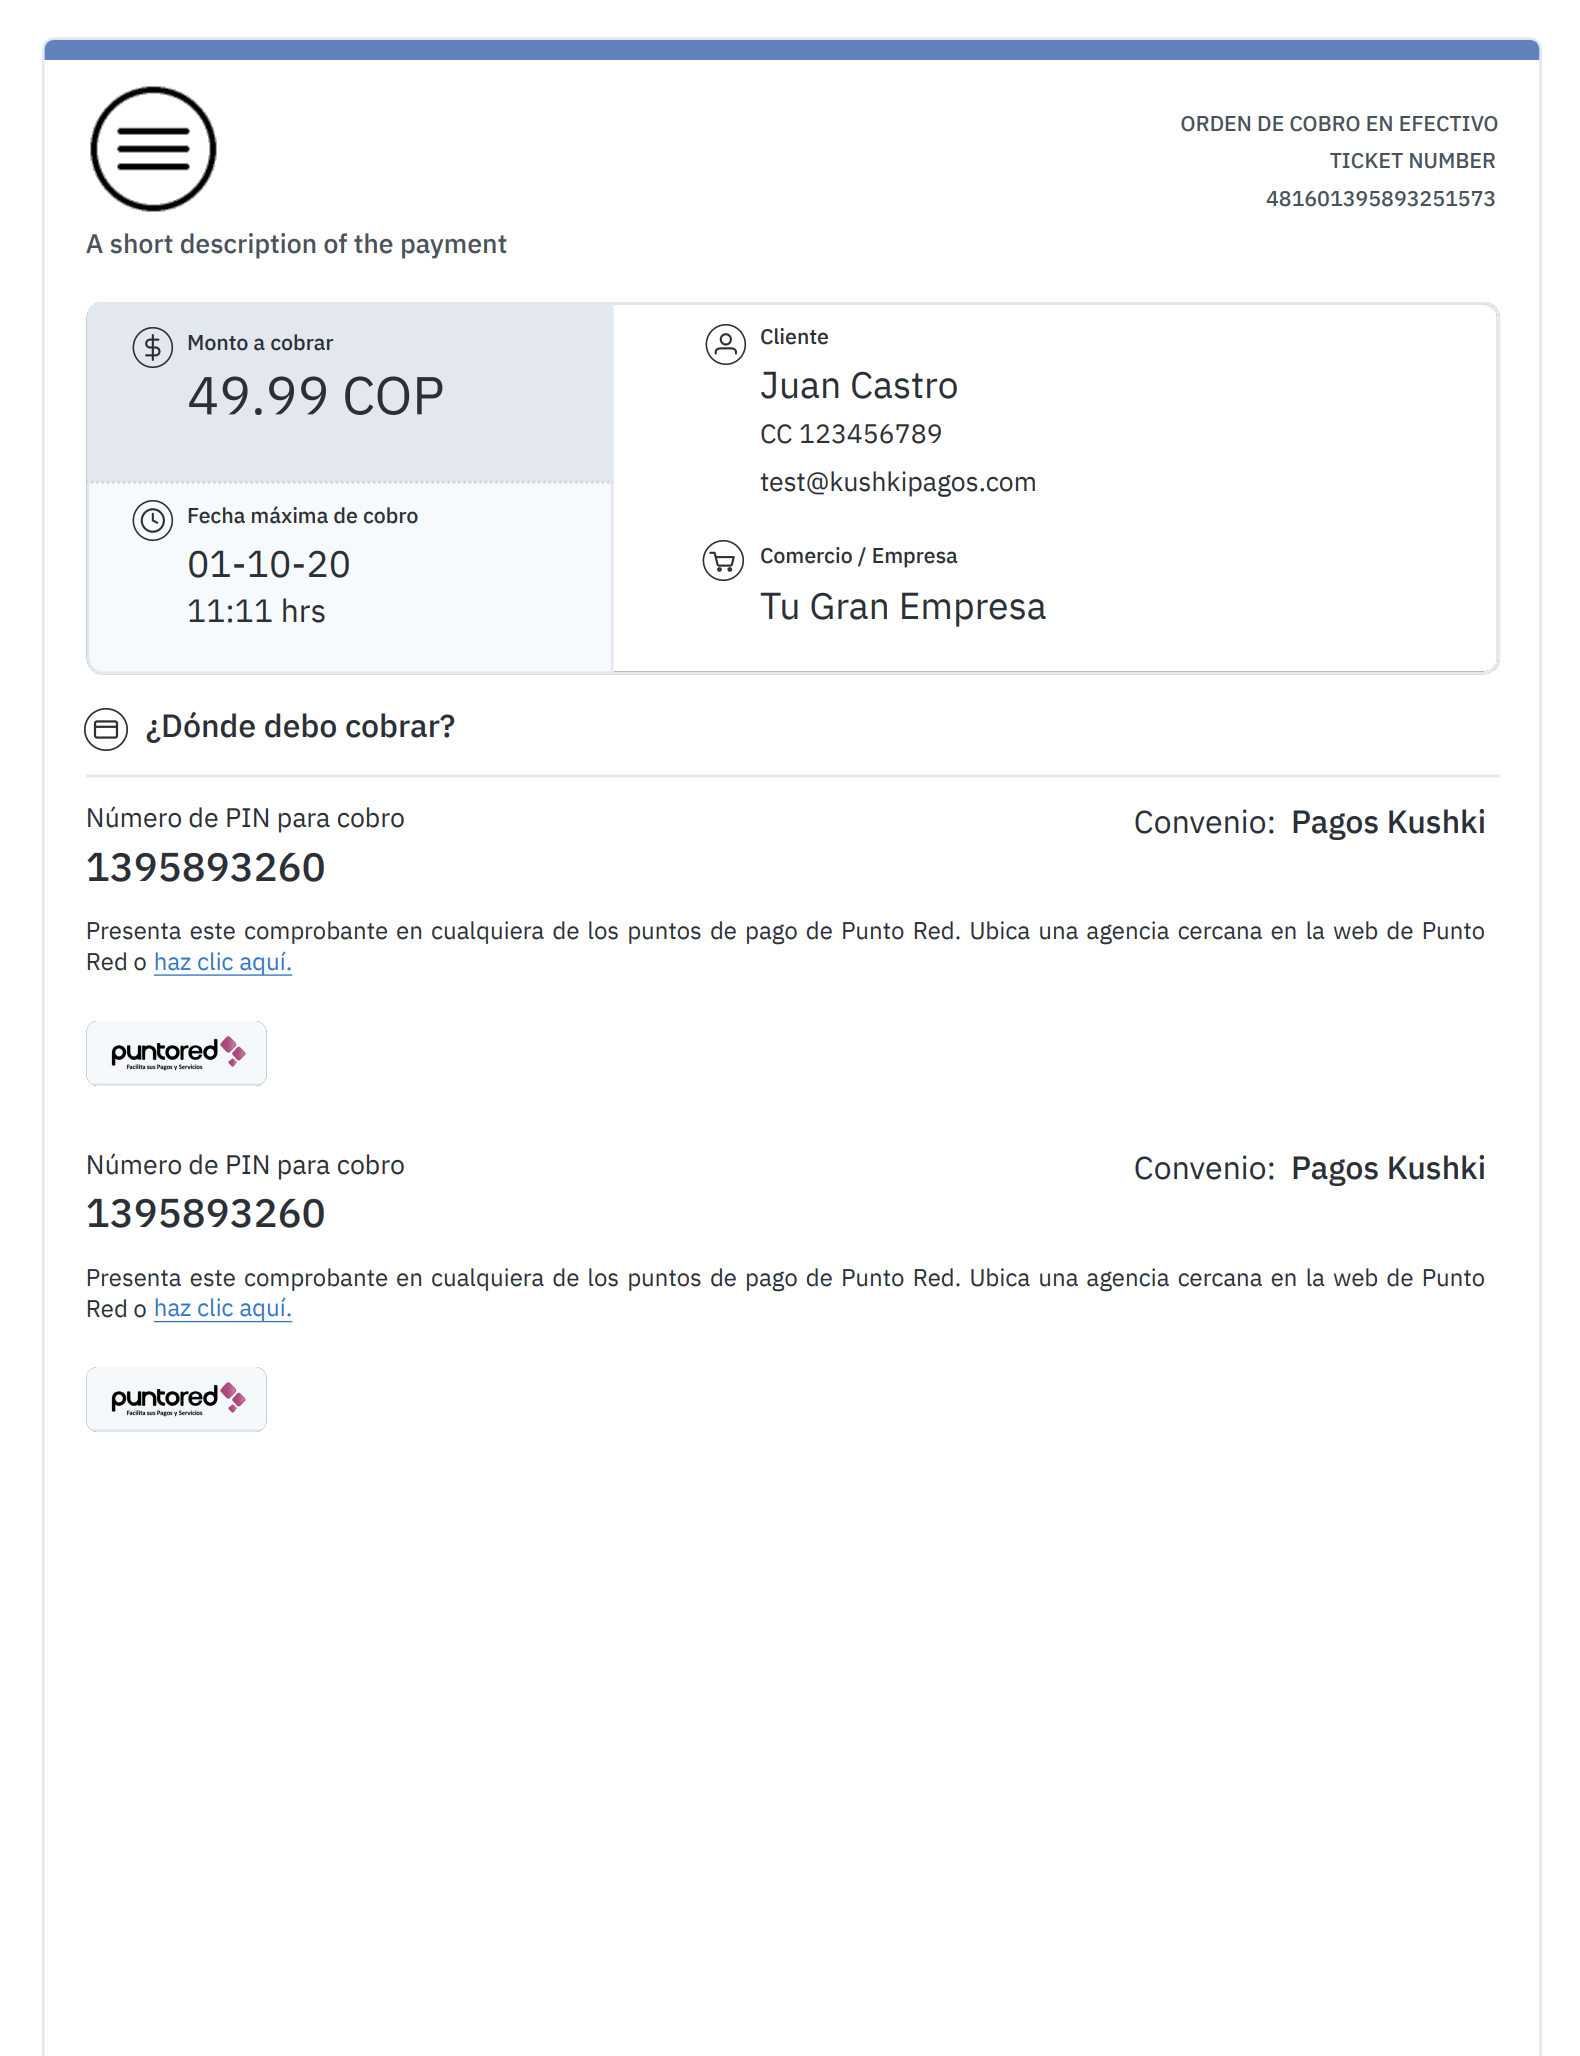
The response delivers a reference voucher that users can show at the nearest, or their preferred cash point, and withdraw their money.
We show you an example below:

Additionally, the data you need to generate a voucher using your design is also delivered.
3. Check the Transaction Status (Optional)
Now that a voucher has been generated for the user to withdraw his/her money, you can track the transaction status either via Webhooks or manually, by using our API.
Webhooks
The transaction status is automatically notified at the time when the money has been withdrawn.
API
You can use our Get Transaction Status, at our API to manually track the status of a specific transaction.
4. Test your Integration
You may use a test identification document in test mode to ensure that your integration is ready.
- Approved transaction:
123456789
5. Prepare your Certification
Read the following guidelines for technical certification approval (required to obtain productive account credentials):
- Tax calculations must be correct.
- Messages displayed on the screen should be aligned with Kushki’s responses.
- Save and record all the responses delivered by Kushki (required if you need support).
- If there’s no requirement for sending a reference voucher to the customer’s mail, you don’t need to specify an email address in the token request.
- If webhook notifications are received correctly, respond to the request with a status 200.
- The payment button must be disabled after the first click.
- Kushki’s logo is visible. You may download these resources in this link.
- Make sure that in the body of the request all the fields required in the API Reference are included.
If you design your own voucher, also consider the following:
- The pin must be visible.
- The agreement number must be visible. (only if the Init response contains it).
- The voucher expiry date must be visible.
- Cash points where the pin can be used to withdraw the money must be visible.
- The total amount is visible.
Front End Solutions (Optional)
Kushki also provides optional tools so that you can use to display a withdrawal form in your front end, optimizing the tokenization process. For example, this is useful when you don’t want or don’t need to save the transaction data of the users. We offer you two solutions for data tokenization: Cajita and _Kushki.js__
Cajita
Use Cajita to simplify your integration and provide a ready-to-use solution to collect user data safely.
Set up Cajita
Embed kushki-checkout.js script in your payment page by adding it to the <head> of your HTML file. Always download kushki-checkout directly from cdn.kushkipagos.com to keep kushki-checkout.js always downloaded directly from cdn.kushkipagos.com. Never embed a script in a bundle or a package, nor host a copy of it.
<head><title>Checkout</title><script src="https://cdn.kushkipagos.com/kushki-checkout.js"> </script></head>
Add Cajita to your Website
Cajita needs a place to live on your page. Enter the following code in your site’s <body>, where you want the payment form to be displayed.
<form id="payment-form" action="/confirm" method="post"><input type="hidden" name="cart_id" value="123"></form>
Remember to configure the action in the action form, according to the corresponding endpoint in your back end.
Then, add the following script tag. Make sure that the form has been uploaded.
<script type="text/javascript">var kushki = new KushkiCheckout({form: "<form-id-where-included-cajita>",merchant_id: "<public-merchant-id>",amount: 49.99,currency: "COP",payment_methods:["payouts_cash"] , // Payment Methods enabledinTestEnvironment: true});</script>
This will create a pre-designed form on your website to accept payments.
Kushki.js
Use Kushki.js if you need more control over the “look & feel” or appearance of your payment form.
Set up Kushki.js
Option 1 - CDN
Use the following script tag at the end of the <body> of your payment page.
<script src="https://cdn.kushkipagos.com/kushki.min.js"></script>
Option 2 - npm
Install the package from npm.
npm install --save @kushki/js
Then import it in your code using the following code.
import { Kushki } from “@kushki/js”;
Set up Kushki Object.
Add the following code to your application
const kushki = new Kushki({merchantId: 'public-merchant-id', // Your public merchant idinTestEnvironment: true,});
Collect User Information and Send it to your Back End
First, embed the form in your payment page adding the required fields. You can design it in the way that best suits you.
For example:
<form id="payment-form"><input placeholder="First name" type="text" name="first_name"><input placeholder="Last name" type="text" name="last_name"><select name="Document type name="document_type"><option value="CC">CC</option></select><input placeholder="Document number" type="text" name="document_number"><input placeholder="Email" type="text" name="email"><input placeholder="Phone number" type="text" name="phone_number"><input placeholder="Description" type="text" name="description"><button id="submit">Pay $49.99</button></form>
Then, for the moment when the user submits the form, add a token request and send it to your back end.
kushki.requestPayoutsCashToken({currency: "COP",description: "test",documentNumber: "123456789",documentType: "CC",email: "test@kushkipagos.com",lastName: "Juan",name: "Castro",phoneNumber: "0987654321",totalAmount: 49.99}, (response) => {if(!response.code){console.log(response);// Submit your code to your back-end} else {console.error('Error: ',response.error, 'Code: ', response.code, 'Message: ',response.message);}});
Manage your payment distributions
Modify or remove your payment distribution transactions.
Distribute payments by wire transfers
Distribute payments safely by wire transfers.
 Chile
Chile Ecuador
 Mexico
 Peru
Peru