Receive Wire Transfers
Your customers will be able to use the balance in their bank account to make purchases on your website or application
Allow your customers to use the available balance in their bank account to purchase your products or services from your website via a PSE or PSE Avanza. To do so, you must enable the list of banks available in Colombia, obtain the basic data of your paying customers and redirect them to the website of their virtual bank branch to authorize the debit to their bank account.
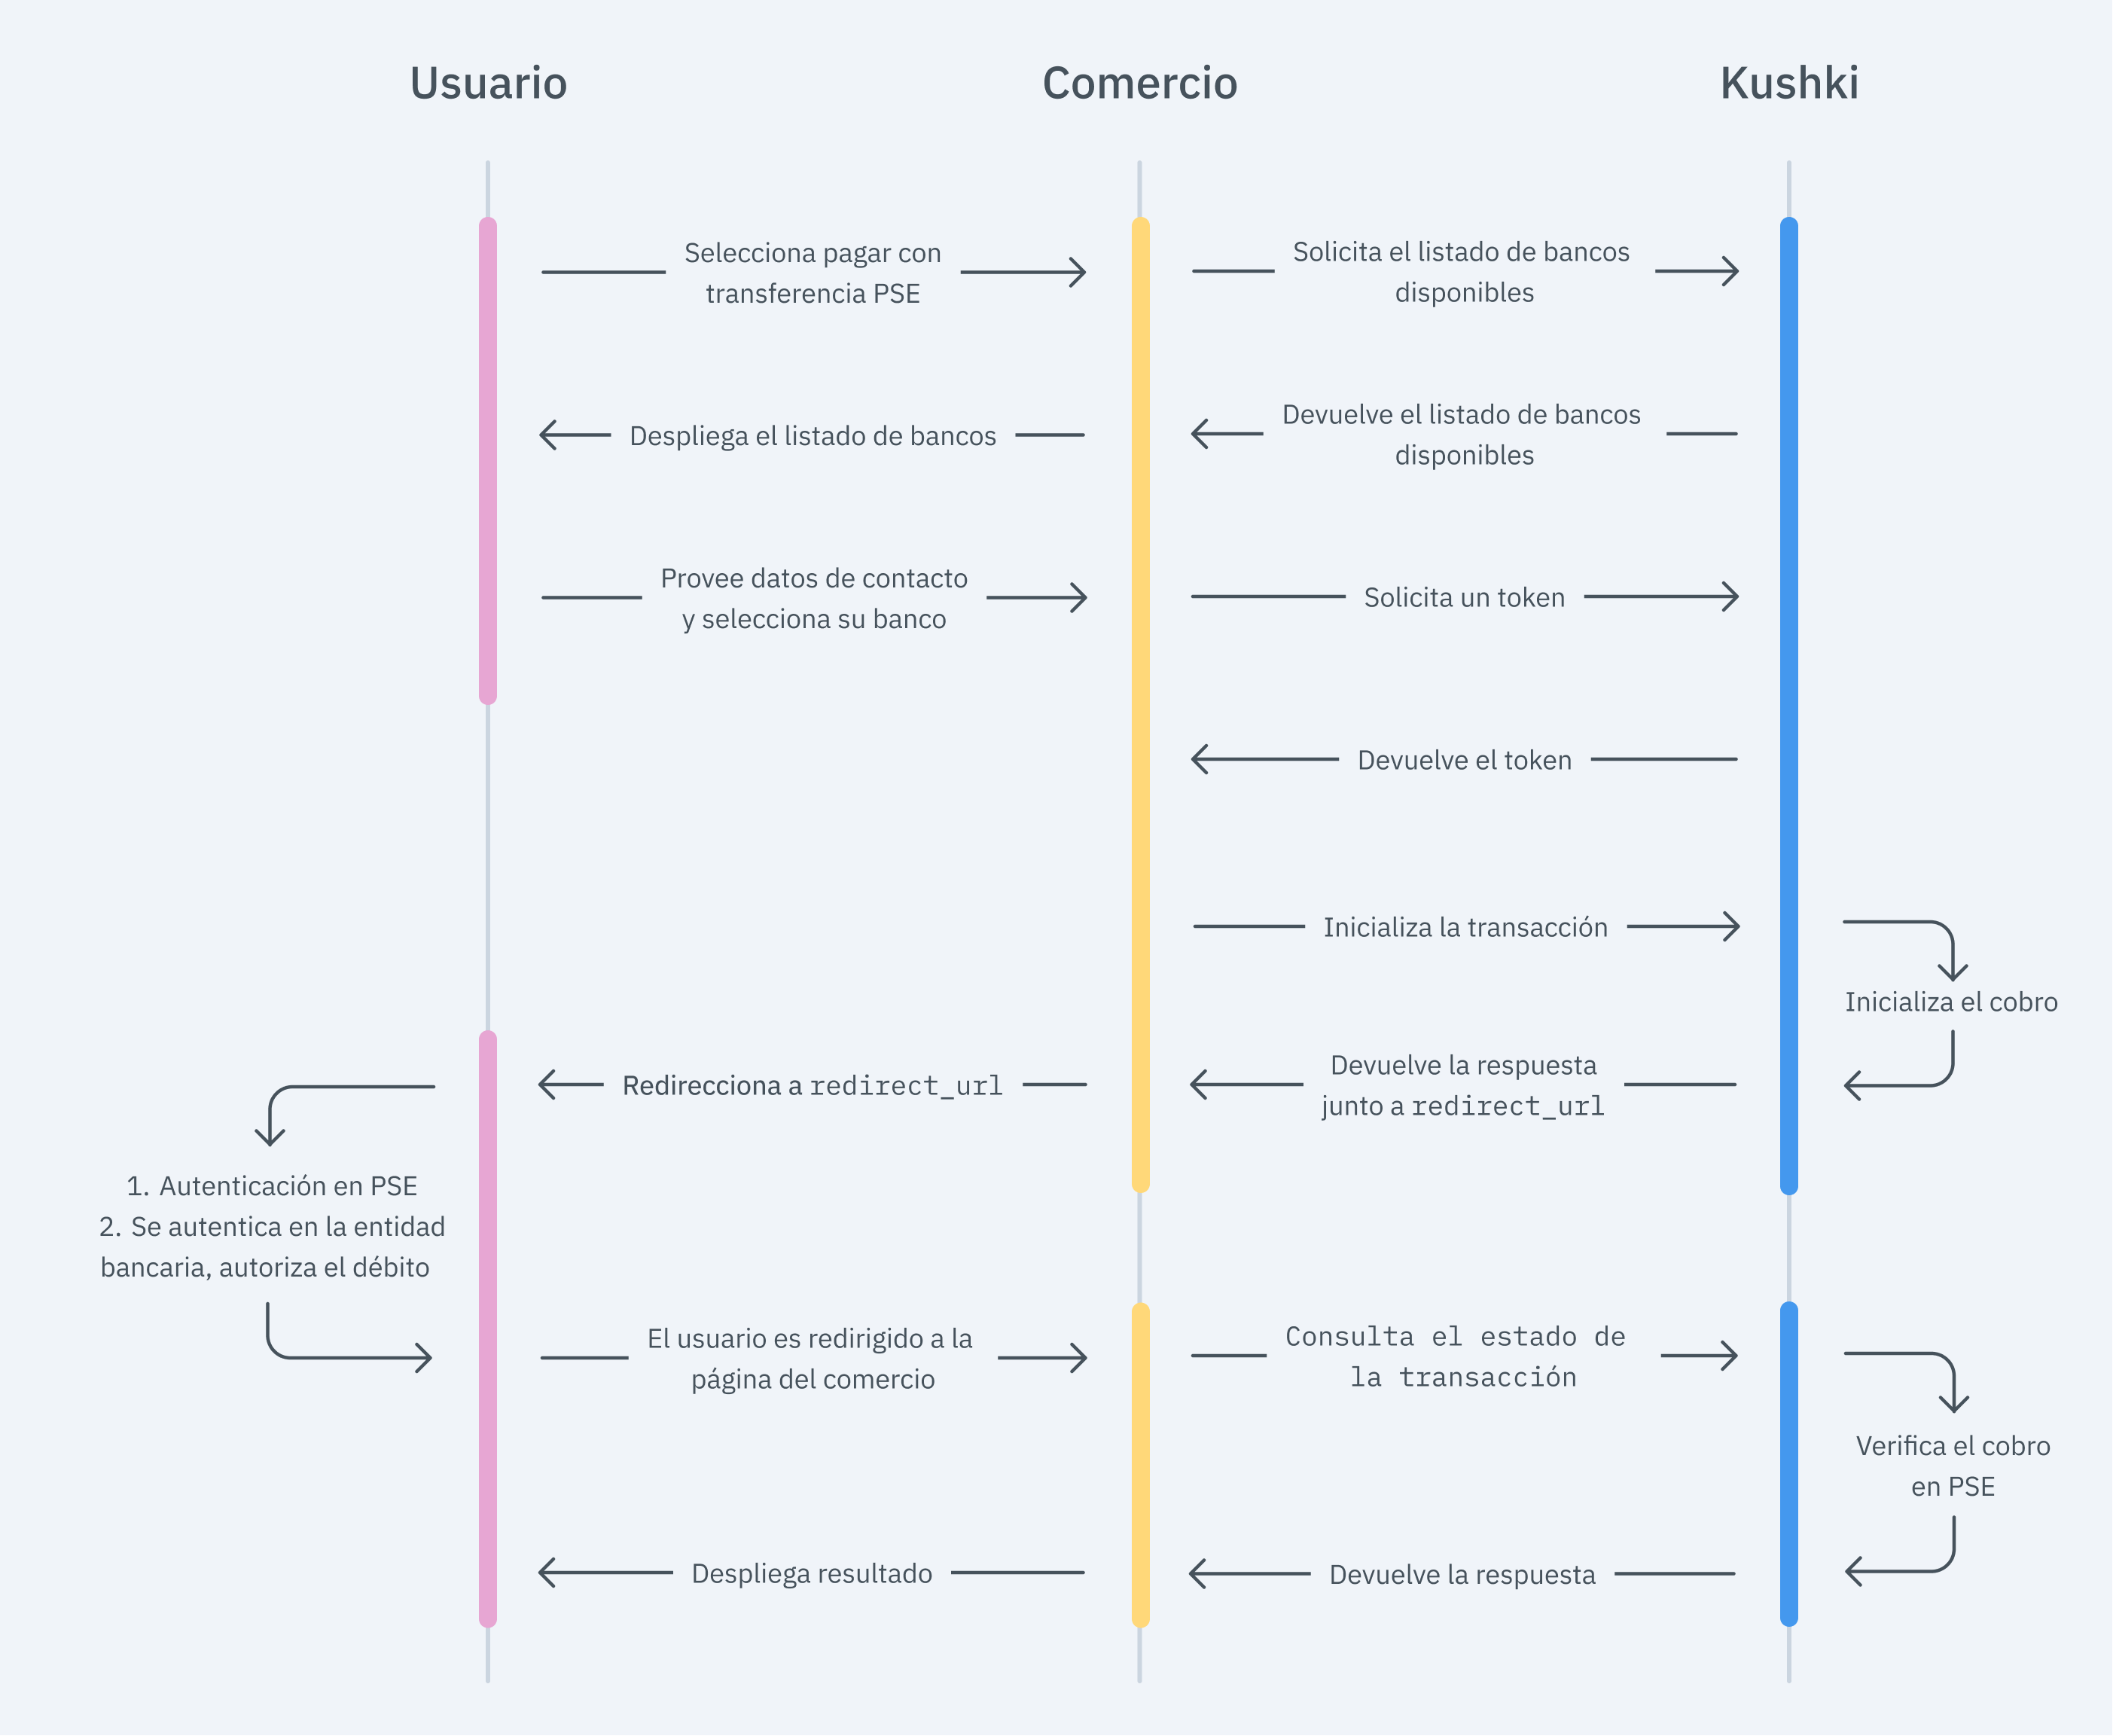
The payment flow for PSE (Version 1.0) that you will integrate is as follows:

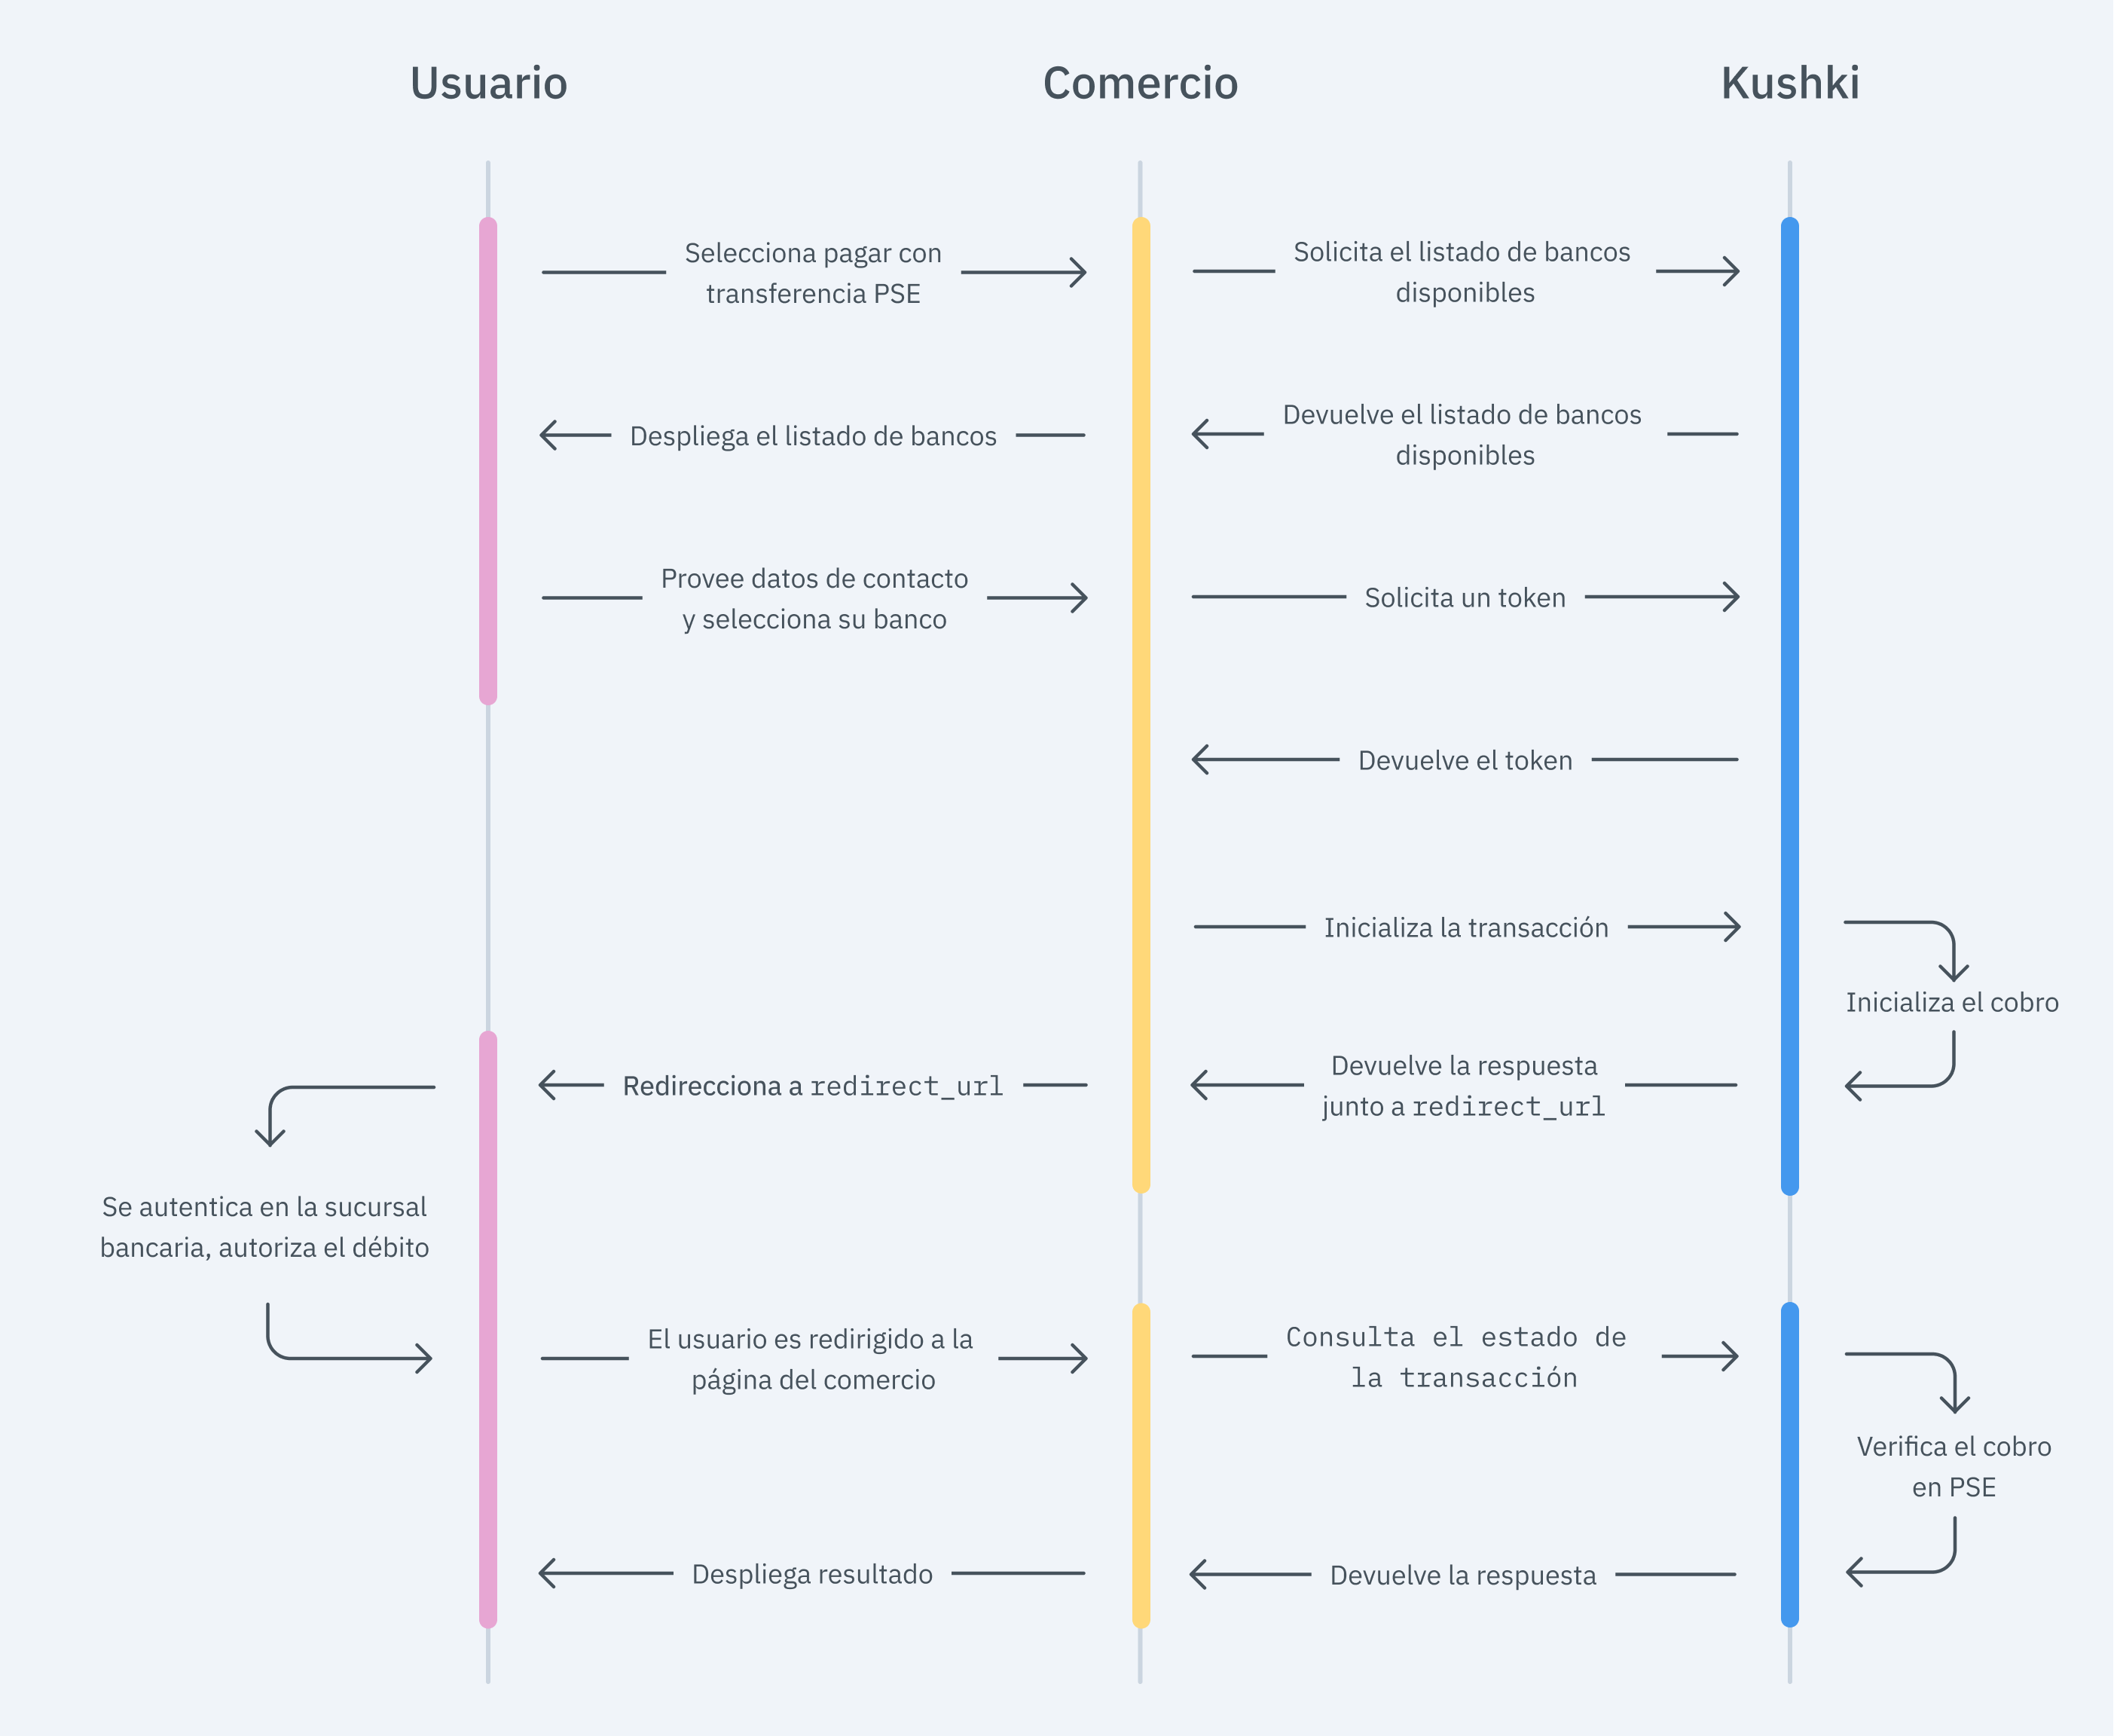
The payment flow for PSE Avanza (Version 2.0) that you will integrate is as follows:

With this version we improve the user experience allowing your customers to purchase in fewer steps.
1. Set up your Front-end
The front end is responsible for collecting the user’s card details securely, generating a token for such information through Kushki’s servers, and sending that information to the back end to start the payment process.
You have two options to integrate: Kajita and Kushki.js.
Kajita
Kushki has payment forms ready to collect card information securely. You can use any of our versions:
- Cajita: the first version of the predefined payment form. Not customizable.
- Kajita: the second version. It allows you to customize your payment forms from your Administration Console and even have several versions of Kajita, for example, one for each payment method.
Create and customize your Kajitas
With Kushki you can create your Kajitas from the Administration Console. Click here to learn how to do this.
Set up Kajita
Include the kushki-checkout.js script in your payment page by adding it to the <head> of your HTML file. Always load kushki-checkout directly from cdn.kushkipagos.com. Do not include the script in a bundle or package or host a copy of it.
<head><title>Checkout</title><script src="https://cdn.kushkipagos.com/kushki-checkout.js"> </script></head>
Add Kajita to your website
Kajita needs a space within your page. Enter the following code in your website’s <body>, where you want the payment form to be displayed.
For Kajita (v.2):
<form id="my-form" action="/confirm" method="post"><input type="hidden" name="cart_id" value="123"></form>
For Cajita (v.1)
<form id="payment-form" action="/confirm" method="post"><input type="hidden" name="cart_id" value="123"></form>
Remember to configure the action of the action form according to the corresponding endpoint in your back end, to obtain the token.
Then, add the script tag.
For the Kajita (v.2) you can obtain such script from your Administration Console as explained here.
<script type="text/javascript">var kushki = new KushkiCheckout({kformId: "HmJXukKb5",form: "my-form",publicMerchantId: "${publicCfredentialId}",// Replace this with your public keyamount: {subtotalIva: 0,iva: 0,subtotalIva0: 1000,}});</script>
For v.1 (Cajita), add the following script, making sure the form has loaded:
<script type="text/javascript">var kushki = new KushkiCheckout({form: "payment-form",merchant_id: "95911a50891s1cb79c0f19dd440b46bd", // Replace this with your Public keyamount: {"subtotalIva": 0, // Set the value to 0 when the Tx has no taxes"iva":0, // Set the value to 0 when the Tx has no taxes"subtotalIva0": 100, // Set here the total amount of the transaction when it does not have taxes , otherwise set it to 0"ice": 0 // Set the value to 0 when the Tx has no ICE},currency: "USD",payment_methods:["transfer"], // You will be able to add more payment methodsinTestEnvironment: true, // Configured in test modecallback_url: "https://return.com" // URL to redirect the user once the payment process has been completed from their bank.});</script>
This will create a predesigned form on your website to accept payments.
Kushki.js
Use Kushki.js if you need more control over the “look & feel” or appearance of your payment form.
Set up Kushki.js
Option 1 - CDN
Use the following script tag at the end of the <body> of your payment page.
<script src="https://cdn.kushkipagos.com/kushki.min.js"></script>
Option 2 - NPM
Install the package from npm.
npm install --save @kushki/js
Then import it into your code using the following code.
import { Kushki } from “@kushki/js”;
Set up Kushki object
Add the following code to your application
const kushki = new Kushki({merchantId: 'public-merchant-id', // Your public merchant idinTestEnvironment: true,});
Request the list of banks
Before generating the token, you need to load the complete list of available banks, so that the paying customer can select the entity to make the transfer:
var callback = function(response) {if(!response.code){console.log(response);} else {console.error('Error: ',response.error, 'Code: ', response.code, 'Message: ',response.message);}}kushki.requestBankList(callback); // Also you can set the function directly
Collect user information and send it to your back-end
First, embed the form in your payment page adding the required fields. You can design it as you prefer.
For example:
<form id="payment-form"><input placeholder="Nombre" type="text" name="name"><input placeholder="Tipo de persona" type="text" name="userType"><input placeholder="CC" type="text" name="DocumentType"><input placeholder="Número de documento" type="text" name="DocumentNumber"><input placeholder="Referencia" type="text" name="Reference"><input placeholder="Descripcion" type="text" name="Description"><button id="submit">Pay $49.99</button></form>
And, for the moment the user submits the form, add the token request and take it to your back-end.
var callback = function(response) {if(!response.code){console.log(response.token);} else {console.error('Error: ',response.error, 'Code: ', response.code, 'Message: ',response.message);}}kushki.requestTransferToken({bankId: '1022', // RequiredcallbackUrl: 'http://www.testcallbackurl.com/',userType: '1',documentType: 'NIT',documentNumber: '123456789'paymentDescription: 'Description of the payment.',email: 'test@test.com',currency: 'COP',amount: {subtotalIva: 0, // Set the value to 0 when the Tx has no taxes.subtotalIva0: 100000, // Set here the total amount of the transaction when it does not have taxes , otherwise set it to 0.iva: 0, // Set the value to 0 when the Tx has no taxes.}},callback); // You can also configure the function directly.
2. Set up your Back-end
The back end is responsible for receiving the token obtained from your front end and starting the payment process with Kushki.
When the user submits the form, your front end sends a token to an endpoint that you specified previously. Using this token, you must make a call to our charge endpoint to start the charge process.
- Javascript
- Python
- PHP
var request = require("request");var options = {method: 'POST',headers: ['Private-Merchant-Id': '0c0b08cd92fc491fb37365170164f7e9', // Replace this with your Private Key'content-type': 'application/json']url: 'https://api-uat.kushkipagos.com/transfer/v1/init', // Test environmentheaders: {'content-type': 'application/json'},body: {"token": "b1d6f46f88fe4759aad9ae0e37cdf905","amount": {"subtotalIva": 0,"subtotalIva0": 90000,"iva": 0,},"contactDetails": {"fullName": "John Doe","address": "Centro 123","email": "test@kushkipagos.com","phoneNumber": "3912345678",},"metadata": {"userId": "IB344"}}};json: true};request(options, function(error, response, body) {if (error) throw new Error(error);console.log(body);});
import requestsurl = "https://api-uat.kushkipagos.com/transfer/v1/init"payload = "{\n \"token\":\"b1d6f46f88fe4759aad9ae0e37cdf905\",\n \"amount\": {\n \"subtotalIva\": 0,\n \"subtotalIva0\": 90000,\n \"iva\": 0,\n }\n },\n \"contactDetails\": {\n \"fullName\": \"John Doe\",\n \"address\": \"Centro 123\",\n \"phoneNumber\": \"3912345678\"\n },\n \"email\": \"test@kushkipagos.com\"\n },\n \"metadata\": {\n \"userId\": \"IB344\"\n }\n}"headers = {'content-type': 'application/json'}response = requests.request("POST", url, data=payload, headers=headers)print(response.text)
$client = new http\Client;$request = new http\Client\Request;$body = new http\Message\Body;$body->append('{"token": "b1d6f46f88fe4759aad9ae0e37cdf905","amount": {"subtotalIva": 0,"subtotalIva0": 90000,"iva": 0,},"contactDetails": {"fullName": "John Doe","address": "Centro 123","email": "test@kushkipagos.com","phoneNumber": "3912345678"},"metadata": {"userId": "IB344"}}');$request->setRequestUrl('https://api-uat.kushkipagos.com/transfer/v1/init');$request->setRequestMethod('POST');$request->setBody($body);$request->setHeaders(array('content-type' => 'application/json'));$client->enqueue($request)->send();$response = $client->getResponse();echo $response->getBody();
- For PSE (Version 1.0)
According to the consumption response of the method to initiate the transaction, redirect the user to PSE using the redirectUrl parameter, so that your customer can authenticate and authorize the transaction amount to be debited from the balance of his/her bank account.
- For PSE Avanza (Version 2.0)
According to the consumption response of the method to initiate the transaction, redirect the user to the URL that Kushki returns, so that your customer can authenticate in the virtual portal of his/her bank entity and authorize the transaction amount to be debited from the balance of his/her bank account.
- Javascript
- Python
- PHP
var request = require("request");var options = {method: 'POST',headers: ['Private-Merchant-Id': '0c0b08cd92fc491fb37365170164f7e9', // Replace this with your Private Key'content-type': 'application/json']url: 'https://api-uat.kushkipagos.com/transfer/v1/init', // Test environmentheaders: {'content-type': 'application/json'},body: {"token": "b1d6f46f88fe4759aad9ae0e37cdf905","amount": {"subtotalIva": 0,"subtotalIva0": 90,"iva": 0,},"contactDetails": {"fullName": "John Doe","address": "Centro 123","email": "test@kushkipagos.com","phoneNumber": "3912345678",},"metadata": {"userId": "IB344"}}};json: true};request(options, function(error, response, body) {if (error) throw new Error(error);console.log(body);});
import requestsurl = "https://api-uat.kushkipagos.com/transfer/v1/init"payload = "{\n \"token\":\"b1d6f46f88fe4759aad9ae0e37cdf905\",\n \"amount\": {\n \"subtotalIva\": 0,\n \"subtotalIva0\": 90,\n \"iva\": 0,\n }\n },\n \"contactDetails\": {\n \"fullName\": \"John Doe\",\n \"address\": \"Centro 123\",\n \"phoneNumber\": \"3912345678\"\n },\n \"email\": \"test@kushkipagos.com\"\n },\n \"metadata\": {\n \"userId\": \"IB344\"\n }\n}"headers = {'content-type': 'application/json'}response = requests.request("POST", url, data=payload, headers=headers)print(response.text)
$client = new http\Client;$request = new http\Client\Request;$body = new http\Message\Body;$body->append('{"token": "b1d6f46f88fe4759aad9ae0e37cdf905","amount": {"subtotalIva": 0,"subtotalIva0": 90,"iva": 0,},"contactDetails": {"fullName": "John Doe","address": "Centro 123","email": "test@kushkipagos.com","phoneNumber": "3912345678"},"metadata": {"userId": "IB344"}}');$request->setRequestUrl('https://api-uat.kushkipagos.com/transfer/v1/init');$request->setRequestMethod('POST');$request->setBody($body);$request->setHeaders(array('content-type' => 'application/json'));$client->enqueue($request)->send();$response = $client->getResponse();echo $response->getBody();
Display the result of the transaction
Once the payment is completed in the PSE portal (Version 1.0) or in the bank’s website (Version 2.0), the customer will receive a GET callback to the callbackUrl you specified when requesting the token.
Along with the return URL we will send you on the transaction token route, with which you can check the status of the transaction using this endpoint. In addition, you will obtain the necessary information for your customer’s payment voucher.
For example, for callbackUrl = 'http://www.example.com' the customer will return to:
GET https://www.example.com/?token=26735cbb653a421ba7138eb515e0ab1d
where token is equal to 26735cbb653a421ba7138eb515e0ab1d
According to the response that you receive from the transaction status, it shows the user a success or failure screen to inform the customer whether the payment was made correctly or if there was an error.
3. Test your Integration
There are test identification numbers that you can use to ensure that your integration is ready. Use them to simulate any status:
- Approved transaction:
123456789 - Pending transaction:
999999990 - Transaction not authorized (
'NOT_AUTHORIZED'):100000002 - Failed transaction (
'FAILED'): Any identification number
4. Prepare your Certification
Read the following guidelines for technical certification approval (required to obtain productive account credentials):
The calculation of taxes and the total amount must be the correct amount.
Messages displayed on the screen are in line with Kushki’s responses.
All Kushki responses must be saved and recorded (required in case you need support).
The customer must recognize the payment method being used, therefore you must include the PSE logo.
You can show the payment method, such as: Debit from checking/savings account
- PSE bank debit
Avoid using the following texts:
- Wire transfer
- Debit to account
For redirection, do not use containers such as Frame, Panel, IFrame, etc. Avoid functions such as pop-ups that are blocked by browsers, or redirect in the same tab or window.
In the payment voucher, add the following information:
- Name of your company (Name or corporate name)
- NIT of your company (TIN)
- Payment description
- Transaction date
- Transaction status
- Traceability code (CUS). You can get it in the response of the init method.
- Transaction number
- Bank name
- Amount
Display the transaction status as shown below:
ProcessorStateOK:APROBADA The status must not be displayed in English. In addition, avoid the use of synonyms, such as: successful, authorized, accepted, paid or affirmative.ProcessorStatePENDING:PENDIENTE The status must not be displayed in English. In addition, avoid the use of synonyms, such as: pending confirmation, unresolved or incomplete.ProcessorStateNOT_AUTHORIZED:RECHAZADA The status must not be displayed in English. In addition, avoid the use of synonyms, such as: declined, canceled, rejected.ProcessorStateFAILED:FALLIDA The status must not be displayed in English. In addition, avoid the use of synonyms, such as: fail or error.
Include within the payment receipt, a link (button) to access a query module showing the following basic data: CUS, amount, transaction date, current status. Companies that do not require authentication with username and password to make payments will not have to build the query module.
Include an option to download and print the receipt.
If the transaction is PENDING, a new transaction must NOT be allowed until the final status of the transaction is approved or rejected.
The transaction cannot be PENDING:PENDIENTE for more than 21 minutes.
All statuses must include the text with a phone number and an email address of your company, where your customers can check the transaction status.
In the event of successful receipt of the Webhook notification, respond to the request with a
statusCode200, and inform your customer.The ”Pay” button is disabled after the first click.
Kushki’s logo must be visible for the customer. You can find our logo in several formats here.
Make sure to send all the variables required, specified in the API reference.
Accept Webhooks
Manage correctly post-payment events.
Check the status of your transactions
With the token you received from the front end, you will also be able to check the status of transactions through our API.
 Chile
Chile Ecuador
 Mexico
 Peru
Peru