Accept one-click payments with 3DS
This functionality is available for the following models:
☑ Acquirer
☑ Aggregator
To ensure the security of your merchant, the Kushki fraud prevention team will ask you to activate 3DS validation, either at the time of saving the card or at the time of executing the payment, as it is explained below.
By having the 3DS validation service active, your customers will be asked to complete an extra verification step (hereinafter challenge) with the card issuer to complete certain transactions. In general, said challenge consists of an OTP sent by the bank to your customer’s email or telephone.
How does 3DS validation work?
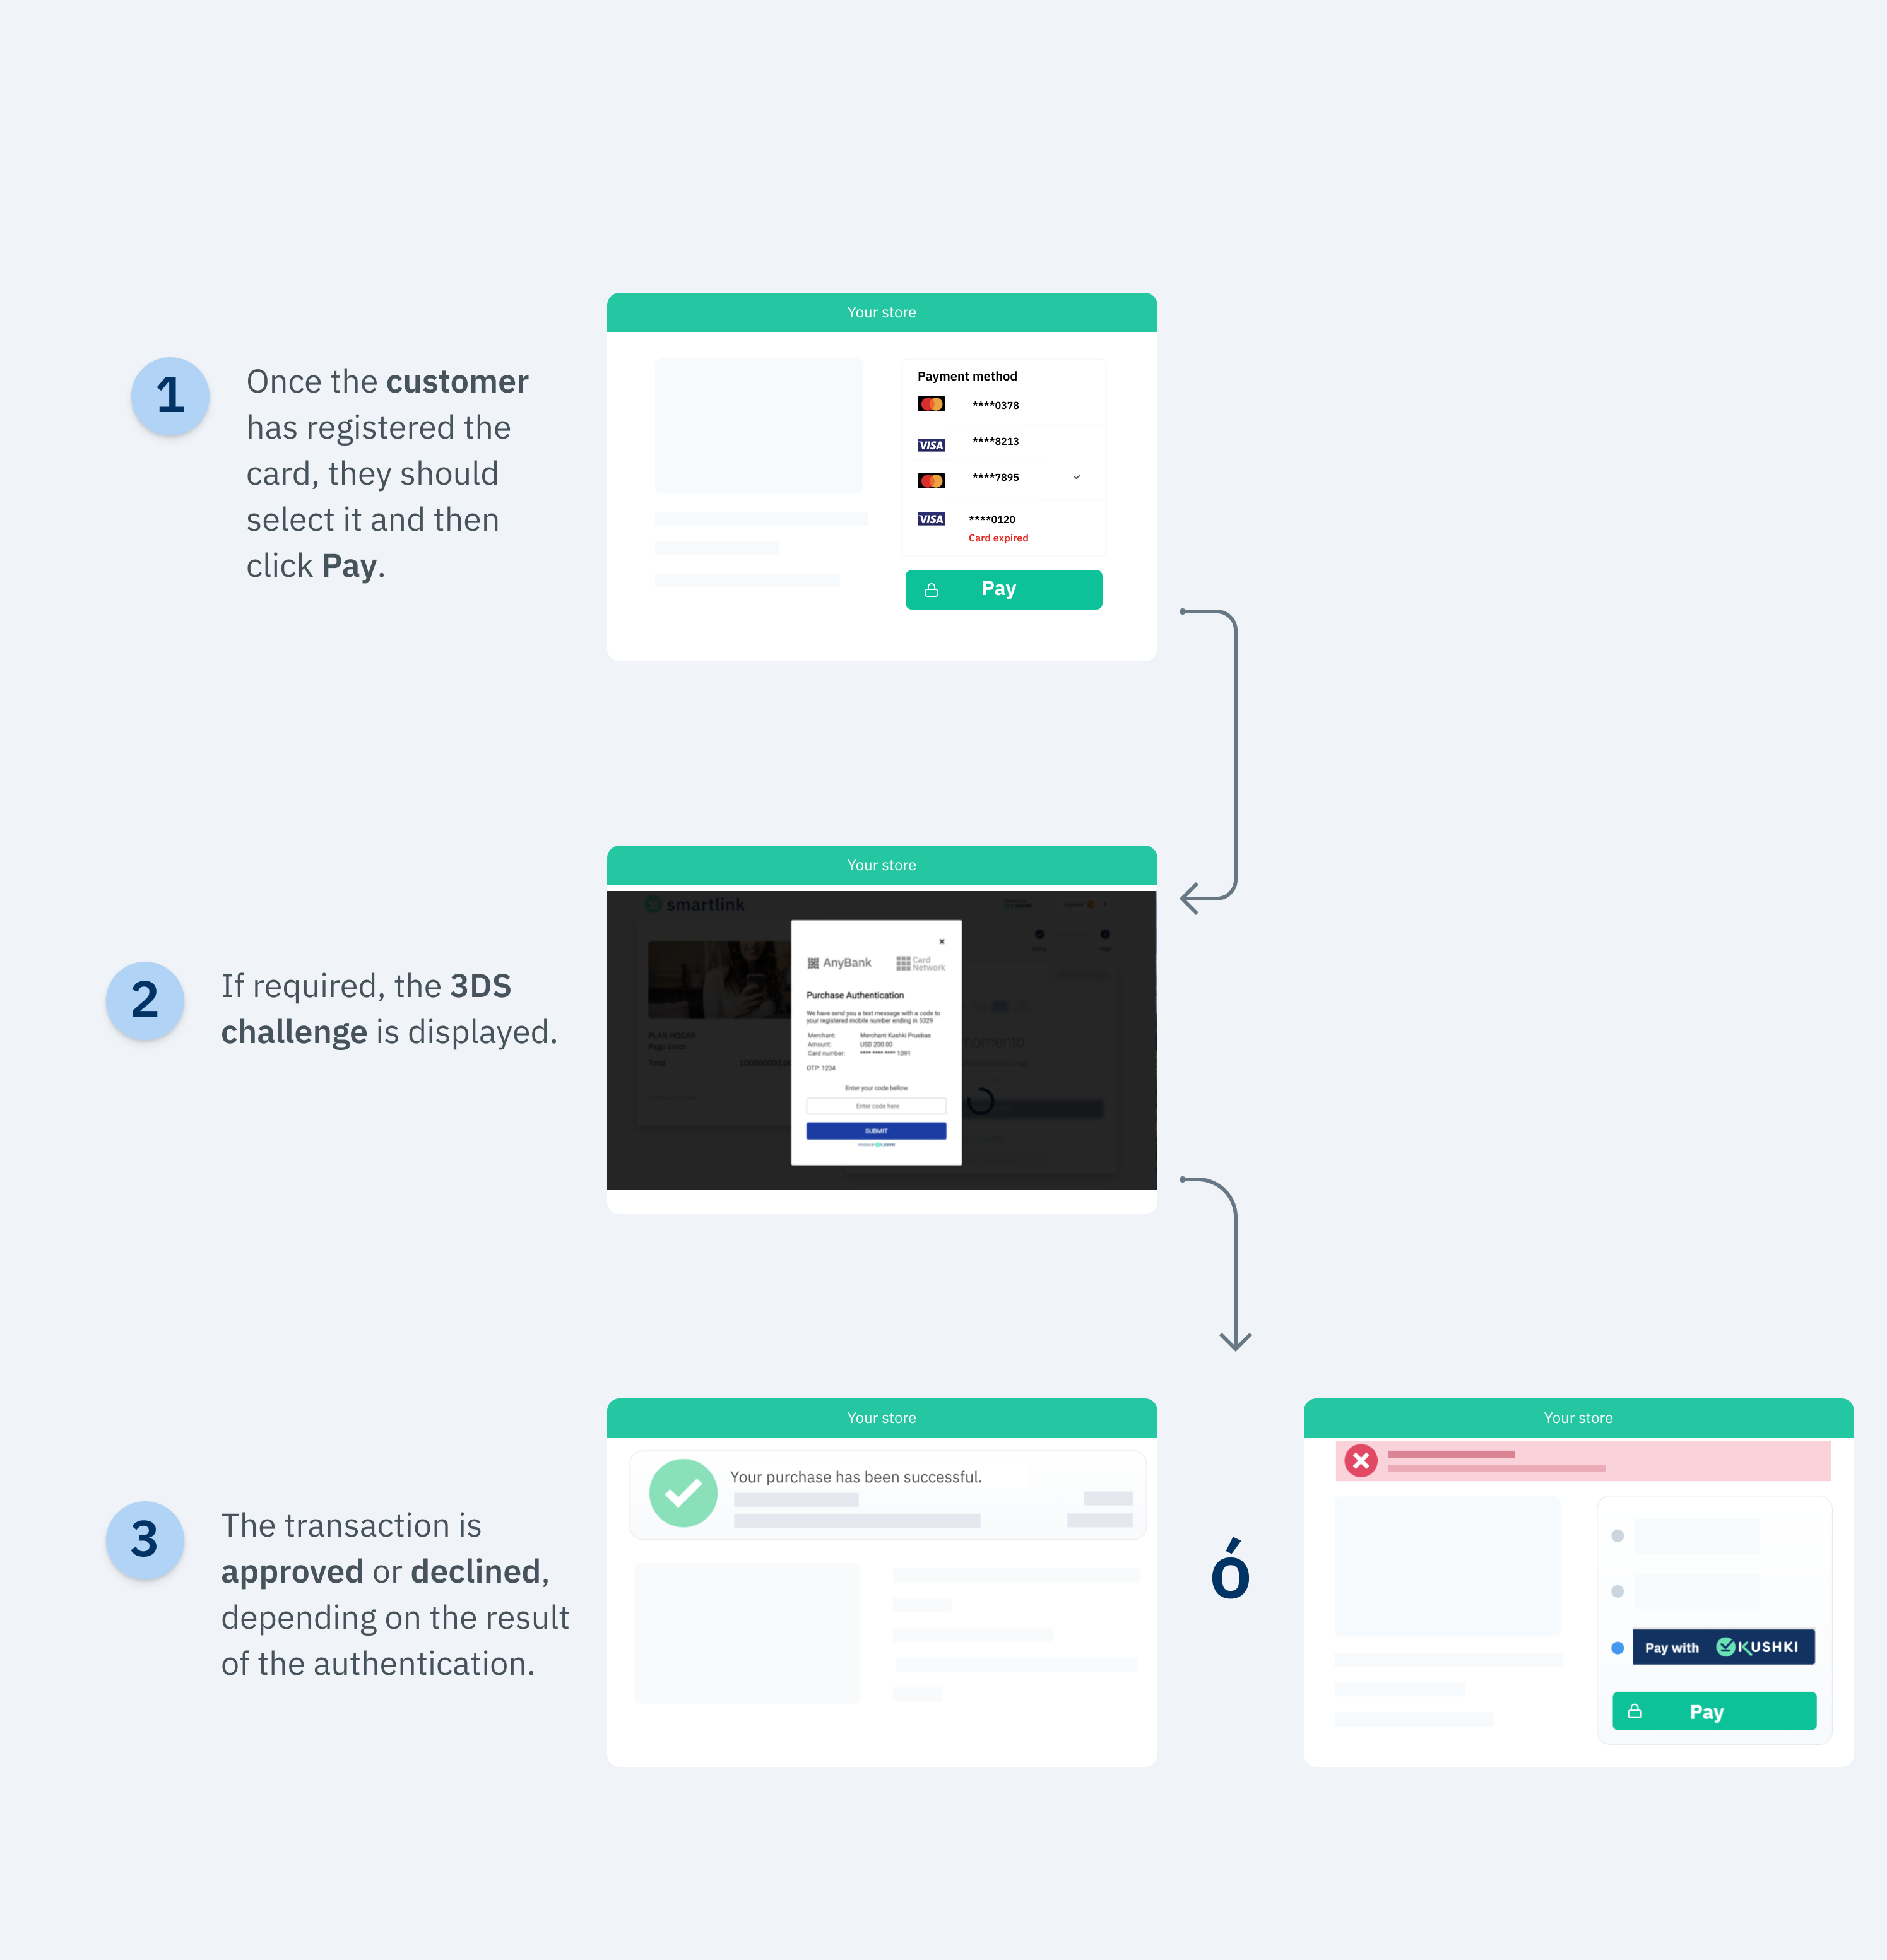
Once the user saves the card, they can make one-click payments. When they click the pay button, Kushki will validate if 3DS authentication is required for the transaction. If such validation is required, your customer will be presented with a challenge whose experience could vary depending on the brand and the issuing bank. When the user completes the challenge, they will be able to finalize the transaction.
The 3DS authentication flow with Kushki for one-click payments is as follows:

Supported brands on 3DS

Basically, integrating 3DS authentication in one-click payments consists of 2 stages: Registration and Collection.
Registration
Follow the instructions described in our Accepting One-click Payments guide to request the card registration token from your front-end and execute the registration or tokenization of the card from the back-end. As a result, you will get a subscriptionId, which you can use to execute one-click payments. To perform 3DS authentication at card enrollment, follow the instructions in our Accept Recurring Payments with 3DS guide.
Payment
1. Set up your front-end
We will take advantage of the fact that our Kushki.js library has been imported and set up previously to use a method that will be very helpful to verify the reliability of the charge.
First, it is necessary to obtain the subscription ID of the card that will be charged.
Then, request the charge token, and send it to your back-end.
kushki.requestDeviceToken({amount: {currency: "USD",subtotalIva: 0, // Set the value to 0 when the Tx has no taxesiva:0, // et the value to 0 when the Tx has no taxessubtotalIva0: 100, // Set here the total amount of the transaction when it does not have taxes , otherwise set it to 0},currency: "USD",subscriptionId: "1543267242354000" // Replace with your subscription id}, (response) => {if(response.code){console.log(response);// Submit your code to your back-end} else {console.error('Error: ',response.error, 'Code: ', response.code, 'Message: ',response.message);}});
When 3DS is enabled, the response from the requestDeviceToken() method will look like this:
{"token": "oaACBE1012310zYTjE239227yqFRA8r7","secureService": "3dsecure","secureId": "e356d68d-3f31-4134-a9a7-8cba46b3cdac","security": {"acsURL": "https://authentication.cardinalcommerce.com/ThreeDSecure/V1_0_2/PayerAuthentication?issuerId\u00d2aa20412b0063aca652facd9g\u0034transactionId\u003dQhcf3XOjdZmjve336Vee2gb5rof1","authenticationTransactionId": "1d8cf7jg5Bfn8Nj73mn7","paReq": "eNpVUtluwjAQfPdXoH5A7DghtGixxFUViRt6iDfXGGJCDpykQL++doDSvu3sjtYzs4ZlqKXsLaQotWQwknnOt7Km1q2HyeIx6EW7w2dn09NjFXnxxn1gMG3P5YHBl9S5ShPmOsShgG8QmRVahDwpGHBx6AzGzKdXoH5A7DghtGixxpVUtluwjAQfPdXoH5A7DghtGixs4ZlqKXsLaQot0u4KqLQKRlUugzC4gP+AYQlHrPwqLImhgfj0cnKvMwUhnfprkj0hiwnSPAxn1gMG3P5YHBl9S5ShPmOsShOqLqJ7x73Gx2vVbgC0DwZoXklFCKXFpo0bcpu83qWht0u4KqLQKRlUugzC4gP+AYQlHrpfUGenfxtGEOl1jIRN0c3hECesjSRhmNC+62Nh7vy7otNVxQmtdkm3Ew/Jrv1Kp0X4elF8Pb6p/n2KH/k0skaqcyeVHfdaulqgoP20X4elF8Pb6p/n2KH/k0sv8\u003d","specificationVersion": "2.2.0","authRequired": true}}
Below is the description of these variables:
| Parameter | Type | Description |
|---|---|---|
authRequired | Boolean | This field tells you whether a 3DS challenge is required or not. |
acsURL | urls | It refers to the URL of the challenge page that the user must go through (Access Control System). |
specificationVersion | String | It refers to the applicable 3DS version. |
authenticationTransactionId | String | ID of the verified transaction from the brands. |
paReq | String | It stands for Payer Authentication Request. It is a field encoded in base64 that contains information about your merchant and the cardholder and that is sent to the issuer for authentication purposes. Note: If you are testing in a UAT environment, you must send sandbox. |
Once you receive the Token response with the above structure, you must send the security object to Kushki by consuming the requestValidate3DS method:
var callback = function(response) {if(!response.code){console.log(response);} else {console.error('Error: ',response.error, 'Code: ', response.code, 'Message: ',response.message);}}kushki.requestValidate3DS({secureId: "5e44449e-869b-4fed-bbca-e1bfa5af53c3",security: {acsURL: "https://authentication.cardinalcommerce.com/ThreeDSecure/V1_0_2/PayerAuthentication?issuerId\u00d2aa20412b0063aca652facd9g\u0034transactionId\u003dQhcf3XOjdZmjve336Vee2gb5rof1",authenticationTransactionId: "1d8cf7jg5Bfn8Nj73mn7",paReq: "eNpVUtluwjAQfPdXoH5A7DghtGixxFUViRt6iDfXGGJCDpykQL++doDSvu3sjtYzs4ZlqKXsLaQotWQwknnOt7Km1q2HyeIx6EW7w2dn09NjFXnxxn1gMG3P5YHBl9S5ShPmOsShgG8QmRVahDwpGHBx6AzGzKdXoH5A7DghtGixxpVUtluwjAQfPdXoH5A7DghtGixs4ZlqKXsLaQot0u4KqLQKRlUugzC4gP+AYQlHrPwqLImhgfj0cnKvMwUhnfprkj0hiwnSPAxn1gMG3P5YHBl9S5ShPmOsShOqLqJ7x73Gx2vVbgC0DwZoXklFCKXFpo0bcpu83qWht0u4KqLQKRlUugzC4gP+AYQlHrpfUGenfxtGEOl1jIRN0c3hECesjSRhmNC+62Nh7vy7otNVxQmtdkm3Ew/Jrv1Kp0X4elF8Pb6p/n2KH/k0skaqcyeVHfdaulqgoP20X4elF8Pb6p/n2KH/k0sv8\u003d",specificationVersion: "2.2.0",authRequired: true}, callback);
If the value of the authRequired variable is equal to true, the 3DS validation modal will be presented, and your client will then receive the value to enter via email or text message.
If the value of the authRequired variable is equal to false, the modal will not be presented for 3DS validation.
Successful response you will receive in the callback function will be:
{isValid: true}
In case of error, the response of the callback function will be something like:
{"message":"error-message","code":"error-code"}
If the transaction is declined for the authentication, its result will be included as part of the response of the charge with 322 and any of the subcodes specified in the Error codes guide.
2. Set up your back-end
Once the payment token has been received and the transaction has been authenticated, follow the instructions in our guide Accepting One-click Payments.
3. Test your integration
Below you will find some test cards that you can use in test mode (UAT) to make sure your integration is ready. Use them with any CVV, enter a future expiration date and once the 3DS modal appears, enter 1234 as the validation code.
- Transaction approved with 3DS authentication required:
44565280803898604456529267234200445652916532830244565248697702554456523340069956
- Transaction approved without 3DS validation:
4456540000000063445654337171331444565419820686154456541249811088
4. Prepare your certification
Follow the guidelines described in our Accepting One-click Payments guide.
 Chile
Chile Ecuador
 Mexico
 Peru
Peru