Webpay OneClick Payments
Save your customers' card details through Webpay OneClick to receive one click payments
This functionality is available for the following models:
☐ Acquirer
☑ Aggregator
Kushki allows saving a customer’s card details securely using Transbank’s Webpay Oneclick. Your customers will be able to buy using credit cards, RedCompra debit cards without the need for an initial charge, and then receive one click payments. This allows you, for example, to add a customer now, set up their payment method and charge then allowing 1-click purchases.
How does it work?
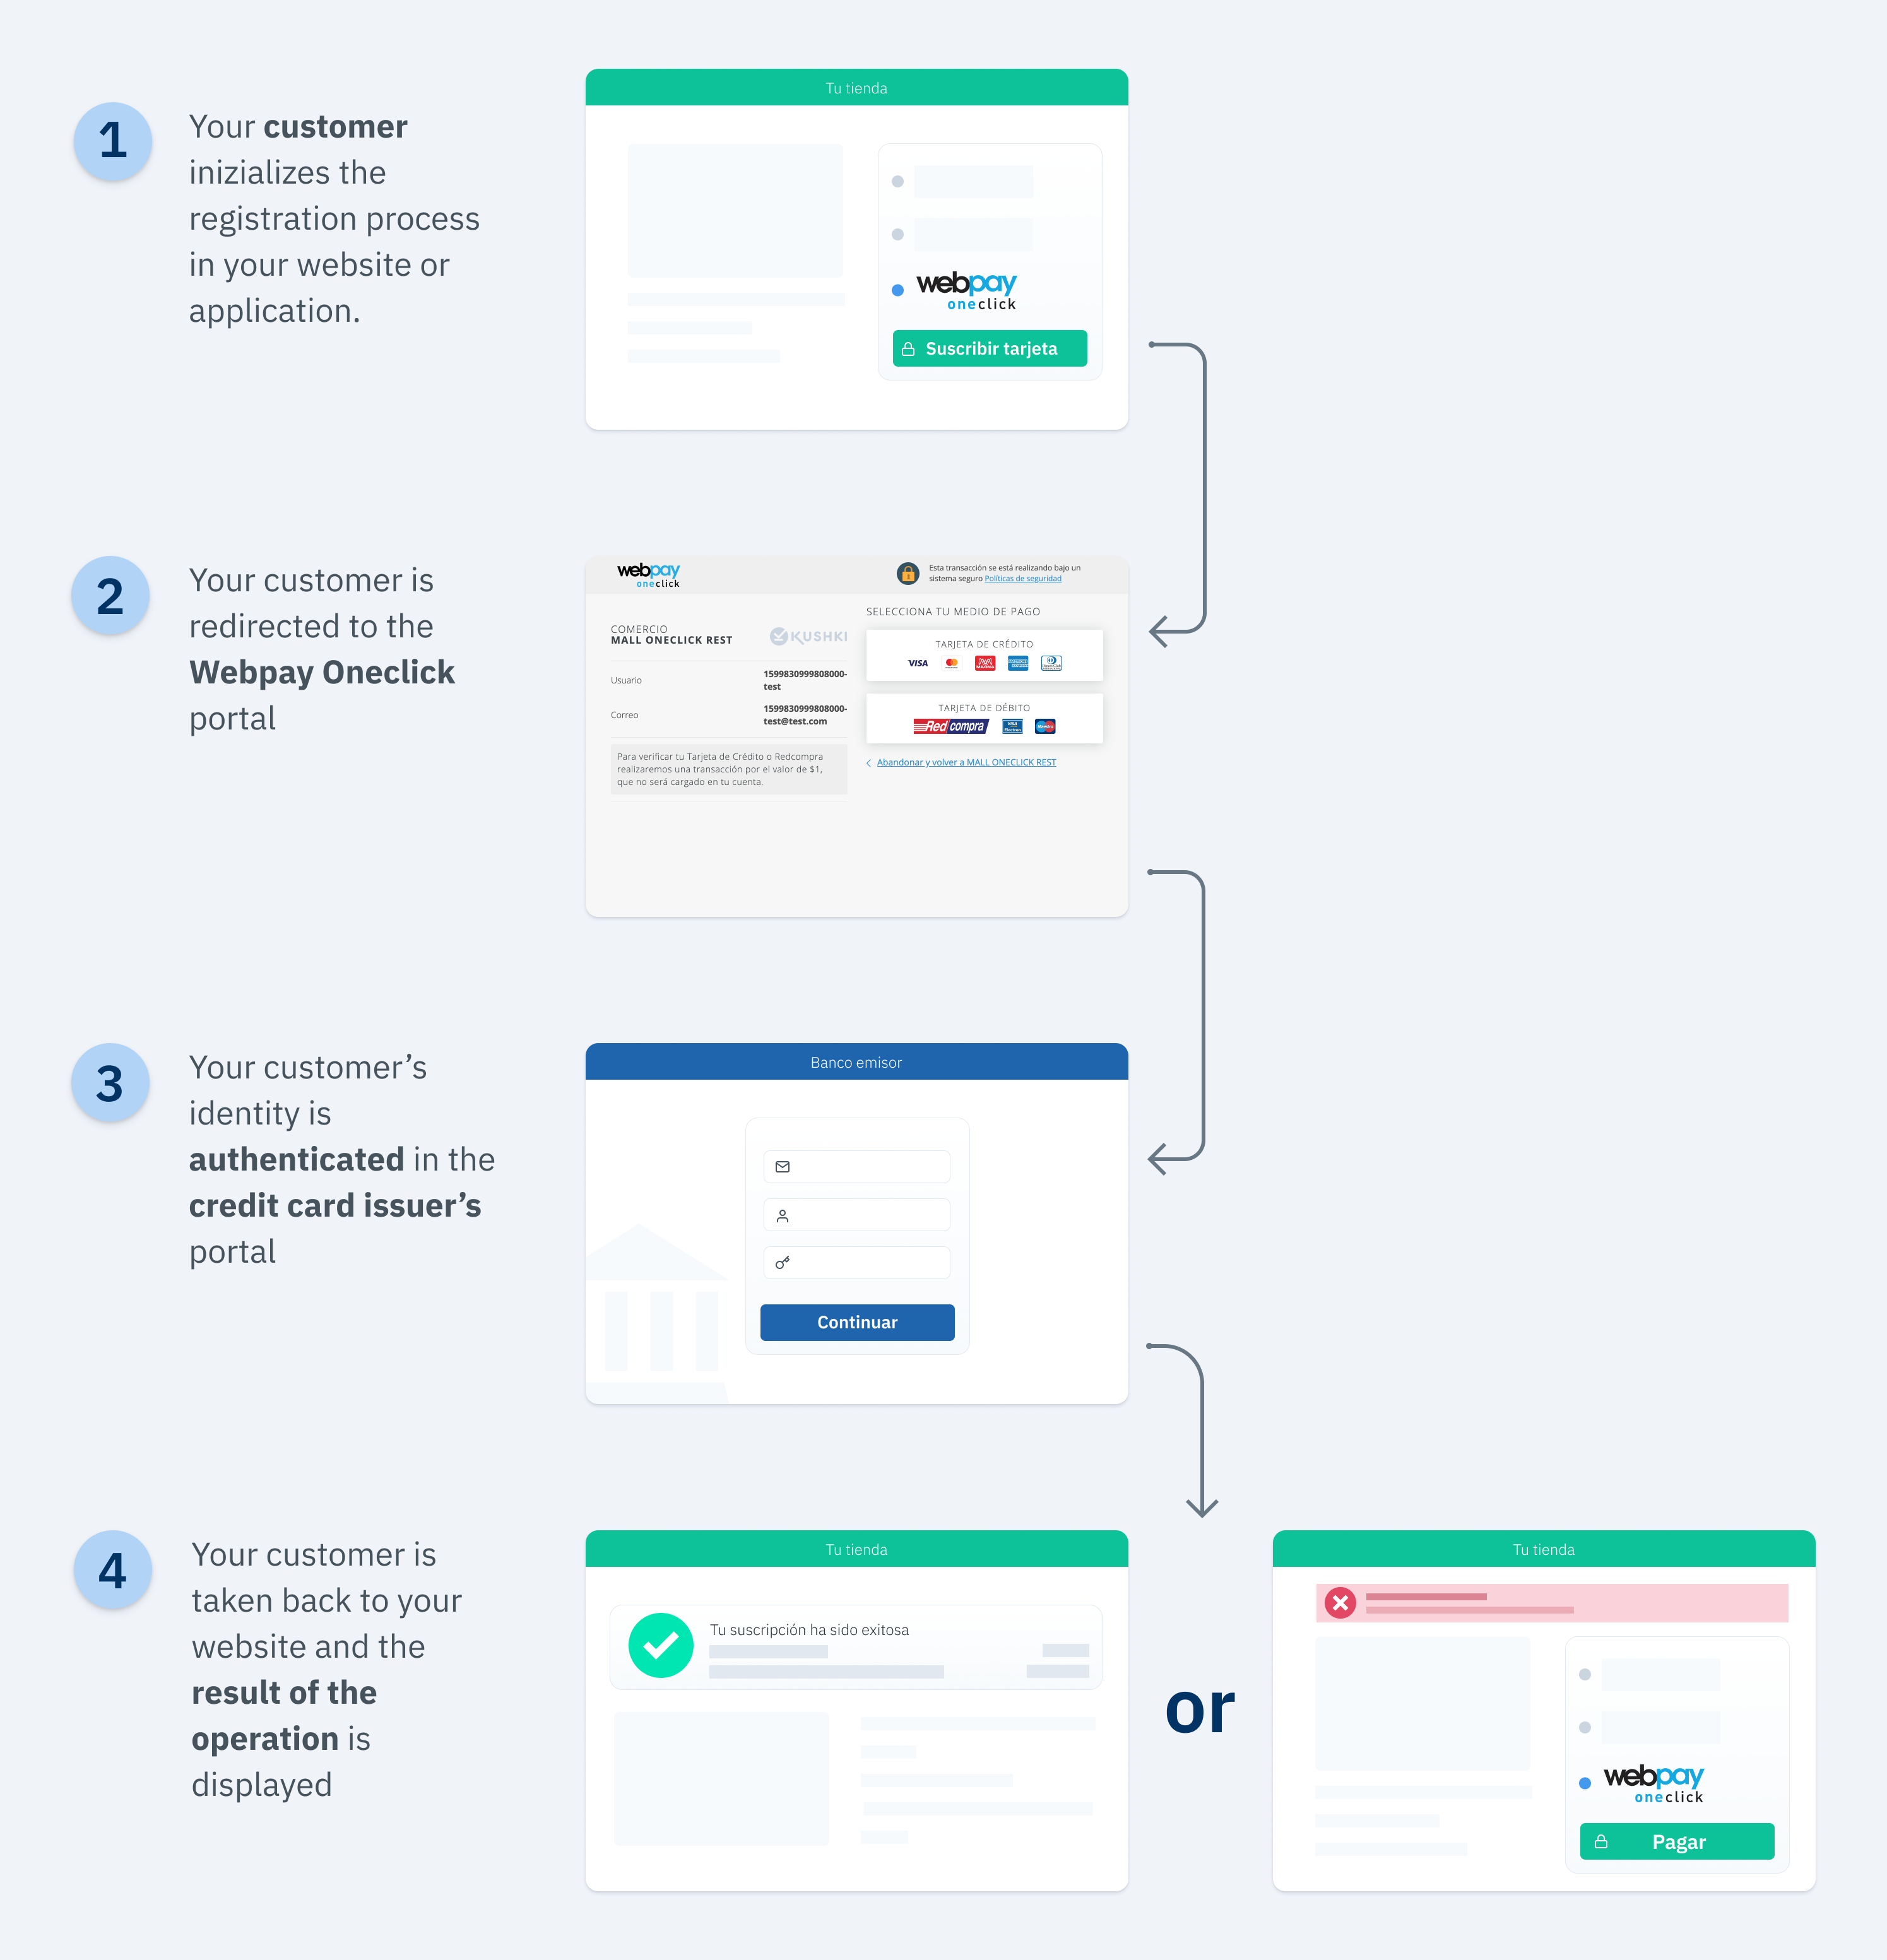
A payment flow on Webpay Oneclick usually consists of the following steps:

- The user starts the card registration process on your website or app.
- The user is redirected to the Webpay portal to select the card type, where their data should be entered.
- Then, the user is taken to the card issuer’s portal (a bank or other financial entity) where the customer’s identity is authenticated using their credentials.
- Once the authentication has been completed, the registration is authorized and the user is taken back to your website.
- A success or failure message is displayed depending on the registration result.
- One click payment is processed or registration is canceled.
Basically, integrating one click payments consists of 2 stages: Registration and charge
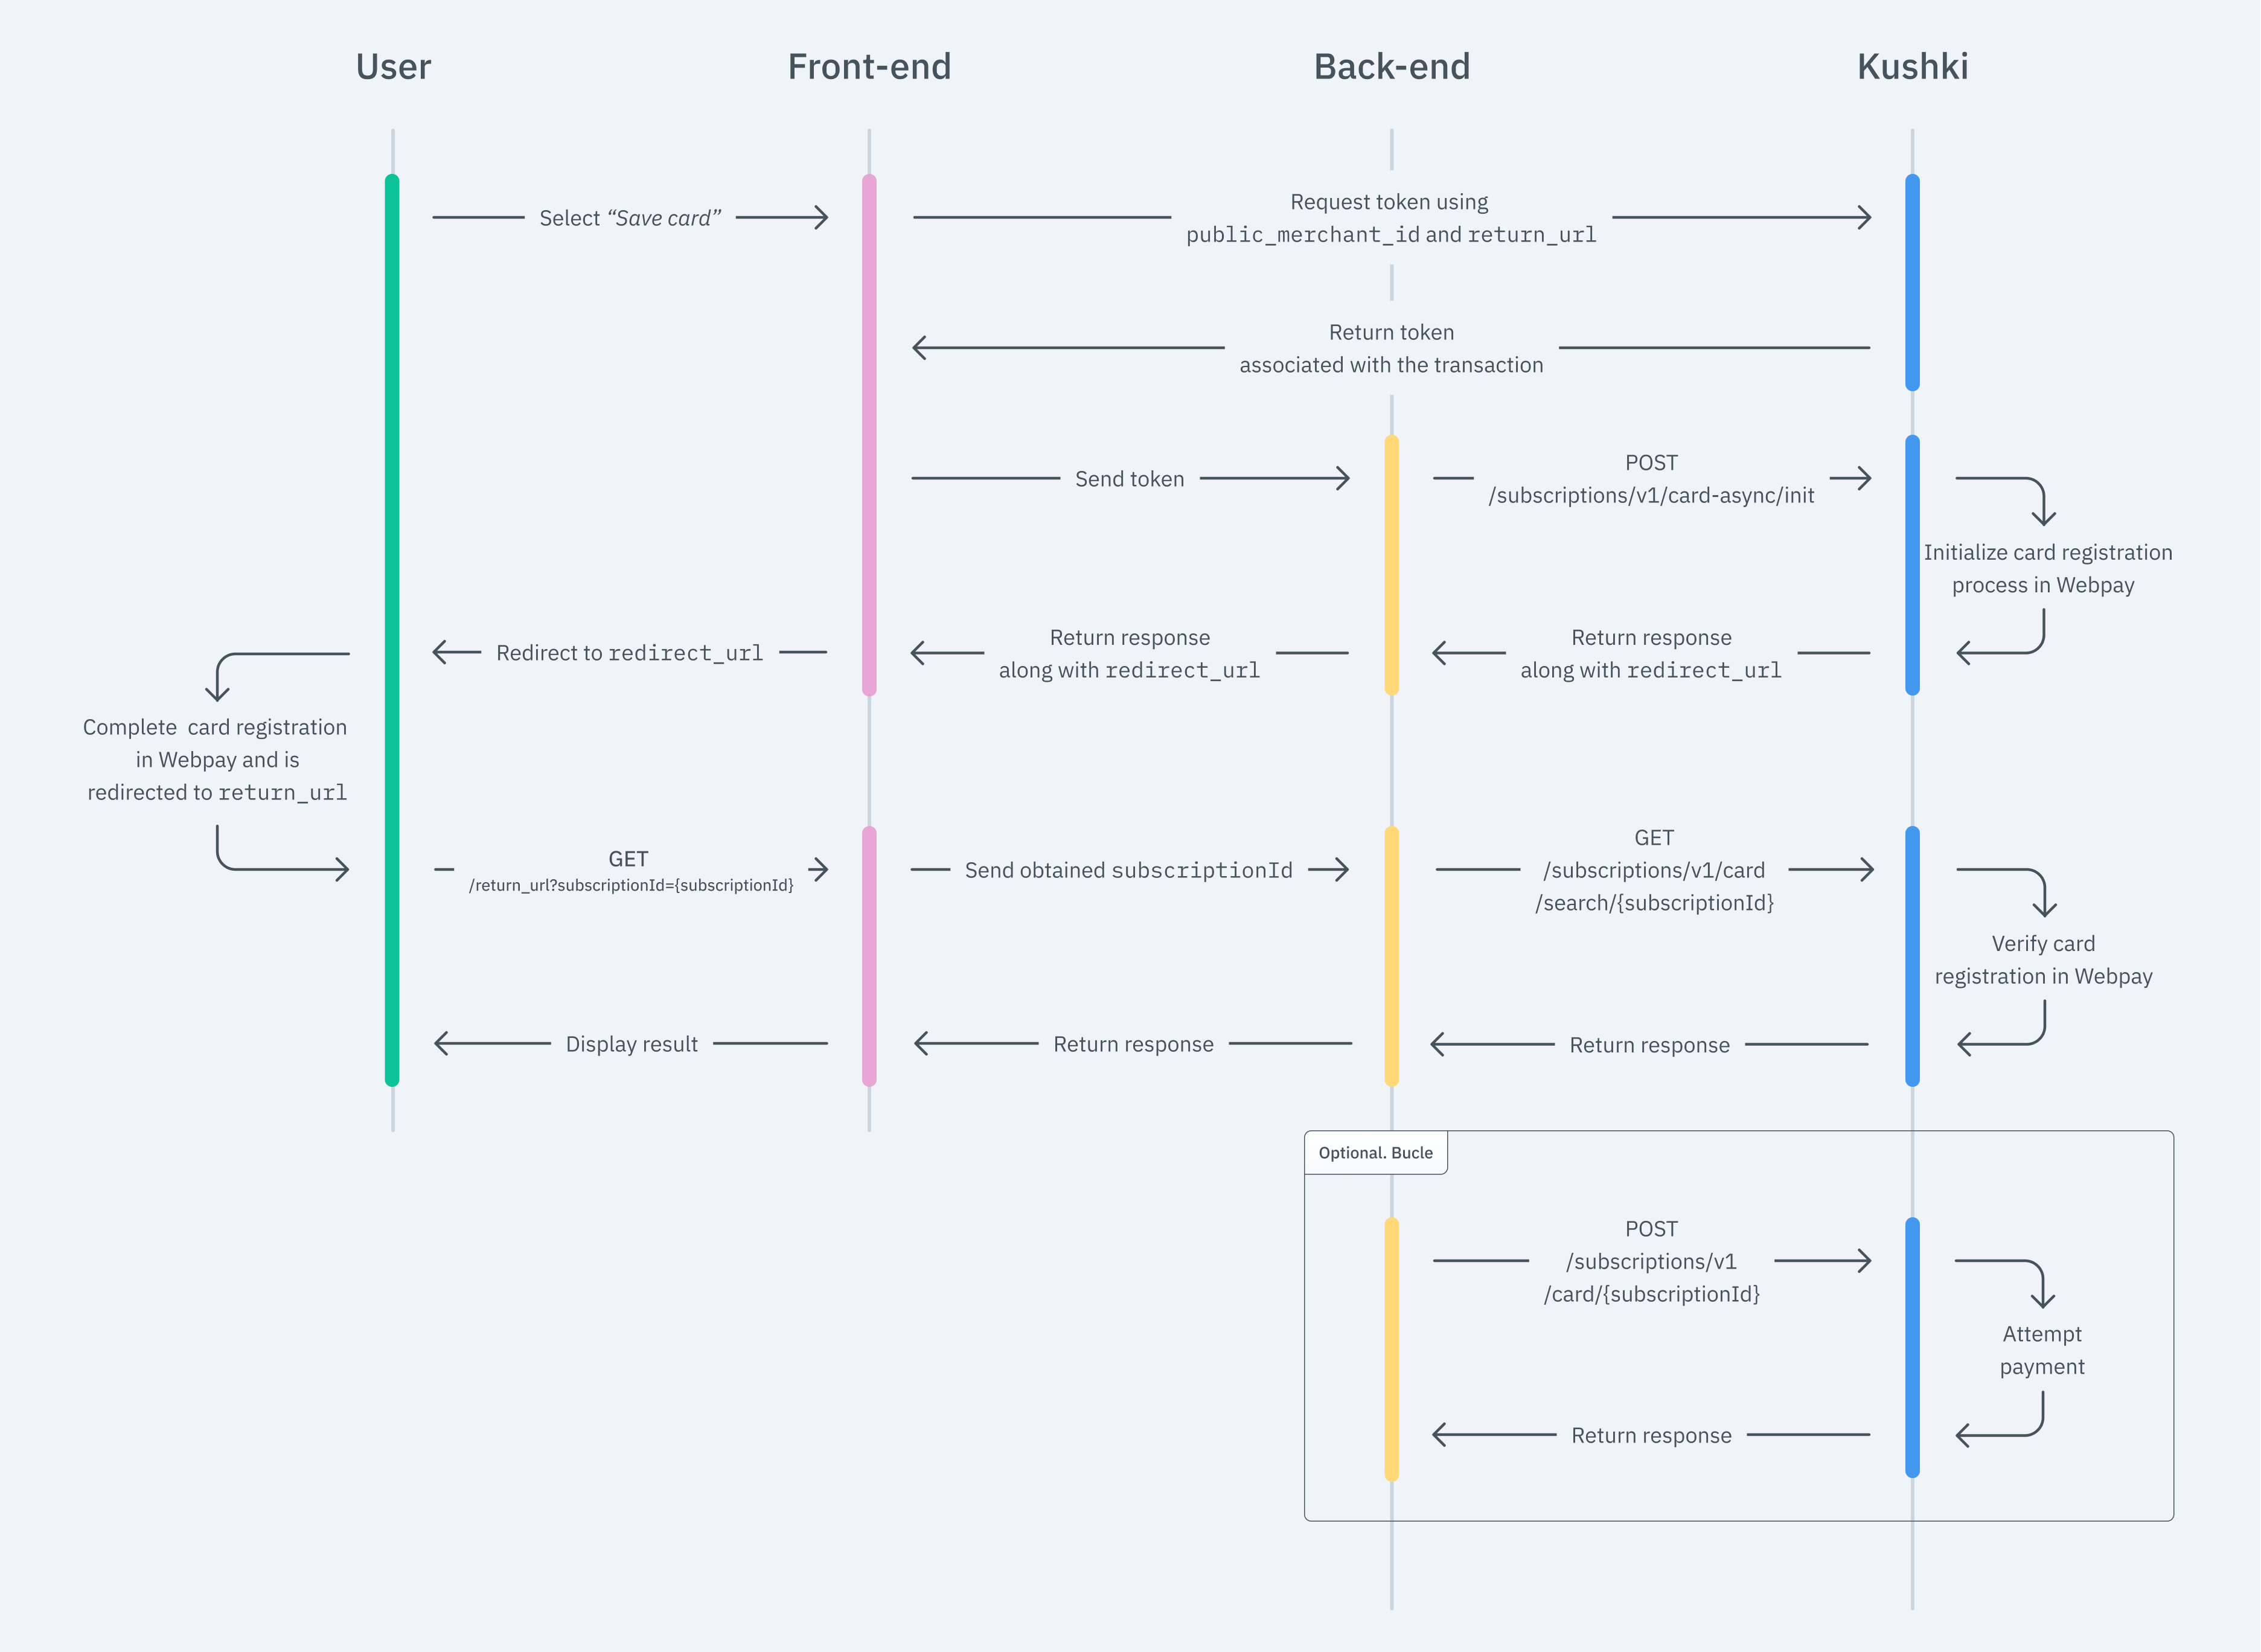
The flow that you will integrate is shown below:

1. Registration
The first thing you need to do to generate one click charges is to register your customer’s card. To do so, follow the steps below:
Set up your front end
The front end is responsible for collecting the user’s card details securely, generating a token for such information through Kushki’s servers, and sending that information to the back end to start the card registration process so that you can charge later.
You have two options to integrate: Kajita and Kushki.js.
Kajita
Kushki has payment forms ready to collect card information securely. You can use any of our versions:
- Cajita: the first version of the predefined payment form. Not customizable.
- Kajita: the second version. It allows you to customize your payment forms from your Administration Console and even have several versions of Kajita, for example, one for each payment method.
Create and customize your Kajitas
With Kushki you can create your Kajitas from the Administration Console. Click here to learn how to do this.
Set up Kajita
Include the kushki-checkout.js script in your payment page by adding it to the <head> of your HTML file. Always load kushki-checkout directly from cdn.kushkipagos.com. Do not include the script in a bundle or package or host a copy of it.
<head><title>Checkout</title><script src="https://cdn.kushkipagos.com/kushki-checkout.js"> </script></head>
Add Kajita to your website
Kajita needs a space within your page. Enter the following code in your website’s <body>, where you want the payment form to be displayed.
For Kajita (v.2):
<form id="my-form" action="/confirm" method="post"><input type="hidden" name="cart_id" value="123"></form>
For Cajita (v.1)
<form id="payment-form" action="/confirm" method="post"><input type="hidden" name="cart_id" value="123"></form>
Remember to configure the action of the action form according to the corresponding endpoint in your back end, to obtain the token.
Then, add the script tag, making sure the form has loaded:
Then, add the script tag.
For the Kajita (v.2) you can obtain such script from your Administration Console as explained here.
<script type="text/javascript">var kushki = new KushkiCheckout({form: "payment-form",merchant_id: "8291028192001", //Replace this with your public merchant idamount: "14.99",currency: "USD",payment_methods:["card_async"], // You will be able to enable more payment methods.inTestEnvironment: true, // Configured in test mode});</script>
For v.1 (Cajita), add the following script, making sure the form has loaded:
<script type="text/javascript">var kushki = new KushkiCheckout({form: "payment-form",merchant_id: "88ba4bff110548d09acde8d326c71253", // /Replace this with your Public Keyamount: "20000",currency: "CLP",payment_methods:["card_async"],is_subscription: true,inTestEnvironment: true, // Configured in test modecallback_url: "https://my-ecommerce.com/return" // URL to which the user will return after completing the registration process});</script>
This will create a predesigned form on your website to register a credit card.
Kushki.js
Use Kushki.js if you need more control over the “look & feel” or appearance of your card form.
Set up Kushki.js
Option 1 - CDN
Use the following script tag at the end of the <body> of your payment page.
<script src="https://cdn.kushkipagos.com/kushki.min.js"></script>
Option 2 - NPM
Install the package from npm.
npm install --save @kushki/js
Then import it in your code using the following code.
import { Kushki } from “@kushki/js”;
Set up the Kushki object
Add the following code to your application
var kushki = new Kushki({merchantId: '88ba4bff110548d09acde8d326c71253', // Replace this with your Private KeyinTestEnvironment: true, // Configured in test mode});
Collect User Information and Send it to your Back End
You may collect users’ data as you prefer. For this case, we only need an e-mail address, so you can provide it directly if you already have this information, or include an email field for the user to enter their address.
Once you have the user’s email address, add a Kushki token request to send it to your back end, as shown below:
kushki.requestSubscriptionCardAsyncToken({currency: 'CLP',email: your_users_email,callbackUrl: 'https://my-ecommerce.com/return' // URL to which the user will return after completing the registration process}, (response) => {if(!response.code){console.log(response.token);// Submit your code to your back-end} else {console.error('Error: ',response.error, 'Code: ', response.code, 'Message: ',response.message);}});
Set up your back end
The back end is responsible for receiving the token obtained from your front end and starting the card registration process with Kushki.
When the user submits the form, your front end sends a token to an endpoint that you specified previously. With this token, you must make a call to our [Webpay OneClick inscription endpoint] (https://api-docs.kushkipagos.com/docs/API-REFERENCE/async-card-subscriptions/init-an-async-card-subscription) for initializing registration and redirectig the user.
- Javascript
var request = require("request");var options = {method: 'POST',headers: ['Private-Merchant-Id': '0c0b08cd92fc491fb37365170164f7e9', // Replace this with your Private Key'Content-Type': 'application/json']url: 'https://api-uat.kushkipagos.com/subscriptions/v1/card-async/init', // test environmentheaders: {'content-type': 'application/json'},body: {token: 'V0OzRB100000xhxQB8035251pHLBQsq5', // Replace this with the received tokenamount: {subtotalIva: 0, subtotalIva0: 20000, ice: 0, iva: 0, currency: 'CLP'},planName: 'Premium',periodicity: 'custom',contactDetails: {firstName": 'Juan', lastName: 'Flores', email: 'pruebas@kushki.com', phoneNumber: '+593984775632'},metadata: {contractID: '157AB'}},json: true};request(options, function (error, response, body) {if (error) throw new Error(error);console.log(body);// Redirect your user to redirectUrl});
As a response to the call, you will obtain the variable redirectUrl that you must use to redirect the user to Webpay OneClick payments portal. Your customer will complete the registration process in the portal.
2. Capture response
Once the registration is complete, the customer will be taken back through a GET call to the callbackUrl provided as a parameter in step 1. This call will be accompanied by a parameter called subscriptionId placed in the path, which stands for the subscription’s unique identifier.
For example, for callbackUrl = "http://www.example.com/return the customer will be returned to GET http://www.example.com/return?subscriptionId=1591842658589000 where subscriptionId is equal to 159184265858900.
If an error occurs during the registration process, the customer will be returned to GET http://www.example.com/return?code=E1&message=Rechazo where code and message notify that the credit card registration was not successfully completed.
According to the response you receive, it shows the user a success or failure page to inform the customer if the subscription was created correctly, or if an error occurred.
3. Charge
Once you have already registered your customer’s card, in order to receive a one click charge, simply call our charge endpoint along with the subscriptionId.
- Javascript
- Python
- PHP
var request = require("request");var options = {method: 'POST',url: 'https://api-uat.kushkipagos.com/subscriptions/v1/card/291929129192912', // Replace this with your subscription IDheaders: {'content-type': 'application/json'},body: {language: "es",token: "1cfaze100000qQ4dtN016410Ow7ot8nd",amount: {subtotalIva: 0,subtotalIva0: 50000,ice: 0,iva: 0,currency: "CLP"},deferred: {months: 6},metadata: {customerId: "123"},contactDetails: {documentType: "CC",documentNumber: "1009283738",email: "test@test.com",firstName: "Diego",lastName: "Cadena",phoneNumber: "+593988734644"},orderDetails: {siteDomain: "tuebook.com",shippingDetails: {name: "Diego Cadena",phone: "+593988734644",address: "Eloy Alfaro 139 y Catalina Aldaz",city: "Santiago de Chile",region: "Santiago",country: "Chile",zipCode: "170402"},billingDetails: {name: "Diego Cadena",phone: "+593988734644",address: "Eloy Alfaro 139 y Catalina Aldaz",city: "Santiago de Chile",region: "Santiago",country: "Chile",zipCode: "170402"}},productDetails: {product: [{id: "198952AB",title: "eBook Digital Services",price: 6990000,sku: "10101042",quantity: 1},{id: "198953AB",title: "eBook Virtual Selling",price: 9990000,sku: "004834GQ",quantity: 1}]},fullResponse: true},json: true};request(options, (error, response, body) => {if (error) throw new Error(error);console.log(body);});
import requestsurl = "https://api-uat.kushkipagos.com/subscriptions/v1/card/291929129192912"payload = "{\"language\":\"es\",\"token\":\"1cfaze100000qQ4dtN016410Ow7ot8nd\",\"amount\":{\"subtotalIva\":0,\"subtotalIva0\":50000,\"ice\":0,\"iva\":0,\"currency\":\"CLP\"},\"deferred\":{\"months\":6},\"metadata\":{\"customerId\":\"123\"},\"contactDetails\":{\"documentType\":\"CC\",\"documentNumber\":\"1009283738\",\"email\":\"test@test.com\",\"firstName\":\"Diego\",\"lastName\":\"Cadena\",\"phoneNumber\":\"+593988734644\"},\"orderDetails\":{\"siteDomain\":\"tuebook.com\",\"shippingDetails\":{\"name\":\"Diego Cadena\",\"phone\":\"+593988734644\",\"address\":\"Eloy Alfaro 139 y Catalina Aldaz\",\"city\":\"Santiago de Chile\",\"region\":\"Santiago\",\"country\":\"Chile\",\"zipCode\":\"170402\"},\"billingDetails\":{\"name\":\"Diego Cadena\",\"phone\":\"+593988734644\",\"address\":\"Eloy Alfaro 139 y Catalina Aldaz\",\"city\":\"Santiago de Chile\",\"region\":\"Santiago\",\"country\":\"Chile\",\"zipCode\":\"170402\"}},\"productDetails\":{\"product\":[{\"id\":\"198952AB\",\"title\":\"eBook Digital Services\",\"price\":6990000,\"sku\":\"10101042\",\"quantity\":1},{\"id\":\"198953AB\",\"title\":\"eBook Virtual Selling\",\"price\":9990000,\"sku\":\"004834GQ\",\"quantity\":1}]}}"headers = { 'content-type': "application/json" }response = requests.request("POST", url, data=payload, headers=headers)print(response.text)# Your logic here ...
$client = new http\Client;$request = new http\Client\Request;$body = new http\Message\Body;$body->append('{\"language\":\"es\",\"token\":\"1cfaze100000qQ4dtN016410Ow7ot8nd\",\"amount\":{\"subtotalIva\":0,\"subtotalIva0\":50000,\"ice\":0,\"iva\":0,\"currency\":\"CLP\"},\"deferred\":{\"months\":6},\"metadata\":{\"customerId\":\"123\"},\"contactDetails\":{\"documentType\":\"CC\",\"documentNumber\":\"1009283738\",\"email\":\"test@test.com\",\"firstName\":\"Diego\",\"lastName\":\"Cadena\",\"phoneNumber\":\"+593988734644\"},\"orderDetails\":{\"siteDomain\":\"tuebook.com\",\"shippingDetails\":{\"name\":\"Diego Cadena\",\"phone\":\"+593988734644\",\"address\":\"Eloy Alfaro 139 y Catalina Aldaz\",\"city\":\"Santiago de Chile\",\"region\":\"Santiago\",\"country\":\"Chile\",\"zipCode\":\"170402\"},\"billingDetails\":{\"name\":\"Diego Cadena\",\"phone\":\"+593988734644\",\"address\":\"Eloy Alfaro 139 y Catalina Aldaz\",\"city\":\"Santiago de Chile\",\"region\":\"Santiago\",\"country\":\"Chile\",\"zipCode\":\"170402\"}},\"productDetails\":{\"product\":[{\"id\":\"198952AB\",\"title\":\"eBook Digital Services\",\"price\":6990000,\"sku\":\"10101042\",\"quantity\":1},{\"id\":\"198953AB\",\"title\":\"eBook Virtual Selling\",\"price\":9990000,\"sku\":\"004834GQ\",\"quantity\":1}]}}');$request->setRequestUrl('https://api-uat.kushkipagos.com/subscriptions/v1/card/291929129192912');$request->setRequestMethod('POST');$request->setBody($body);$request->setHeaders(array('content-type' => 'application/json'));$client->enqueue($request)->send();$response = $client->getResponse();echo $response->getBody();// Your logic here ...
Cancel a registration (Optional)
If you wish to unsubscribe a card, so that it is not possible to receive on-demand payments with it, you will have to use the unsubscribe endpoint from your backend.
- Javascript
- Python
- PHP
const request = require("request");request({method: 'DELETE',url: 'https://api-uat.kushkipagos.com/subscriptions/v1/card/213123123123',headers: {'content-type': 'application/json'}}, (error, response, body) => {if (error) throw new Error(error);console.log(body);// Insert your logic here...});
import http.clientconn = http.client.HTTPSConnection("api-uat.kushkipagos.com")headers = { 'content-type': "application/json" }conn.request("DELETE", "/subscriptions/v1/card/213123123123", headers=headers)res = conn.getresponse()data = res.read()print(data.decode("utf-8"))# Insert your logic here...
$client = new http\Client;$request = new http\Client\Request;$request->setRequestUrl('https://api-uat.kushkipagos.com/subscriptions/v1/card/213123123123');$request->setRequestMethod('DELETE');$request->setHeaders(array('content-type' => 'application/json'));$client->enqueue($request)->send();$response = $client->getResponse();echo $response->getBody();// Insert your logic here...
4. Test your Integration
You can use some test cards in test mode to ensure that your integration is ready. Use them with any CVC and a future expiration date.
- pproved transaction:
4023655102252133 - Declined transaction:
4568652646042584
5. Prepare your Certification
Read the following guidelines for technical certification approval (required to obtain productive account credentials):
- Tax calculations must be correct.
- Messages displayed on the screen should be aligned with Kushki’s responses.
- All Kushki responses must be saved and recorded (required in case you need support).
- The subscription is cancelled with Kushki when your customer decides to cancel a card.
- All the required data as specified in the API Reference must be submitted.
- Kushki’s logo must be visible to the customer. You can find our logo in several formats here.
If you are using Kushki.js, also check the following:
- The payment button must be disabled after the first click.
- Kushki’s logo must be visible to the customer. You can find our logo in several formats here.
Accept Webhooks
Manage correctly post-payment events.
 Colombia
 Ecuador
 Mexico
 Peru
Peru