Configure my merchant’s branch offices
Access, check, and manage the branch offices of your merchant in a simplified way from a single platform.
Through our console, you will be able to integrate your company’s branch offices With Kushki, you can integrate different payment-receiving solutions for each of your company’s branches and manage them from a single platform, saving time and resources. We tell you how to do it.
Ideal for:
- Payment Service Providers (PSP).
- Companies with one or multiple branch offices, franchises, or marketplaces.
When configuring your company’s branch offices, the information for each one of them can be viewed in an individual and centralized way.
The data of each branch office will be linked to the information of your main merchant, and it will be managed under the following hierarchical logic, which takes into account the branch offices types that you can create in your Console.
Branch office types
Centralized branch office
A centralized branch office is one that inherits the basic data, rates, financial configuration, processors and payment methods, services, credentials, and users established in your main merchant.
Decentralized branch office
A decentralized branch office does not inherit the data set in your main merchant. In this case, you will be able to configure the specific information of the branch office.
Available tools
By using the branch office configuration service, you will be able to use the following tools:
- My Merchant: Use filters such as Name, Country, Status, among others, to search for information on specific branch offices. You can also download this information to check it.
- Access the My Merchant module administration guide to find out how you can visualize the branch information in a consolidated manner, along with all the information configured at the level of payment methods, services, billing, collection and dispersion, rates and deferred payments.
- Transactions: It improves the segmentation of collections, payments and chargebacks between the branch offices that you register in the system.
- Within the console of your main merchant, you can view the transaction history to review the collections, payments and chargebacks , with the option to check or download the information in JSON or CSV files.
- Find out how the process of approving a card transaction refund works.
- Enter the link to learn how the chargeback processing works and how to upload the documents required to make a refund.
- Learn how to download chargeback records with hierarchical information. In this guide, you will find the related instructions: download chargeback report.
- In the transactions panel you can filter the payment movements, by using 3 categories: Payment methods, Statuses, and Amounts.
- Discover how to download payment receipts that Kushki generates for each successful transfer or cash transaction.
- Users: Optimize the management of your branch offices by establishing roles for the members of your work team in charge of managing the information of each branch office in the Kushki console. In this way, you will be able to effectively monitor each of the efforts.
- We will tell you how to configure individual or massive users, by using the Master Customer user.
- Credentials: You will have available the information of the credentials, such as the public and private keys of each of your branch offices easily and quickly.
- Find out in this guide how to check or copy the data related to the credentials of your branch offices and how to remove them in case of that one of these is no longer available.
Integration process

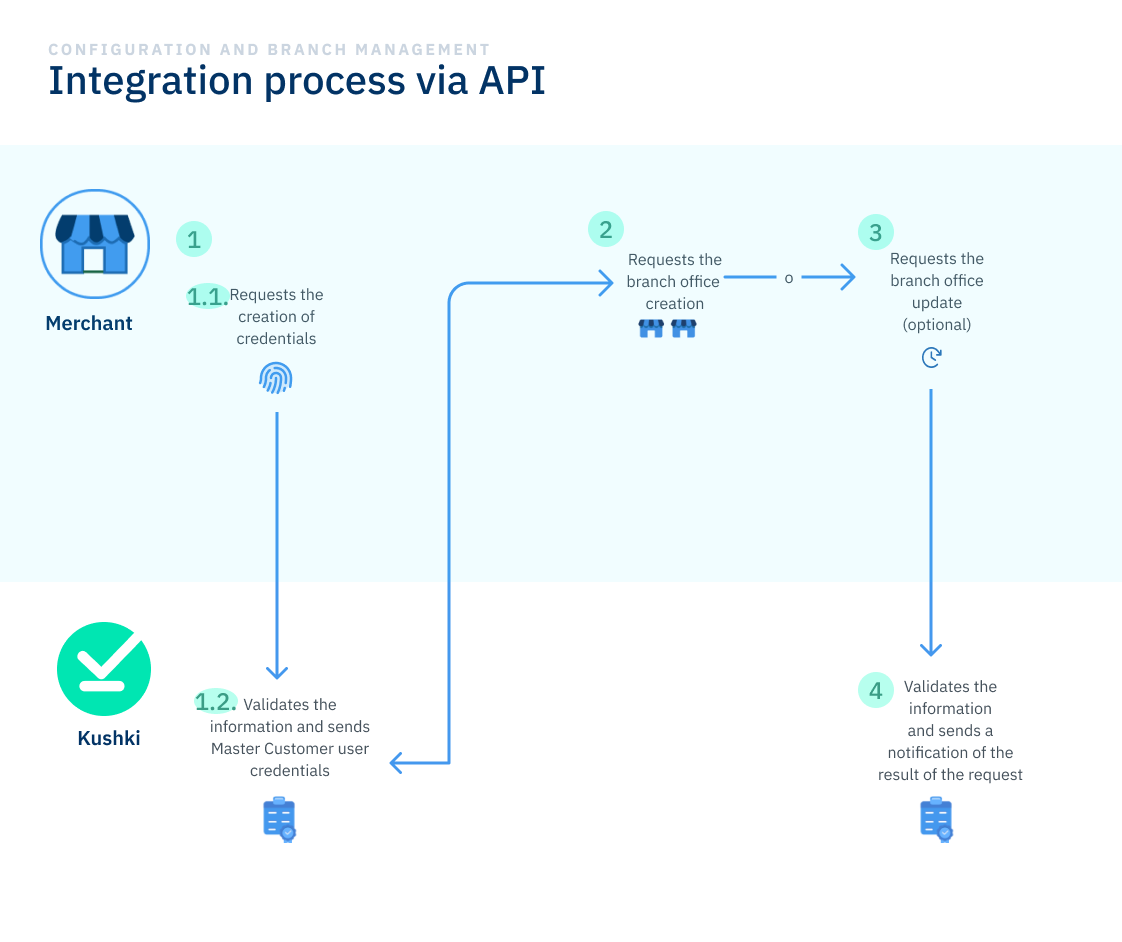
Stages of the integration process
The process of integrating the branch office configuration that are part of your merchant works as follows:
1. Credential request
At this stage, your merchant can make the credential request to integrate this service into your merchant. This request can be made directly with the Kushki sales executive assigned to your merchant.
2. Branch office creation
To create the branches of your merchant, it is required that you:
- Generate a token, by using an endpoint in which you will need to include the information of the Master Customer type user credentials that have been assigned to your merchant. This token has an expiration of 60 minutes, and it can only be used once.
- With the token created, you can request the individual or mass creation request of up to 500 branches per request.
3. Branch office update (optional)
At this stage, you can use the token generated in stage 2 to activate, deactivate, or modify the information you previously configured in the creation of your merchant’s branch offices. To do so, you can perform the same process performed in the branch office creation step-by-step process.
4. Validation and notification of the response of the request
When you send us a request to create or update branch offices, the Kushki team will validate the information received and notify you with the result via email, indicating if your request has been approved or rejected.
Additional recommendations
We recommend checking the following manuals:
API branch office manual with the information, so your development team can carry out the integration process.
a. Branch office creation token guide.
b. Create a branch office guide.
c. Update a branch office guide.
Remember that you can also create or update branch offices of your merchant, either individually or in bulk. In this process, you do not need to consume the endpoints mentioned above. Visit the following link:
Additionally, we enable the following forms, so your merchant can share additional documentation with us during the affiliation process of your branch offices. Check the following links:
- Additional branch office documentation form.
- Branch office performance report form.
- Daily branch office registration report.
Branch office creation and update
Now that you know about your company’s branch office configuration service, it’s time for you to learn how to integrate these services from the API.
 Chile
Chile Ecuador
 Mexico
 Peru
Peru